Eggplant Taco - Mediterranean Flare

I am often lured into buying eggplant. But just as often it goes bad in the back of my fridge because I’m the only one who really enjoys it. Naturally, I’ve always been a huge fan of eggplant parmigiana but due to several food sensitivities I can’t indulge in it anymore. Yes, you can take a moment to let that somber thought soak in and be sad for me. In replacement of that I have created a few eggplant recipes to curtail my eggplant hankering. And since they are gluten and cow dairy free, I tend to return to their basic concepts: fresh, zesty ingredients and layering flavors. So, it should be no surprise that here I am riffing off of those previous recipe ideas. This version is basically a very similar recipe to my Gremolata on Grilled Eggplants with regard to ingredients but different application.

As a reminder, my recipes are typically hatched out of a few situations:

1). The items I have available

2). The need to use up foods that will go bad soon

3). An occasion that requires a food void to be filled

4). All of the above

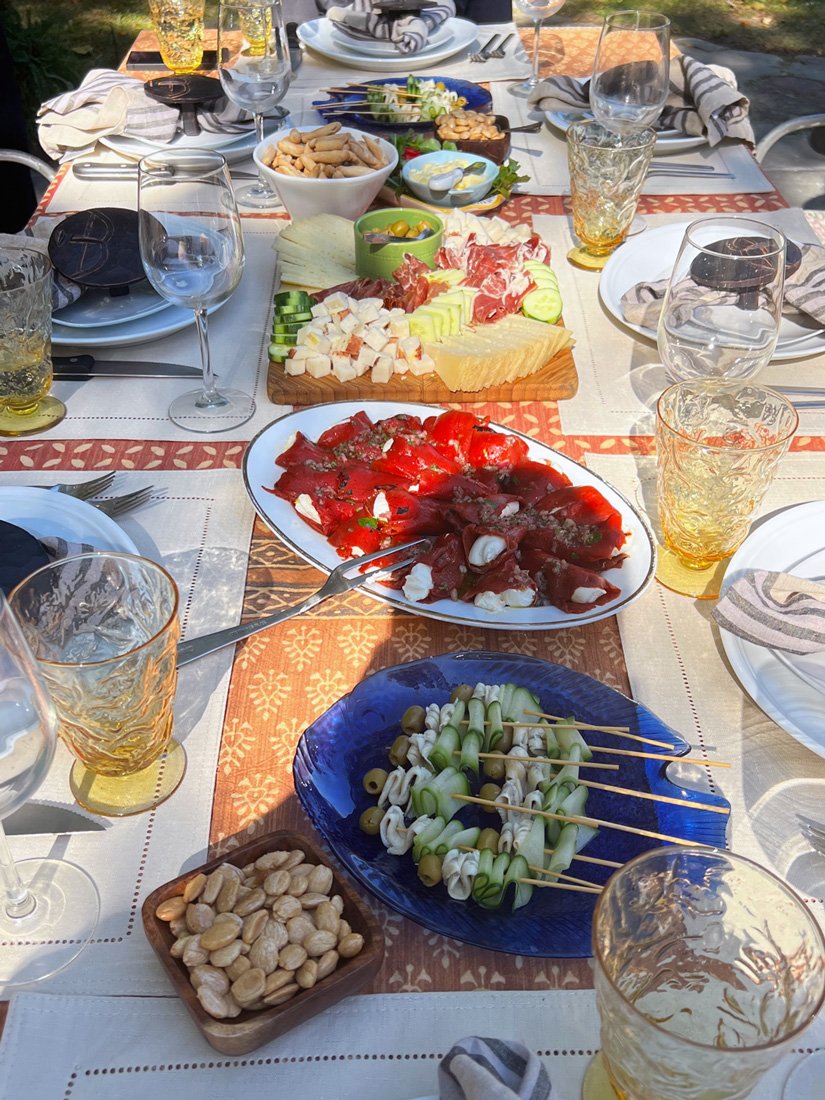
I have made this once before but didn’t have the opportunity to photograph it. I thought now might be an ideal time to share it right before Easter in case you needed a fresh new appetizer to add to your table. This idea first came to me back when the Christmas holidays were barreling down upon us. I was hosting our annual neighbor’s holiday cocktail party. (Side note, since I always seem to be a bit behind with posting, I hope to write up all those offerings in a separate post. Timing doesn’t much matter since they are appropriate for any cocktail party.) But back then eggplant was on my mind as one of the appetizers. I wanted it to be cocktail style; pick ‘em up and eat ‘em, no fork necessary. As anticipated by my husband, I made plenty of other offerings thus leaving the eggplant on the menu chopping block. So, now there I was stuck with an eggplant again that needed to be used (see #2) With some luck, I needed to bring an appetizer to my sister’s house for Christmas day (see #3), so I searched my fridge (see #1) and voila the Eggplant Taco - Mediterranean Flair was born (#4).

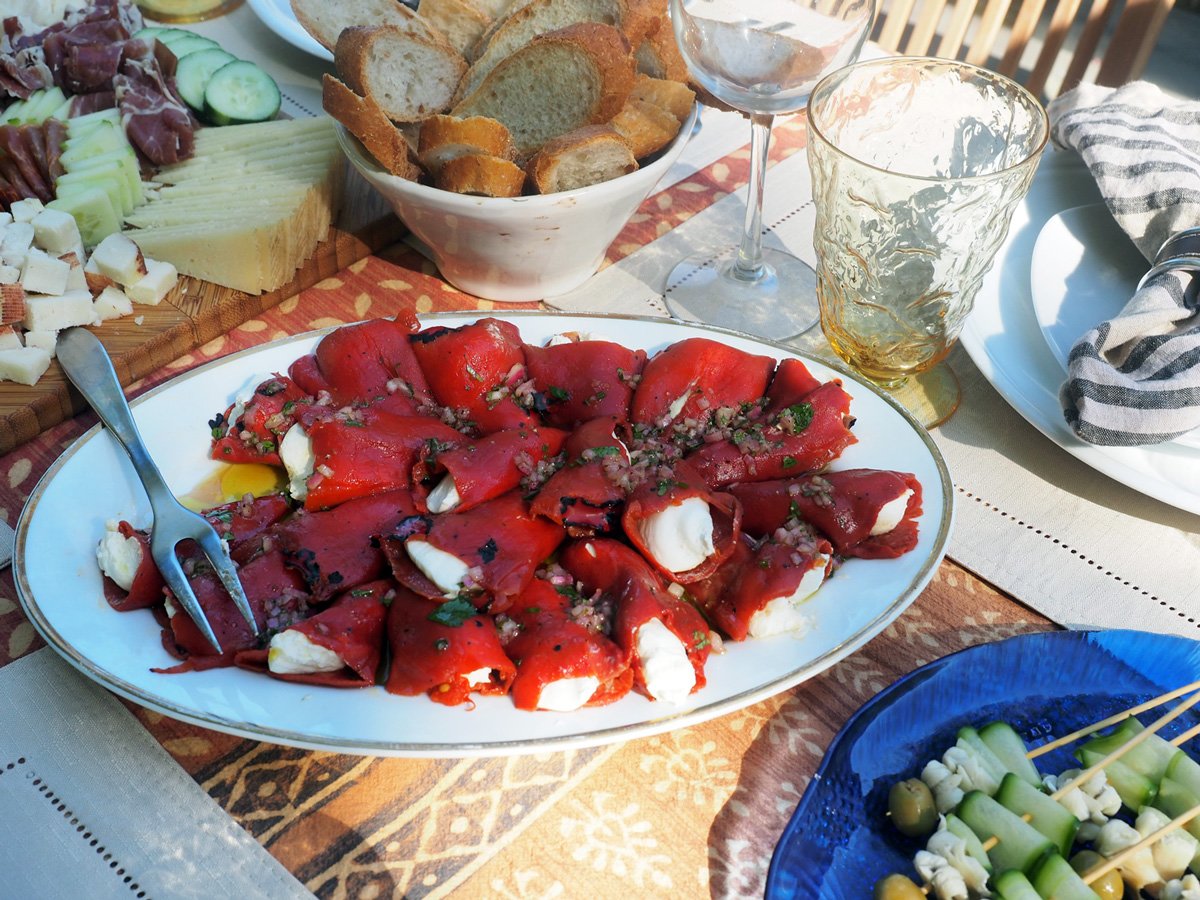
I had seen a video wrapping eggplant with cheese and thought I could use a similar filling to my Goat Cheese Stuffed Piquillo Peppers then top them with a gremolata similar to Gremolata on Grilled Eggplants recipe. Folding the eggplant like a mini taco would make these easy to pick up and eat in one or two bites. Why reinvent the wheel when it already rolled into your kitchen.

I did make a few ingredient modifications (see #1 - use what you have available), and also wanted to bring a slightly different twist.

Since i didn’t photograph the process during the holidays I needed to create a reason to make these again to document the basic steps. I decided to include this appetizer for our upstate friends’ dinner party.
Mind you, three of them are trained chefs from the C.I.A.
No, not the government agency but Culinary Institute of America! Ugh, no pressure.

Our upstate friends, who love sharing good times, food, and wine.

Since I prepped some items at home and then finished it off in our upstate house, you will notice that these aren’t my usual photographic style. I did the best I could, but it gives you some insight into why it takes me awhile to post. When I’m hosting a party, there is always plenty to do already. Stopping to stage and photograph each step sometimes just isn’t in the timeline. I hope these will suffice.

Ingredients:

Makes approx.26 mini tacos

14 oz. Eggplant (I used the smaller Italian baby eggplant, ideal for bite size appetizer.)
oil

Stuffing
6 oz. Goat cheese, room temperature, softened
1.5 oz Feta cheese
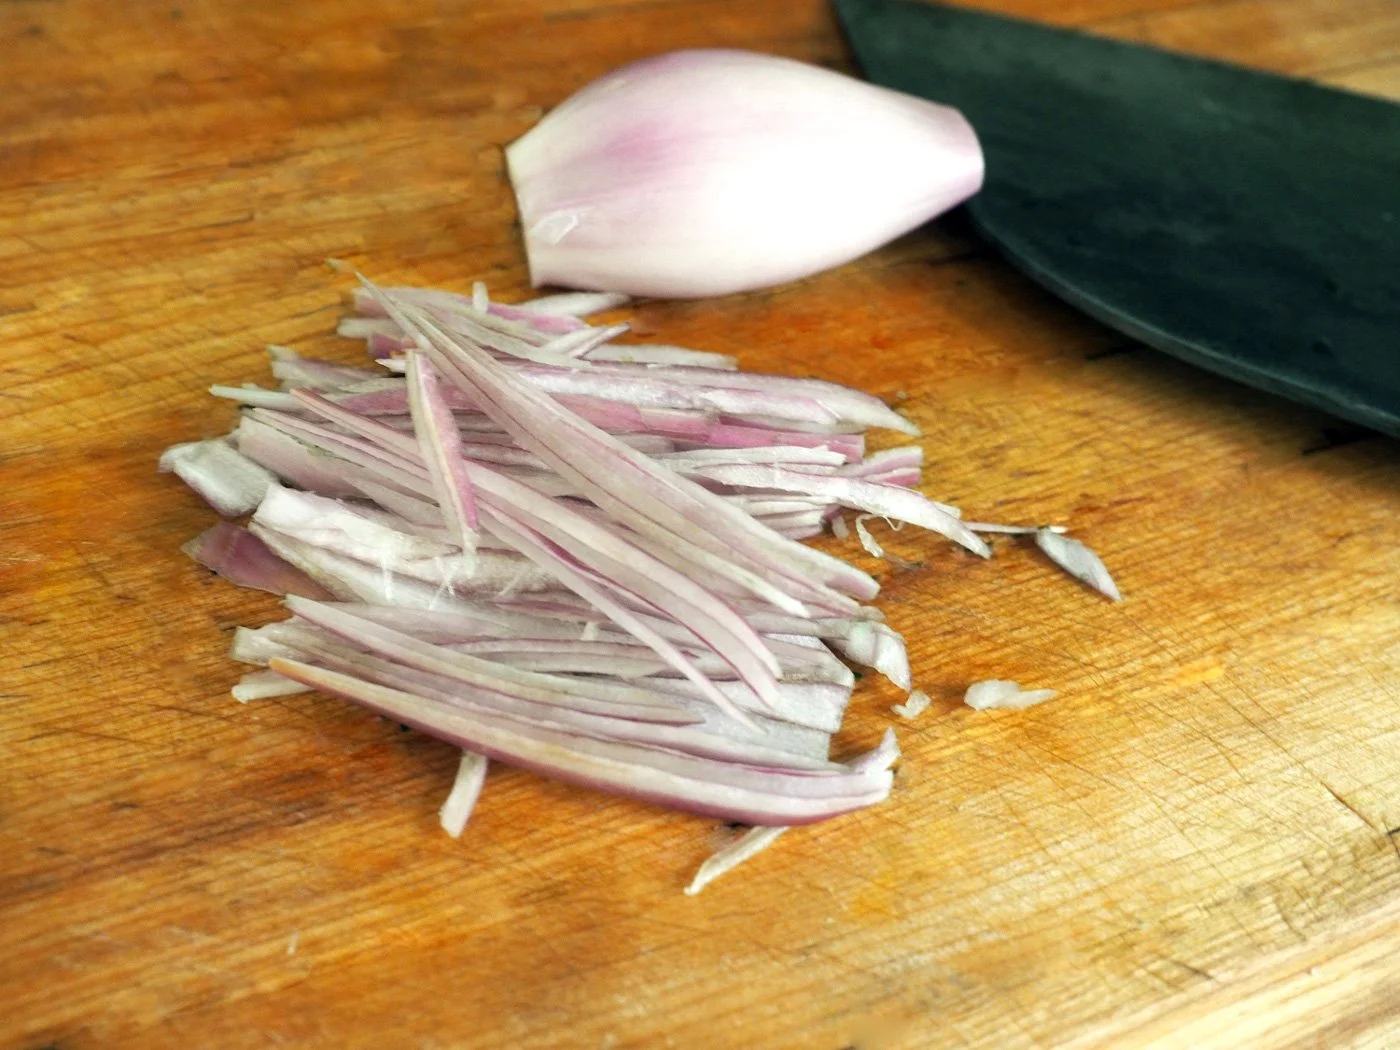
3 T Shallots, minced
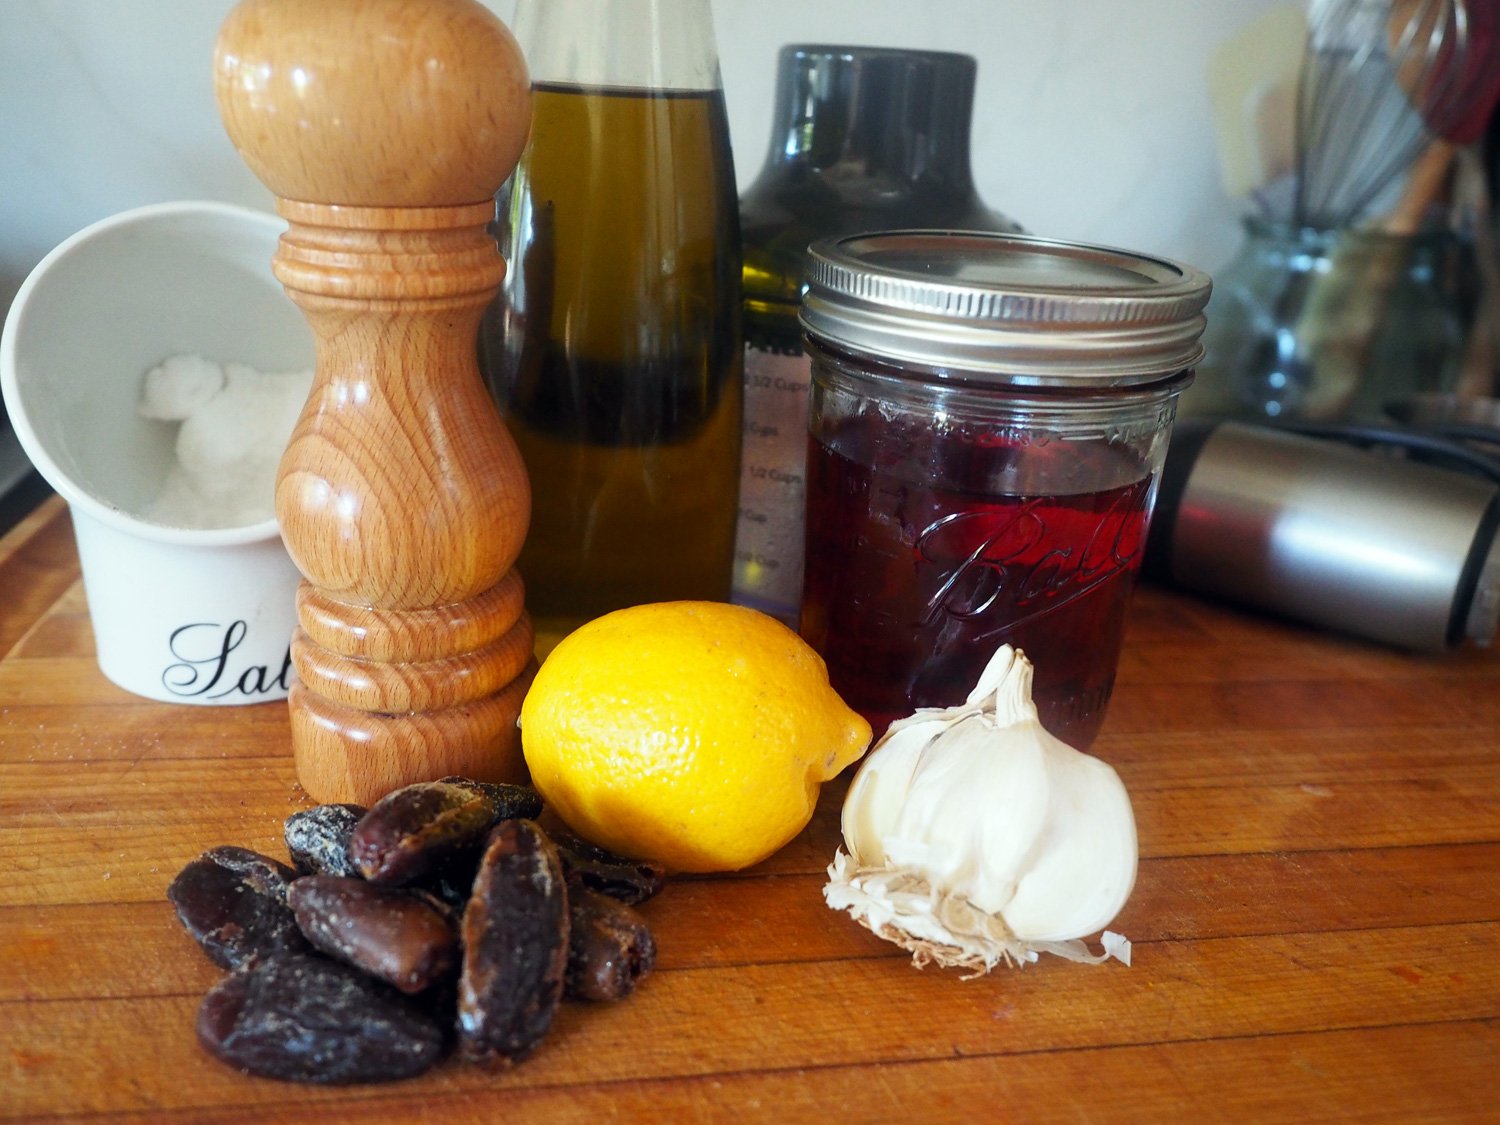
Gremolata
1 cup Parsley leaves, minced approx. 1/3 c
1 cup Mint leaves, minced approx. 1/3 c
2 Garlic cloves, grated
1/4 x Pecans, lightly roasted, chopped
pinch Red Pepper Flakes
1/2 Lemon Juice/Zest
Olive Oil, a drizzle
Pomegranate seeds, optional


Make Ahead Notes: You can prep parts of this dish 1-2 days ahead. Grill the eggplant and store them on paper towels in an airtight container in the fridge. Mix the goat/feta cheese and shallots together and place in piping bag or ziplock. Remember to bring it to room temperature for easy piping. Also, I highly recommend removing the pomegranate seeds ahead of time, since it can be a tad time consuming. Store those in an air tight container in the fridge. However, in order to keep the gremolata as fresh as possible, make that right before assembling.

Instructions:

1. In a mixing bowl combine soften goat cheese with feta and minced shallots, place in a piping bag or ziplock bag, and set aside.

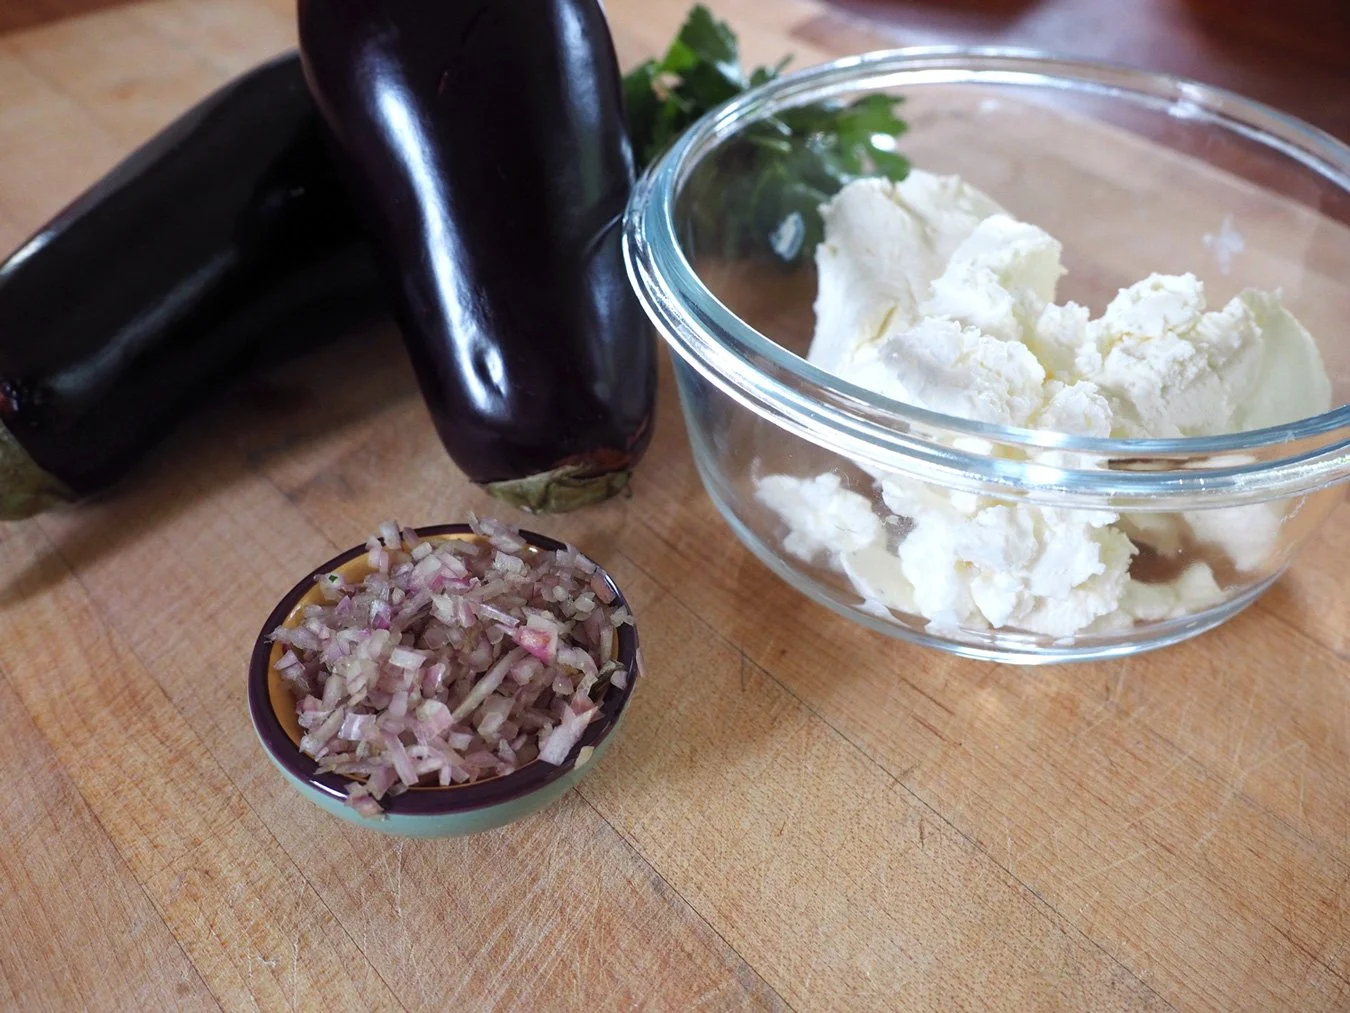
Make sure the goat & feta cheese are room temperature so they are easy to work with.

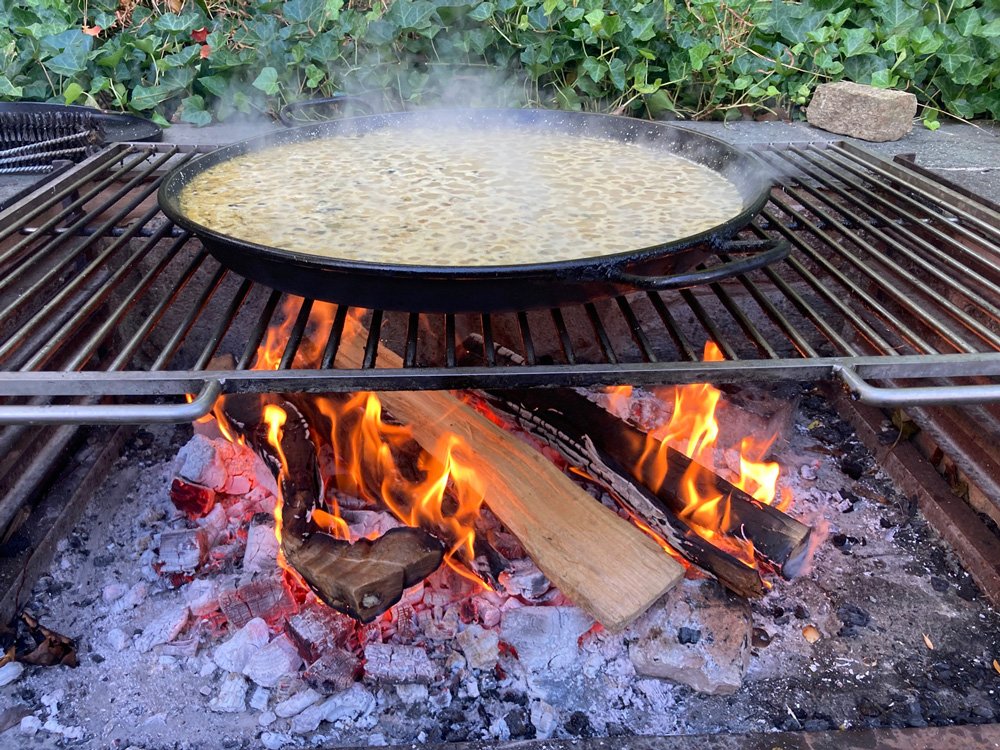
2. Cut the eggplant into 1/4” slices, and place on an oiled sheet pan. Season with salt & pepper and drizzle with more olive oil. Roast at 375 degrees until golden, flip and roast until golden. Or you can fry them in a cast iron, as I did this time.

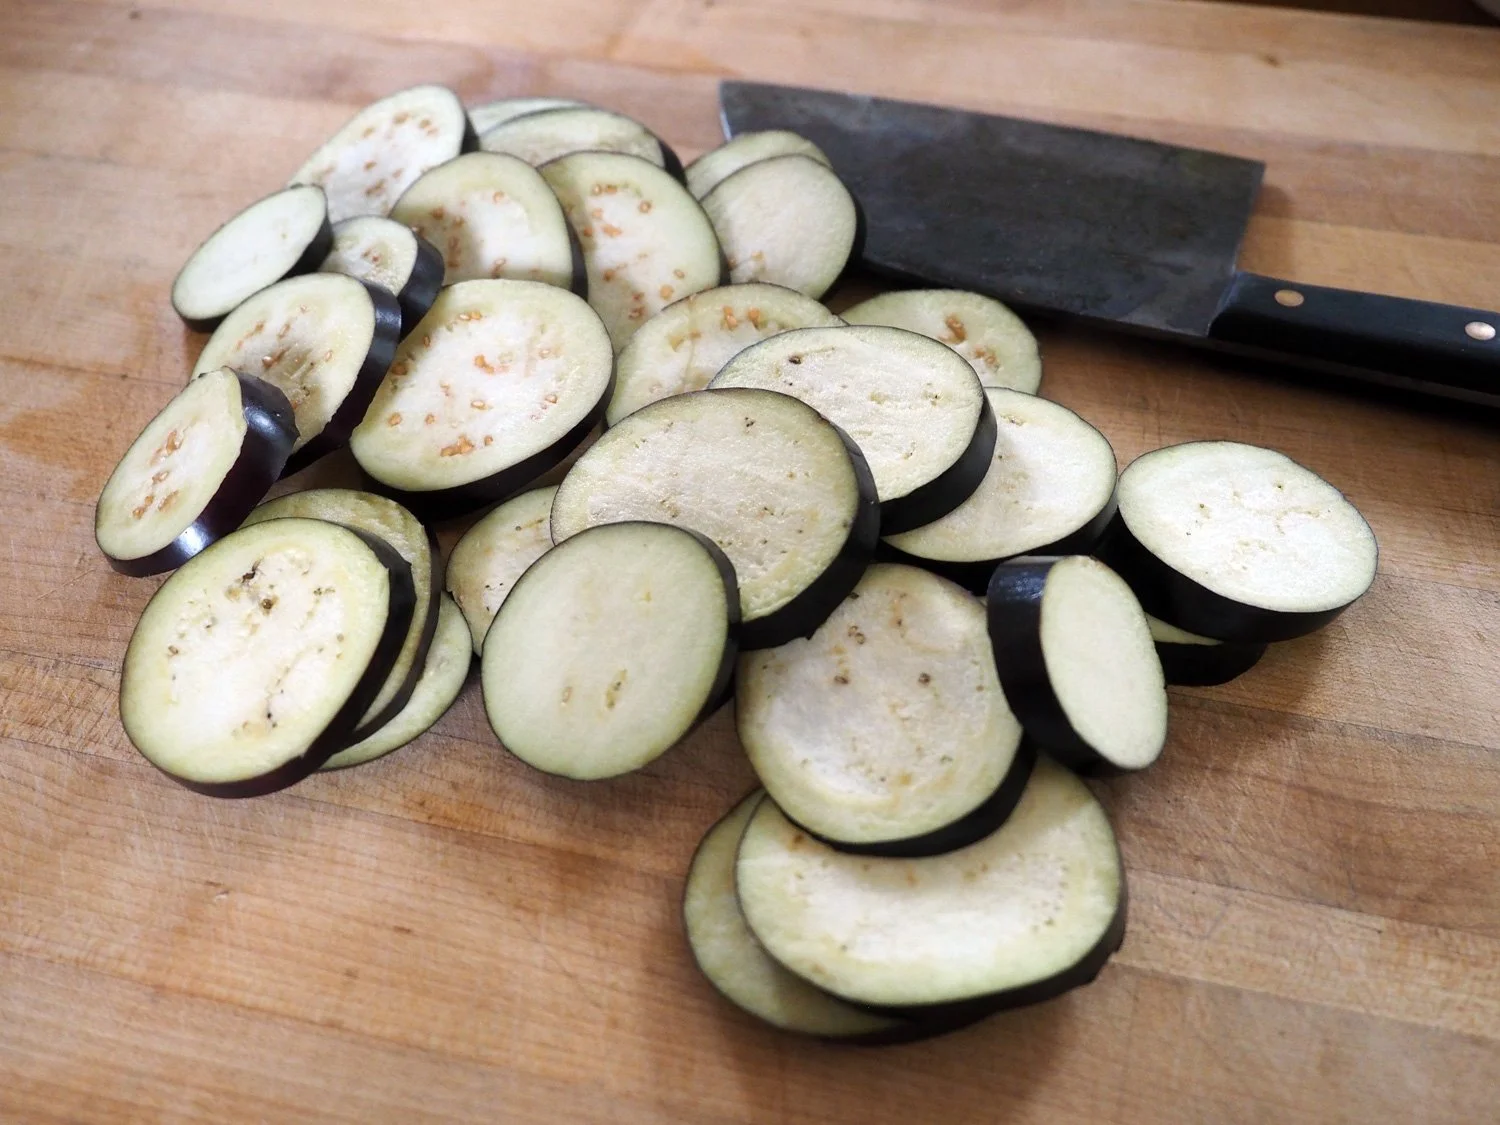
I like the size of the smaller Italian eggplant as a bite size appetizer. However, if you want these to be more substantial or a side dish use the large eggplants. You will need to increase the amount of cheese filling to accommodate the larger slices.

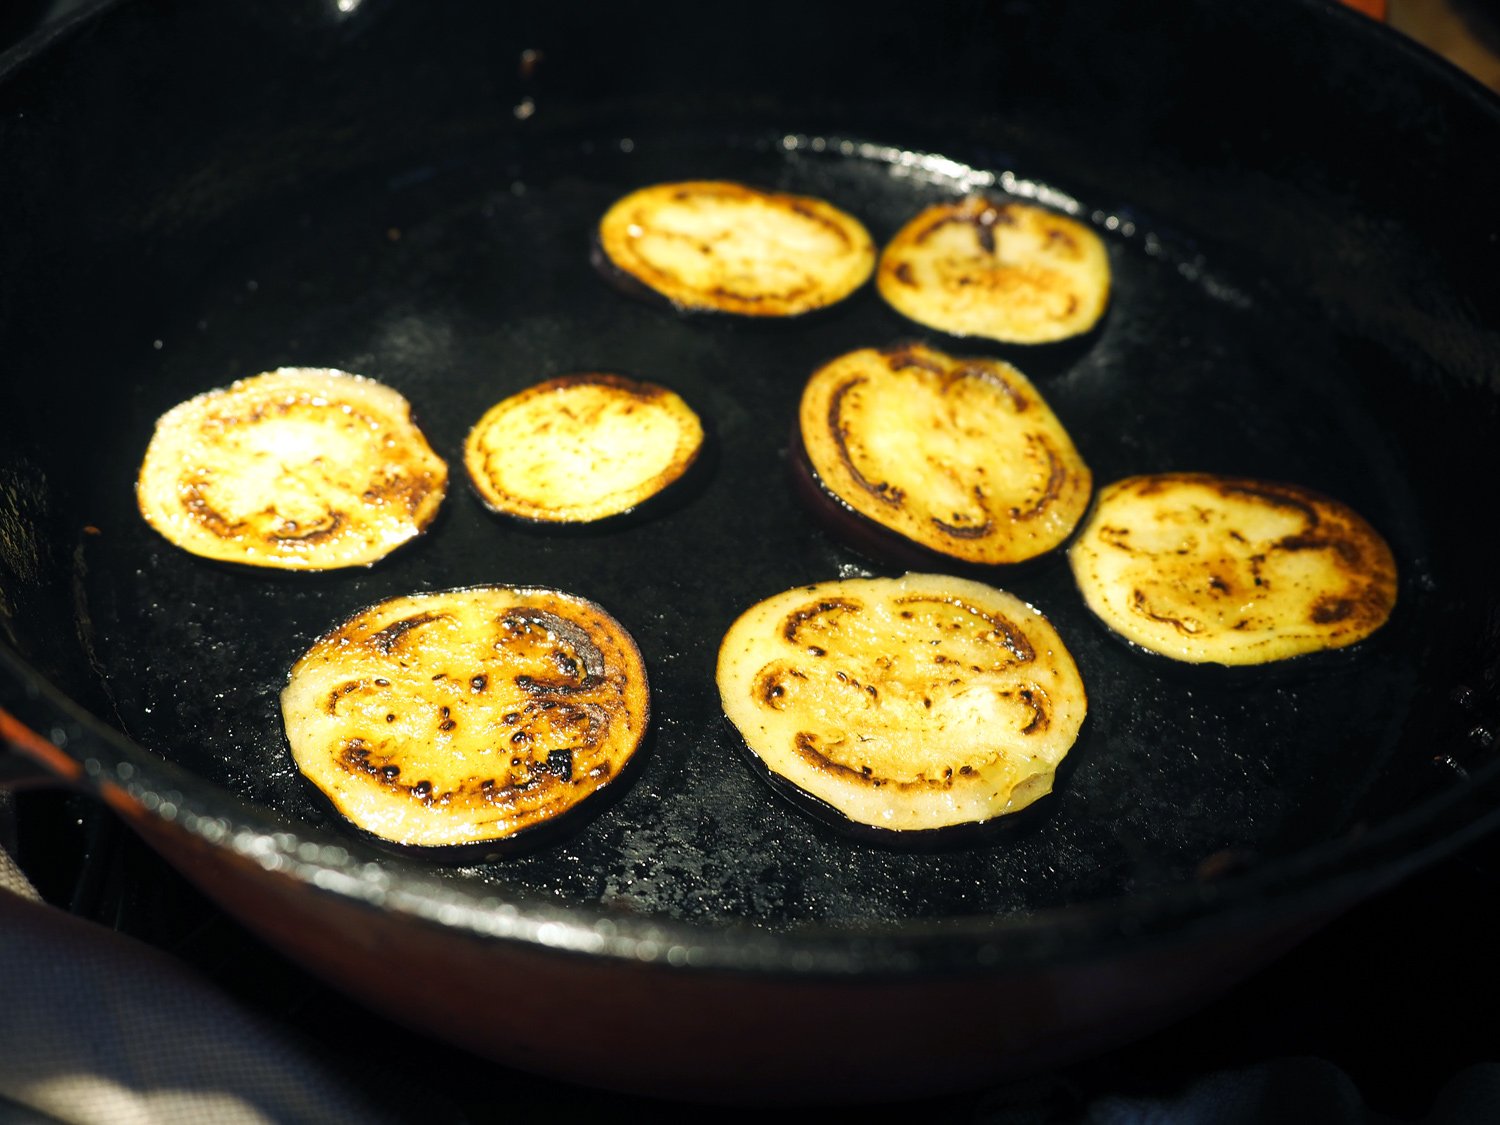
This time around I decided to fry them in a cast iron pan because the oven was occupied. Either method works. Oven roasting allows you to tackle another task without having to be constantly monitoring them.

3. In another bowl add minced parsley, mint, crushed or grated garlic, red pepper flakes, lemon zest, lemon juice, chopped pecans. You can also add grated Parmesan cheese. Mix with just a touch of olive oil.

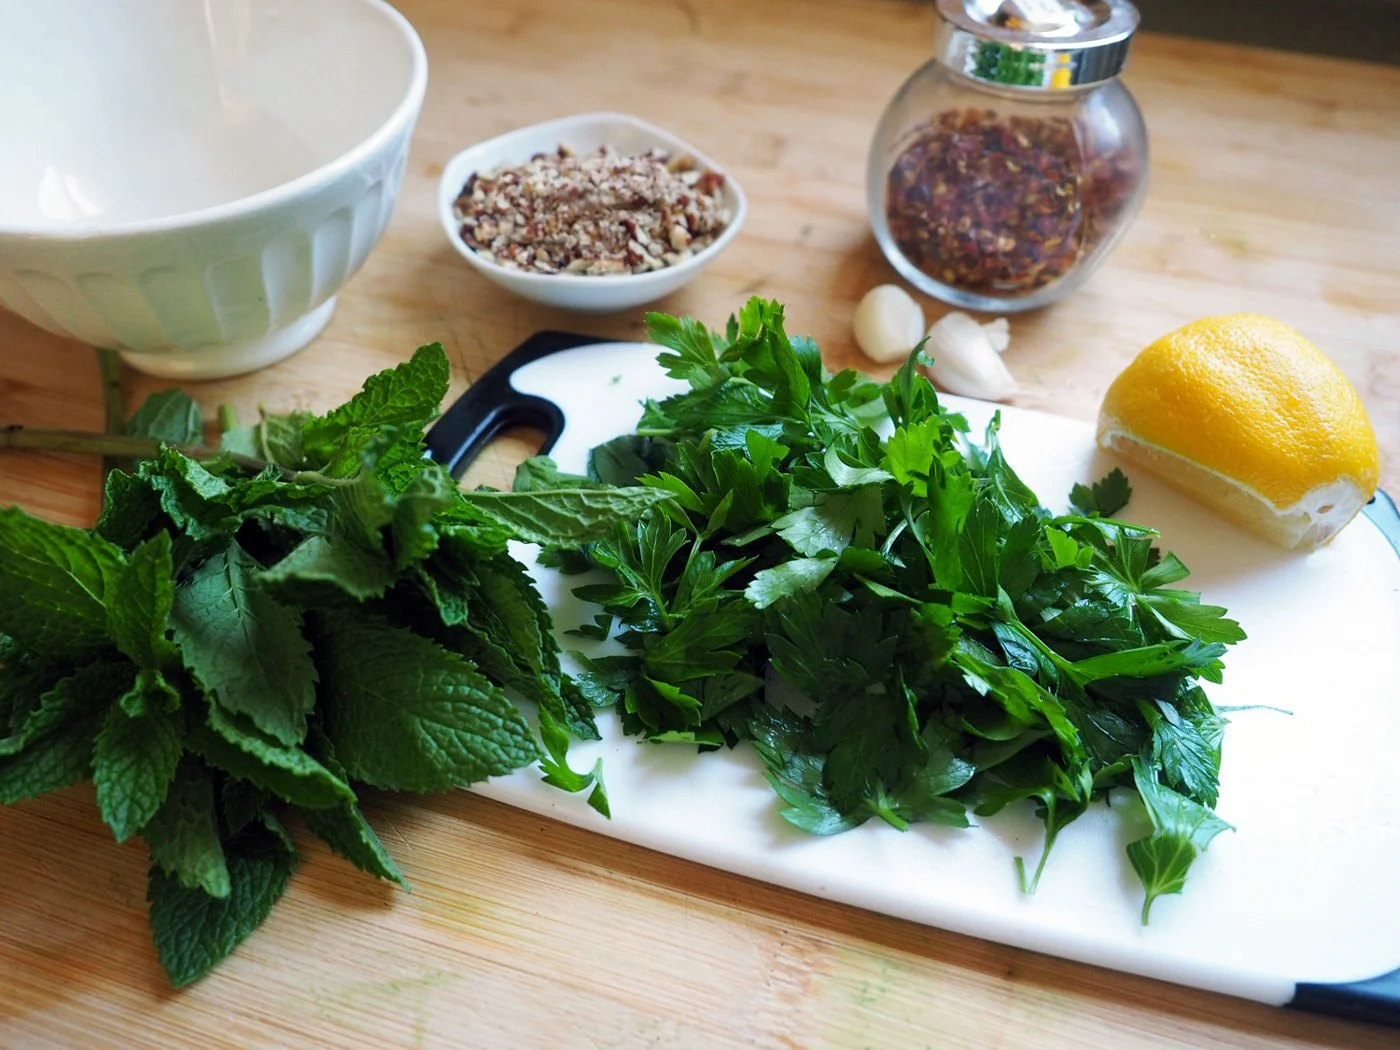
These ingredients are so bright and fresh. The garlic brings the zing, the lemon keeps it bright. The mint adds that herbal punch, while the red pepper flakes provide a touch of heat. The pecans throw in a lovely crunch.

You can use a garlic press, but why dirty something else when you can use the lemon zester to grate the garlic too.

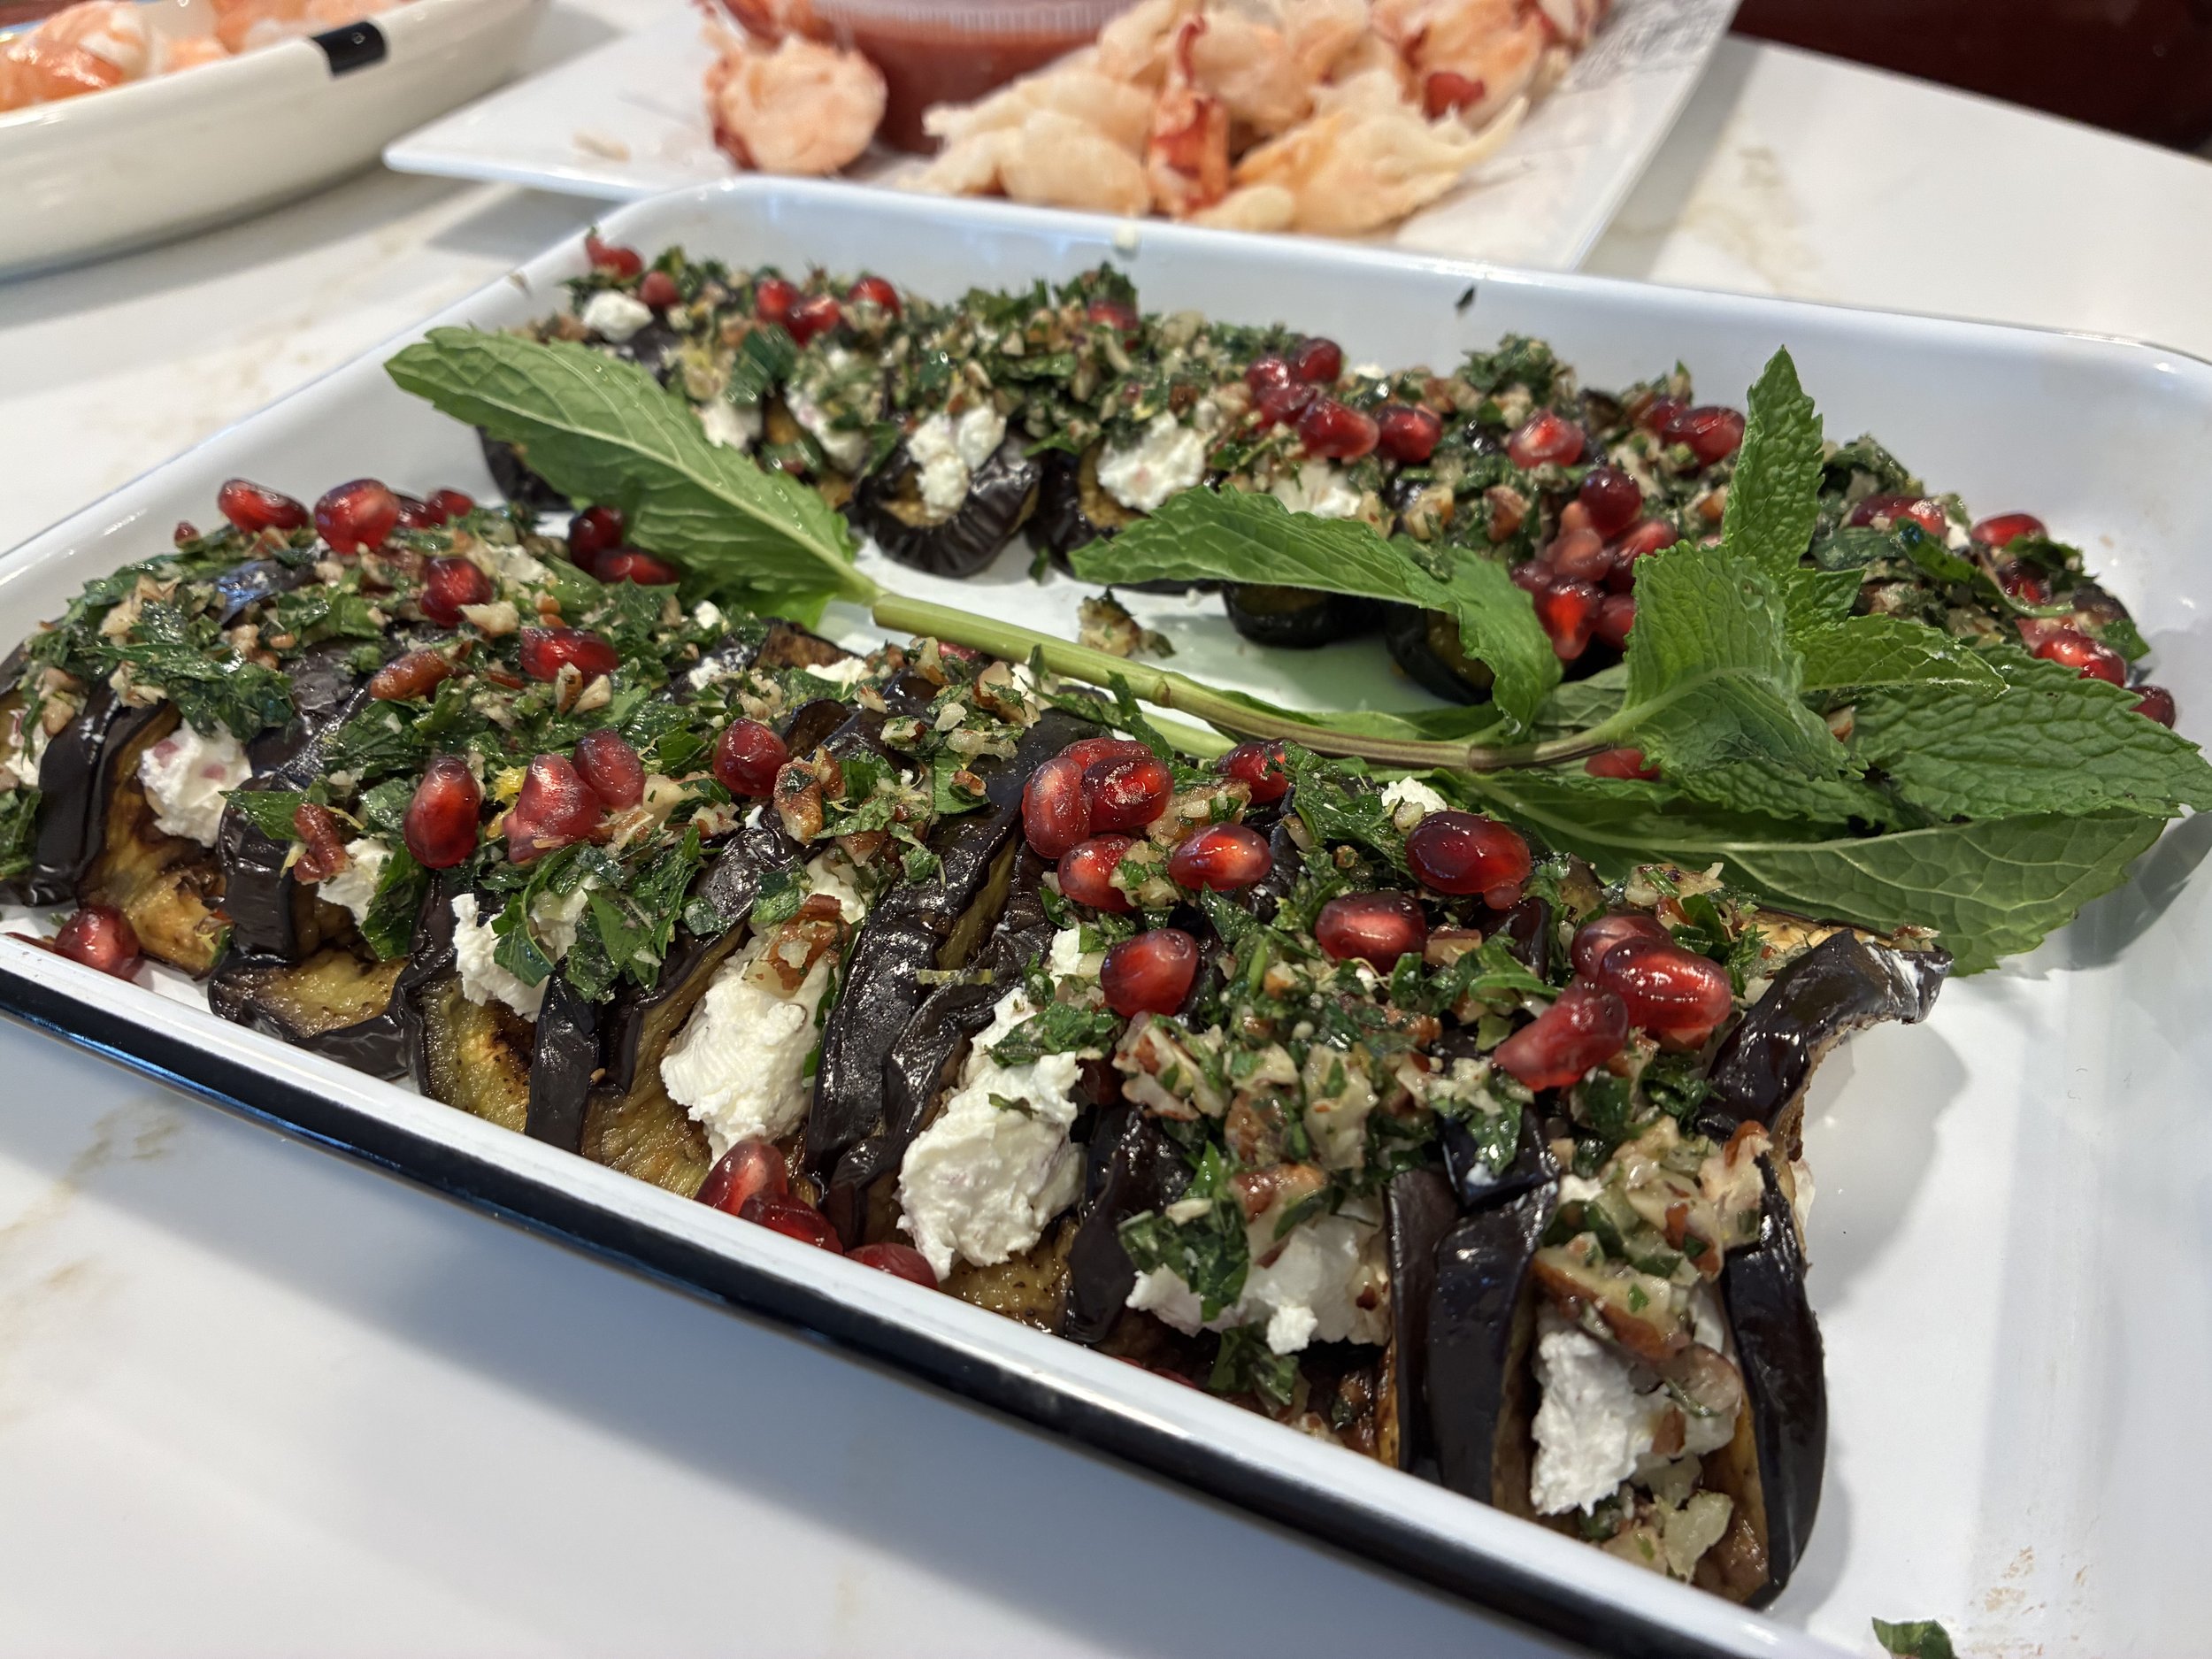
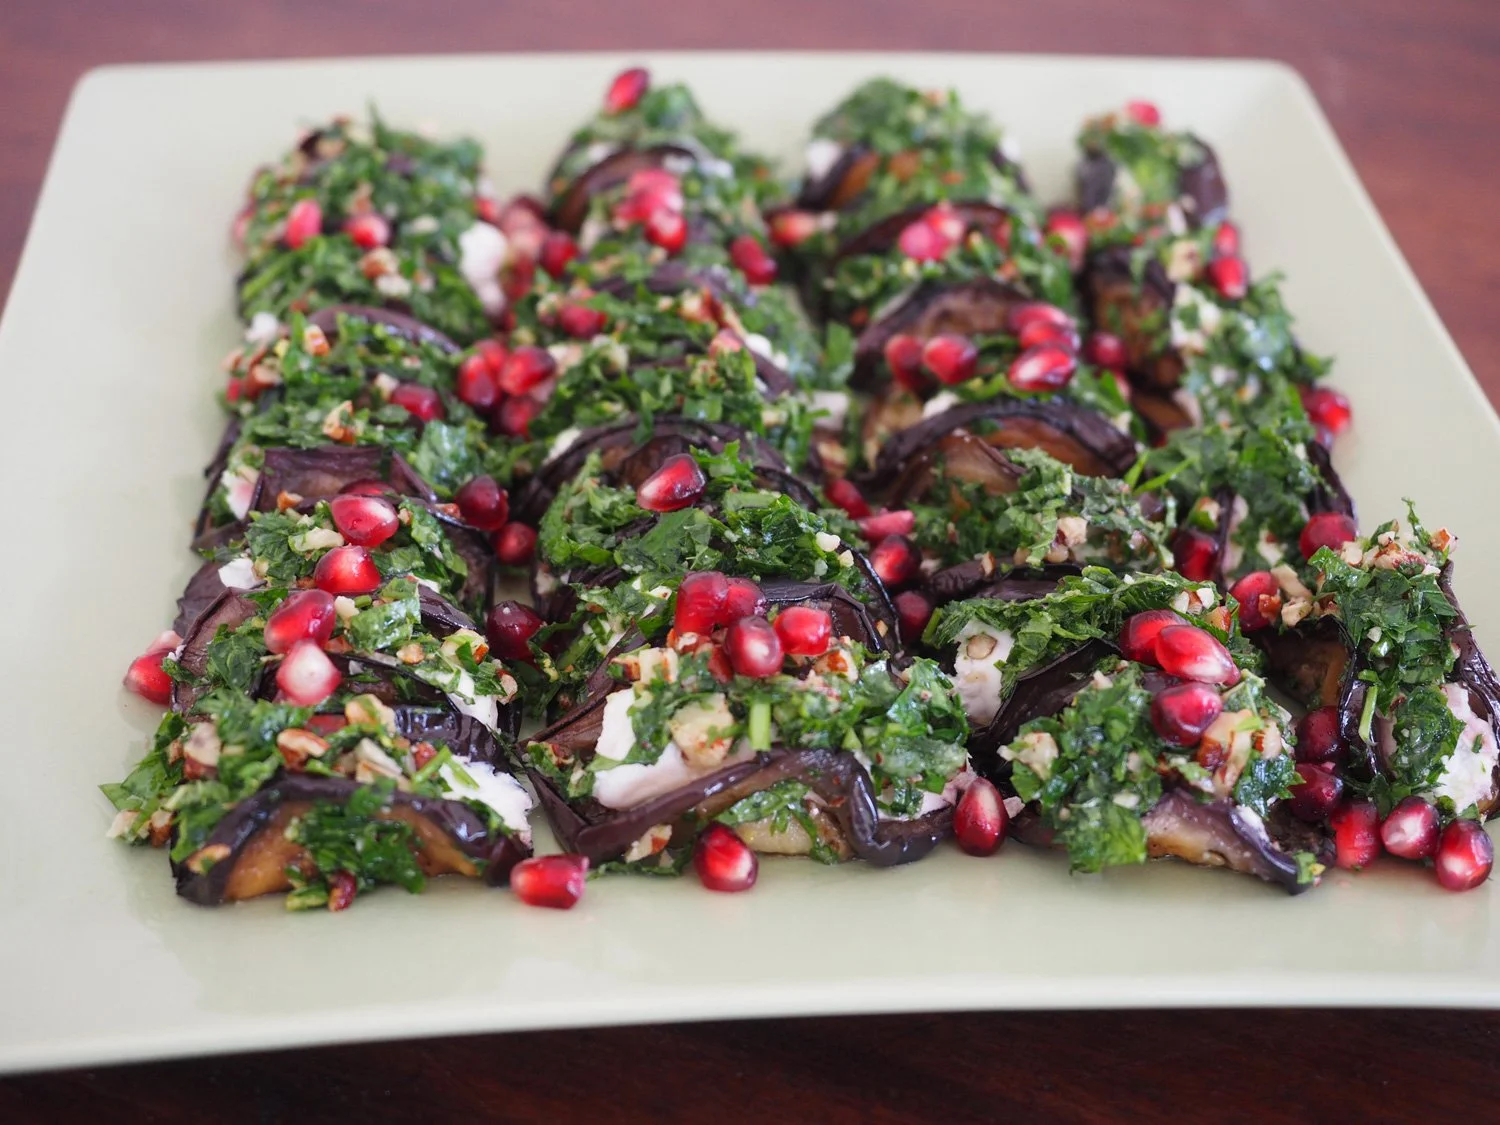
4. Once the eggplant is cooled, pipe or spoon the cheese mixture in the middle and fold like a taco. Then you can roll or spoon the gremolata mixture along the edge. Place on a plate and finish with pomegranate seeds.

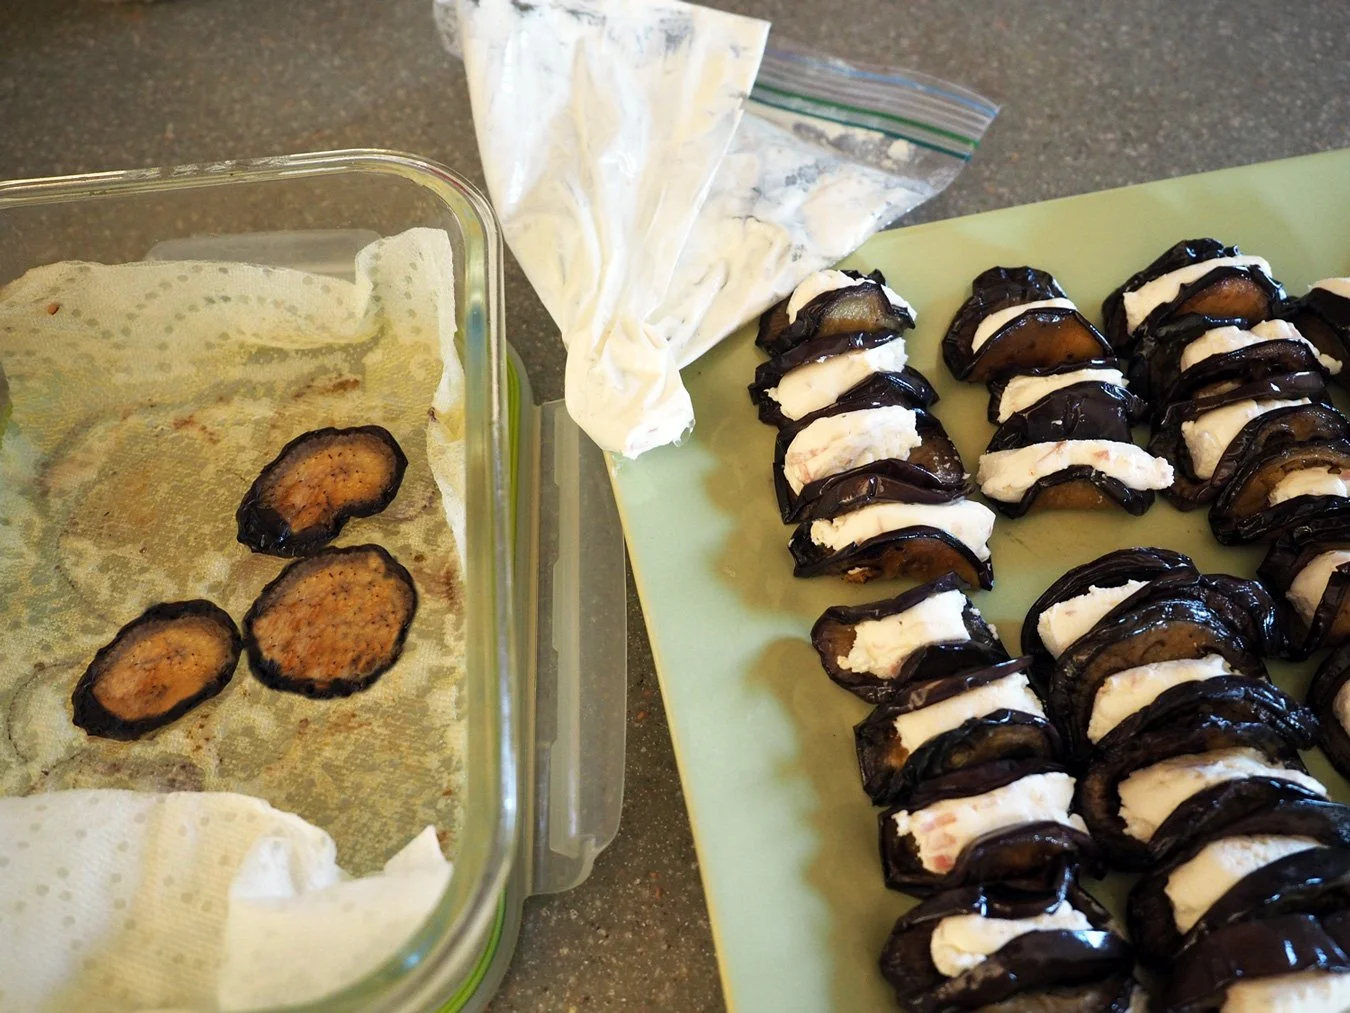
I used a ziplock bag for piping the filling into the eggplant. Piping is so much easier, cleaner and more precise. I highly recommend stuffing them this way.

I love the tart pop of flavor and burst that the pomegranate seeds provide. Let’s not discount how very festive and striking it looks. Never underestimate the small addition that draws the eye to the stomach that motivates the hand to mouth reaction.

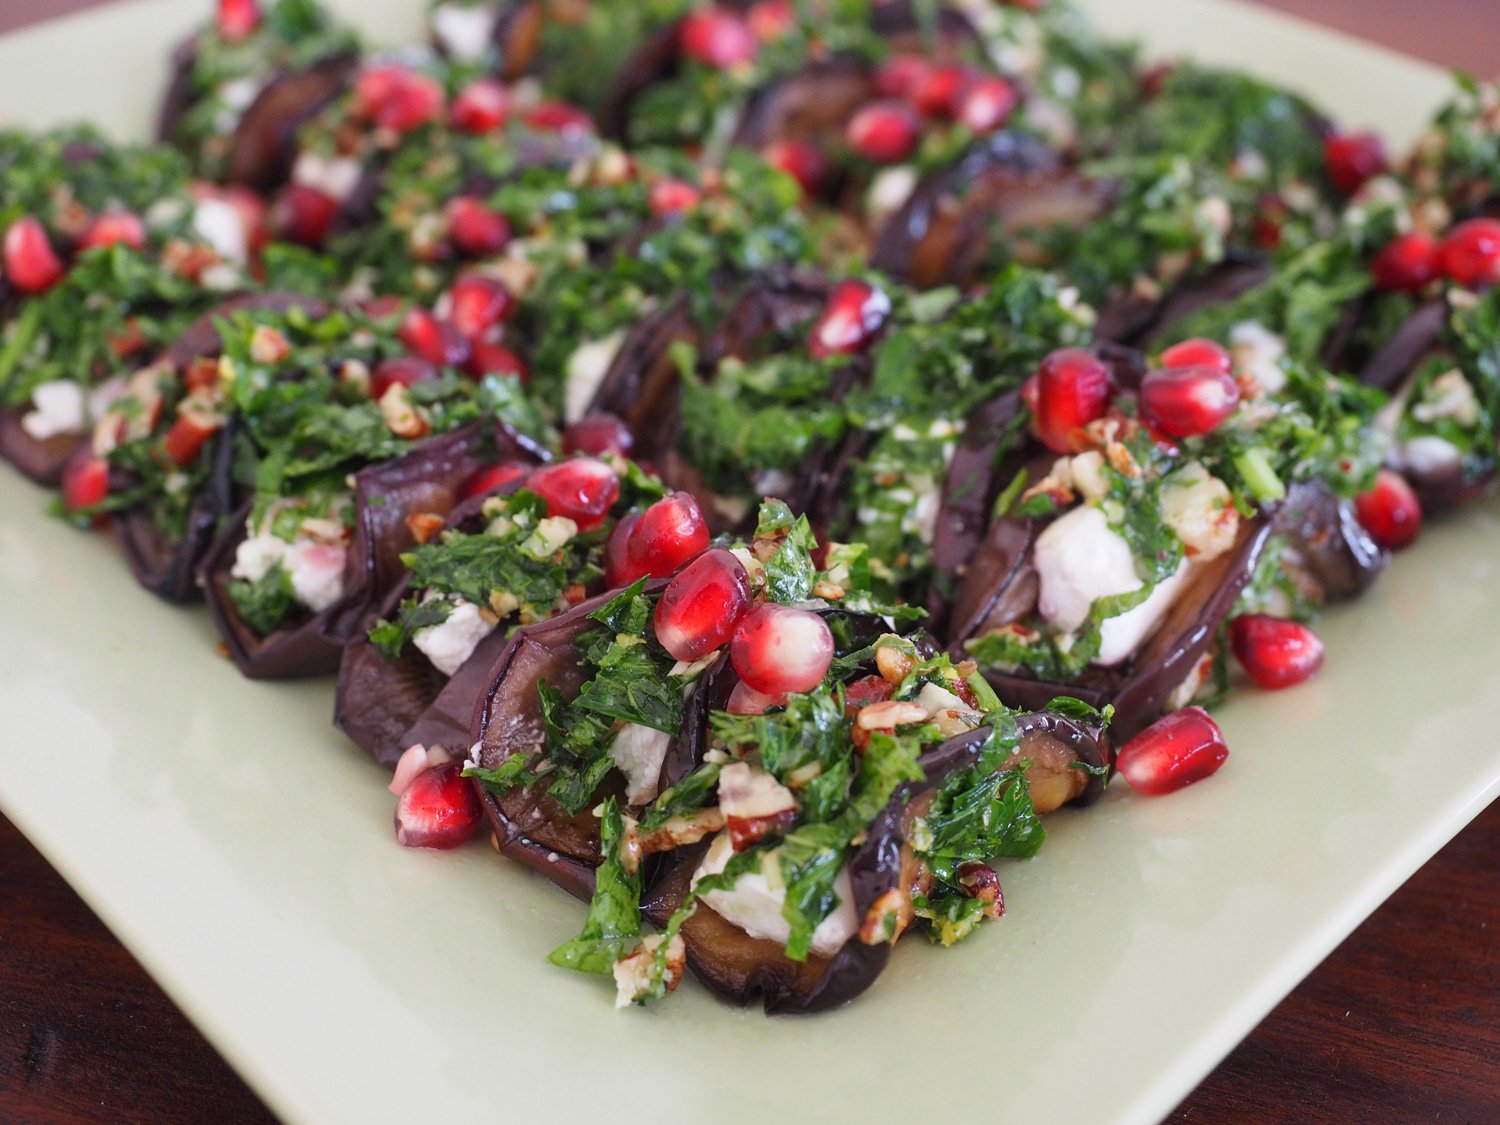
A tiny bite that packs many bursts of flavor.

These were winners both times I offered them up. I hope you are lured by eggplant. Lured by the taco idea and compelled to fulfill numbers 1-4 with an attention-getting Eggplant Taco.

Happy Easter!

Bibb, Arugula & Butternut Squash Salad

Bibb, Arugula & Butternut Squash Salad

I’m usually known as the queen of entertaining. (Mind you, that is not a self dubbed title but one others have bestowed upon me.) That said, I’ve been out of practice. The pandemic, and other life situations (all good ones) have thrown a monkey wrench into our usual hosting schedule. And so, coming up with new recipes has been put on the back burner. However, a couple weekends ago we took the leap and hosted our friends/family for a small backyard lunch.

JuanCarlos had his mind set on making a paella ‘a la parilla’, which means on the grill, thus forcing us to be outside. We lucked out in the middle of NY October with glorious, sunny, warm weather. JuanCarlos has been making paellas for years but continues to research and study master paella makers in order to perfect his. Each one gets better and better. He loves making outdoor fires, and then hanging out with good friends to enjoy a glass of wine or two while he cooks.

With paella in the driver’s seat, the appetizers were riding shotgun and followed along in Spanish Tapas style. I made Stuffed Piquillo Peppers, Boquerones Skewers, Charcuterie/Cheese Board, Radishes with Salted Butter

But when it came to the salad, I veered off the Iberian road, and glad I did. It’s Fall and I felt like leaning into that season using roasted butternut squash. I make roasted spiced butternut squash slabs as side dish for my customers and decided to use similar spices but cut the squash into cubes and added a touch of maple syrup. In composing the salad in my head, I thought about all the other Fall inspired accompaniments that would not only pair well with the squash but would also provide a visual wow. So, a pop of dark red from dried cranberries, a toasty brown from pecans, a lovely green from pepitas, and slivers of red onion would all do the trick nicely. These don’t just deliver on the visual impact, each one also provides a different textual element that is key to making a salad, or any dish, interesting on the palate. Arugula was still fresh at the farmer’s market so I grabbed that for a hint of peppery punch that would counter balance the sweetness. For the dressing I borrowed the idea of using dates from another recipe, but of course changed it up a bit.

Can I just say how much I love this salad. It’s crisp. It’s earthy. It’s sweet. It’s peppery. It’s damn good, and I’m damn glad I made a ton so I could have leftovers for the next day.

I’m posting this now because I think it would make a wonderful salad for Thanksgiving. It hits all the marks and is the perfect counterpoint to the heaviness of a traditional Thanksgiving meal. Please give it try either as a green salad or swap out the lettuce with quinoa as the base. It could also work with pearl couscous as well.

Ingredients

2 Bibb/Boston lettuce
1 Arugula, bunch
1 medium Butternut Squash, approx 4 c cubed
1 c Dried Cranberries
1 c Pecans, toasted
1 c Pepitas, toasted
1/2 c Red Onion, thinly sliced
1/8 t Cayenne
1/8 t Cumin
1/8 t Cinnamon
2 T Maple Syrup
2 T oil

Dressing
4-5 Dates
3 T Red Wine Vinegar
1/2 c Extra Virgin Olive Oil
2 t Honey (optional)
1 Garlic clove, crushed
lemon zest
1 T lemon juice
3 T water
salt, pepper to taste


Date Dressing Setup: Dates, lemon, garlic, red wine vinegar, olive oil, salt, pepper

Instructions

  1. Peel and cube the butternut squash. Place on a roasting pan and season with oil, salt, pepper, cayenne, cumin and cinnamon.

2. Roast at 425 degrees until golden on one side. Then flip them and add the maple syrup and roast until golden on the other side. Remove from oven and let cool.

Roast until squash is tender and edges are browned.

3. Meanwhile, wash the Bibb lettuce and Arugula and dry them well.

4. Roast the pecans and pepitas slightly to enhance their nutty flavors. This can be done in 300 degree oven or on the stove. Just make sure to keep an eye on them as they can burn quickly.

5. Make the dressing by first rough chopping the dates, crushing the garlic and adding to a mini food processor along with lemon zest, salt and pepper. Blend until the dates are a small crumb.

6. Then add vinegar, oil, and lemon juice and blend until emulsified. Then drizzle in a bit of honey and blend again. Add water to thin out.

Place chopped dates, crushed garlic, lemon zest, salt and pepper into a mini food processor.

Blend until dates are small crumbs.

Once you add the oil and vinegar the dates will break down even more to create a creamy consistency.

7. Assemble the salad by placing the lettuces on a big platter and then sprinkle the sliced red onions, butternut squash, pecans, dried cranberries and pepitas all over the top of the lettuces.

I sometimes hold off on dressing an entire platter of salad in case there are leftovers I don’t want the remaining salad to get soggy. So, I let the guests add the amount of dressing they want to their plate. Do what feels right or works for you. But always serve it up with love.


Bibb, arugula salad with roasted butternut squash, dried cranberries, pecans, pepitas & date dressing

Serving it up with dressing on the side, and with plenty of love

I loved it so much that I expanded the idea to use it with quinoa for a customer side dish. Which by the way was such a hit, they texted me to say it was another winner. I just love getting those texts messages.

Quinoa with all the same ingredients as the salad… minus the lettuce.

Summer Lunch - All Day Eating with Friends

JuanCarlos and I are super fortunate in many ways. And when it comes to the friend category, we absolutely score. We have the most amazing friends, all over the country. One such lovely group lives in Princeton, NJ and are always willing to make the long drive to visit us. Given the time they invest in traveling, JuanCarlos and I make sure that we prepare an all day affair filled with delectable bites. The food ranges from easy and simple mixed with some other items that require a tad more prep. But the fun part is that we keep it casual and flowing, bringing out items as they are ready. It allows us to mingle, chat, and relax without any formal schedule yet with plenty of food from which to choose. It’s like a grazing event.

Louisa & Rocco sampling the appetizers.

I actually love this type of entertaining because it affords me the opportunity to prepare a variety of different plates. Sometimes I get overly enthused, and just want to offer up the world… on a platter. It feeds my need to experiment plus have a group of food lovers to test out my ideas. I will admit that often times I have to reign myself in for parties. I get so excited, wanting to make more dishes than are humanely possible to consume, unless an army shows up. That said, I do a good job of keeping to amounts that makes sense.

I know I’m always giving advice about making a plan, having a budget, being organized, etc. All of which are necessary. Having a list, knowing what to buy, prep and what to make when, plus staying within your financial limits all are essential. I keep to the first rules diligently. List making, organizing, prepping; that’s my jam. Which is why I included a printable complete shop/prep/menu list at the end of the blog if you choose to replicate this menu. However, one thing I will admit openly; we rarely, if ever, follow a budget. JuanCarlos and I are both of the same mindset. If we are hosting, we will make whatever we deem is appropriate for the occasion and not be concerned about the cost. I don’t recommend this approach for everyone. Having a budget in mind helps to keep you on track and from over buying.

Ok, enough chit chat. This post is going to be chock full of food, so the least said the better. Although, I believe I’ve past that point already. Onward!

Table Setting

I’ve said it a thousand times, as my many posts dedicated to table settings will prove, and I will continue to say it. DO NOT skimp on your outdoor table. Plain and simple: Make it inviting.

Note: If you want me to stop saying it, send me some photo examples of your tables and I will dispense with the repetitive table setting suggestion.

I chose a bold green and black tablecloth that is similar to the one I recently featured Green & Black: A Graphic Table Setting.

I laid a neutral table runner with a bold, black graphic design across the wooden table that was used as a buffet. . I felt that the dramatic outline paired well with that of the tablecloth. I then kept everything else extremely simple.

I bought this khaki colored table runner from IKEA. It was the stark, graphic print that attracted me.

Big white plates, white napkins with a simple rectangle fold placed on the plate lengthwise with the utensils atop. Flowers were from Trader Joe’s. Nothing expensive or extravagant put a fresh pop of color that complemented the tablecloth colors.

Simple but still feels special.

I love the contrast of magenta and lime green. In a pinch, you can’t beat Trader Joe’s for flowers.

Drinks
Have a variety of drinks, but don’t go overboard. I can tell you from experience, people aren’t expecting to have every drink option under the sun. We used to offer a full bar, but through the years have pared down considerably on our offerings.

First tip, know your crowd. If most of your guests enjoy beer over wine, buy accordingly. Our groups are typically wine drinkers. No surprise there. So we offer a variety of wines, sparkling and flat water plus I usually make home iced tea as a non alcoholic option.

Second tip, be gracious; pour and refill your guests glasses. Sure, you would hope they feel comfortable serving themselves, but not everyone will. And it certainly makes them feel special when you are an attentive host.

Keep ‘em refreshed!

Starter | Appetizers

Have a 2-3 different dishes.

You all know that I’m a huge fan of the ubiquitous cheese/charcuterie platter. Since this was a warm August day I wanted to keep the starters less fussy without tons of cheeses melting in the sun. Instead I skewed this a bit lighter with a more tamed grazing platter.

Grazing Platter

Mortadella, French Breakfast Radishes with herb salted butter, salchichon, marcona almonds and dates.

Instead of the big cheese/charcuterie platter, I opted for a more simplified version I dubbed The Grazing Platter.

Watermelon Salad

Watermelon Squares topped with feta, pickled red onions & mint drizzled with balsamic vinegar over a bed of arugula

Nothing more refreshing than watermelon. Up the ante and top it with tangy feta, sharp pickled onion and the fresh herbaceous hit of mint, a drizzle of balsamic adds sweetness. It’s a party in your mouth.

Stuffed Endive

Endive stuffed with whipped cream cheese & goat cheese two ways:
Strawberry | Grape tomato | Basil
Sautéed Peas | Shallots with Pea Shoots.
Click here for recipe

Endive are the perfect vehicle to deliver food into your mouth. I love stuffing them with tons of fillings. These offerings were perfect for a hot summer day.

Intermezzo

This is a small course that we like to serve in between the appetizers and the main meal. I know what you are saying… Food in between the food courses? Well, I did say it was an all day eating affair. For this occasion we served a surf and turf tasting of scallops and grilled meats.

Butter Seared Scallops with Peas/Shallots

These scallops were seared in a cast iron pan on the grill. I used some of the pea/shallot mixture leftover from the endive dish to accompany the scallop. It was a beautiful pairing, and a tasty bite.

Seared scallop with peas

If you can’t get fresh, use frozen peas.

Grilled Meat

No explanation necessary. Grill up some of your favorite meats and serve it family style on a wooden board.

My husband loves, loves, loves to grill. He also loves to have his friends around him while he grills. So offering up both the scallops and the meat right off the flames is right up his alley.

Pluma is the end of the pork loin from an Ibérico pig from Spain. It is moist and tender, and quite the special bite of grilled pork.

My happy grill master, JuanCarlos, chatting it up with Ivor.

Dinner

Salmon Burgers

with Buns & all the fixings (raw red onion slices, pickled red onions, heirloom tomato slices, basil & pea shoots. People can choose whatever floats their boat.

Click here for recipe.

Build a burger station.

Heirloom tomatoes in big slices, raw and pickled onions, fresh basil. Just that is a great salad!

My gluten & egg free salmon burgers. On this occasion, I encrusted them in cornmeal to give them an extra crunch.

Pea shoots and micro greens are more delicate for the salmon burgers. Plus I had leftover from the endive appetizer, so use what you have.

Our friend, Louisa, has celiac intolerance, and I am wheat intolerant. The gluten & egg free salmon burgers were ideal for us and the rest of our guests. While they enjoyed the burgers with a bun, we each choose a different way to stack our burger using a tomato slab; making it our own.

All the other guests enjoyed the bun.

Tomato on top…

Tomato on the bottom…

Spicy Slaw

I love serving this salad because it complements so many dishes. It pairs great with grilled meats or fish. It’s a natural with burgers. So it made sense to sit alongside my salmon burgers.

Click here for recipe.

Spicy Slaw, a crisp, refreshing and hearty salad.


Smashed Baby Potatoes with herb garlic oil

Nothing hard about this one. And the best part is that the majority of this can be made ahead. I use new potatoes, but you really can use any potato you like. Boil them up fork tender but not overdone. Drain well and let them cool slightly on a baking tray. Then using the bottom of a glass or a measuring cup press down on each potato smashing them flat but still keeping them together. You don’t want to fully smash or they will completely fall apart. If making ahead, refrigerator until you are ready to fry them up. To finish them, you can either bake them at 400 degrees in the oven with a drizzle of oil, salt and pepper. You can fry them in a cast iron pan on the stove or on the grill, as we did.

I love serving these with either my marinated feta or a simple herb garlic oil, much like a chimichurri sauce. Simply mince cilantro, parsley, basil, chives, crushed garlic, lemon zest, squeeze of lemon juice, olive oil, salt and pepper. If you want to kick up the heat, add red pepper flakes. You can add whatever herbs you like or have. Make it your own.

Nothing better that the crispy skin of a potato with the soft interior. Slather with herb oil and you are in heaven!

Grilled Asparagus

If you have grill fired up, might as well throw on some asparagus. It’s a great summertime green BBQ vegetable.

Dessert was a variety of my ice cream sandwiches. More wine and after dinner drinks. We ate. We drank. We talked. We laughed and ate and drank some more. We love spending time with our Princeton pals, and feel so incredibly fortunate that they make the drive to our little haven in Westchester.

My chocolate chip cookie with vanilla chocolate chip ice cream. All homemade, of course.

Chocolate crisp cookie with vanilla chocolate chip ice cream.

Lemon spice cookie with strawberry basil ice cream.

Now this may feel like a ton of food for 6 people. But remember we paced ourselves and were nibbling all day. You don’t have to make all of these. Try a few. But if you do want to tackle this entire menu check out the printable Prep list document for the entire shop, prep, to do rundown.
I hope you have friends that you would enjoy spending all day with. If you do, make it special. It’s worth every minute!

Endless Endive: Strawberry, Tomato, Basil and Peas, Shallots

Years back I posted Winter Fresh Endive Boats and promised that I would post about the variety of other ways to stuff endive.  And although it's been quite some time since that posting, I like to make good on my promises, even if it takes me years to come through. So here is my first round of fillings.  And I promise, there will be more, especially since the title is Endless Endive.

Endive seems to have been specifically made as the perfect carry vehicle for fillings.  I know most people cut them up and toss into salads, but I much prefer them as a big spoon! They are great for dipping and are literally the ideal shape to fill so guests can easily pick up and enjoy. Why in the world would anyone cut them up when their true purpose seems clear? Well, at least to me. That’s why I fill them, endlessly.

I entitled this Endless Endive because quite honestly the list of fillings is just that. The only limitation is one's lack of imagination.  But I know that together we can invent tons of fillings. I’ll do my part to start us off. For this post I’m keeping it to two different fillings that are perfect for Spring and Summer Time.

But first some tidbits about Belgian endive. It’s like a small head of lettuce but instead of being round like Boston lettuce it has a cylinder shape usually around 6 inches long. The most typical has pale yellow leaves that are tightly packed together with one end more sturdy (the filling end) and the top end feathering out to a more delicate whisper. There is also a purple toned version, Red Belgian, which when combined with the greenish yellow version makes quite a stunning plate. Being part of the chicory family, it has a mild bitter taste, but not nearly as much as radicchio. I find endive to be mild and neutral. You can actually cook endive and it mellow out the flavor to a more nutty tone.

Ok, onto the fillings.

As I mentioned, there are two different toppings but both versions use the same cheese filling. You can use any combination of cheese fillings or a single cheese. The most important part is that it is whipped so that it is light and fluffy.

Ingredients

3-5 Endive*
12 oz Cream Cheese**
10 oz Goat Cheese
**

Strawberry/Tomato Filling

1 qt Grape Tomatoes, chopped
1 qt Strawberries, chopped
1/4 c Basil, chiffonade

Peas/Shallot Filling

2-3 T Mint, chopped
1- 1.5 c Peas, frozen
1 small shallot, fine dice
Pea Shoots, for topping
Magic 3 (olive oil, salt, pepper)

* Depending on the size will determine how many leaves each one will yield. I always buy an extra one to be safe, especially since as you get closer to the center the leaves get smaller and smaller.

** You can use both cream and goat cheese combined. The cream cheese balances the tang of the goat. You can also use ricotta cheese with is lighter.


Instructions

  1. Whip cream cheese and goat cheese together until fluffy. Season with salt and pepper to taste. Place in a pastry bag or large Ziplock bag and refrigerate until ready to fill.

You can certainly stir it together but I find using a hand mixer creates a smooth, creamy consistency.

Fill a pastry bag or plastic bag for easy filling.

2. Carefully separate the leaves from the core. I like having a clean edge, so I cut the bottom until leaves naturally release. Then continue to cut across the core releasing more leaves. This method helps to have even clean edges as well as ensuring not to tear the leaf. Let them dry on a paper towel.

Look as those lovely natural boats.

3. Wash, core and chop the strawberries. Wash and chop the grape tomatoes, and chiffonade the basil. Set aside. Combine everything in a bowl, season with salt, pepper and a drizzle of olive oil and set in the fridge to marinate. Note: I recommend a small dice so you can get several pieces of each when you fill the endive

When you use fresh ingredients, you only need a few. Just let them shine and show their natural glory.

So appetizing.

4. Blanch the peas for 1-2 minutes and shock them in cold water to stop any further cooking.

Quickly blanch the peas. They don’t need much time.

Placing them in an ice bath stops the cooking and helps retain their vibrant green color.

5. In the same saucepan, sauté the shallots until softened. Season with salt and pepper

Shallots are milder then red onion and don’t overpower the sweet, tender pea. They also do not take long to sauté and soften.

6. Remove the peas with a spider, draining all the water and add them to the shallots. Taste for seasoning, and adjust if needed.

A tasty mixture.

7. Arrange the endive leaves on a platter and using the piping bag squeeze a hefty tablespoon amount of cheese into each leaf.

I like to arrange some greens on the bottom of the serving platter to finish the presentation.

Fill to your hearts content. If you like more cheese filling, then put more. I feel like a heaping tablespoon amount is just right.

8. Then fill with the leaves with each of the two toppings, separately.. Finish the pea version with pea shoots. I liked alternating the versions next to one another. But you can also arrange it so one side of the platter has the Pea/Shallot version, and the other side has the only the Strawberry/Tomato version.

So vibrant and fresh.

These can be made up to 1/2 hour prior to serving. However, you could prep all the components ahead of time (day before) and store airtight in the fridge. You can even fill the endive with the cheese filling hours ahead. Cover with plastic and then fill before serving.

A festive, refreshing Spring or Summertime appetizer.

I absolutely love the freshness of this appetizer. So crisp, so clean. So refreshing. The best part is it requires no dishes, no utensils. These are ‘pick up and devour’ apps. I hope you give these a try. With Spring sprung, we need a few fresh, cooling appetizers up our sleeves.


Chick Pea Fritters - Gluten Free Treat

You know why it’s important to learn baseball when you are younger? So you can hit life’s curveballs when you are older. You never know when the universe is going to toss one at you. But rest assured, a few will be pitched your way. Some are serious and life altering, Some are less severe but still require adjusting. Some curveballs are disguised as opportunities. Actually, let me rephrase that. Most of life’s curveballs actually ARE opportunities.

This past summer, I had an awesome gig come across my plate. I was hired to cook for a family of 7 adults, providing lunches and dinners for a two week period. (The family ended up loving what I provided that they extended it for entire month.) This was a huge undertaking in every sense of the word. And there were plenty of fastballs and curveballs pitched my way.

Curveball #1: Refrigerator and freezer needs. I have 2 refrigerators with 2 regular freezers plus 1 full freezer. Yet that was not going to be enough. But as luck would have it our neighbors sold their house, moved out and the new owners weren’t moving in for a month. Coincidence or Fate? I say lifesaver as I packed their fridge and freezer to the brim.

Curveball #2: The clients many food restrictions which required a complicated menu planning.

Curveball #3: The management of each meal, heating instructions, and color coded labeling system. With so many containers being delivered, the only way they would know what to heat up was having a color coded labeling system so they knew what dish went with what and for when. They would also need instructions for re-heating and for sauces/dressings. M/L = Monday Lunch, F/D = Friday Dinner and so on.

Other challenging parts of the gig was that I had to deliver the food over an hour away twice a week which required a well orchestrated shopping-cooking- delivery schedule, using various coolers and pack out lists to ensure nothing was left behind. Add to that the various food restrictions which included what proteins some of the guests ate and others did not. This meant that I had to come up with two mains for every meal. Ensuring that every person had sufficient protein was like solving a Rubik’s cube. Oh, did I mention, gluten free? That part is easy for me since I’ve been gluten free for over a decade. So, I won’t even count that.

There were other curveballs but I think you get it.
Big, Big, Big. And I’m always up for a challenge, especially one that requires logistical thinking. I have the detail oriented mind to tackle this type of task. All bragging aside, it’s actually one of my super skills.

I am a very visual person. In order to tackle this monster, I needed to see it. At first, I starting handwriting the menu and the to do lists. Then I typed it into the computer. But soon realized that it was a living, breathing beast which needed to be shifted and modified constantly. Moving items around on the computer wasn’t as effective since all the columns kept getting out whack. I knew the only way to confront this monster of a task was the old fashioned method of sticking it up on a wall. I needed a system that would allow flexibility, full visibility and the ability to easily move food offerings around without shifting others out of place (as what happens in a Word Doc). This could be the next new meaning of a Moveable Feast.
I printed out each offering, cut them into small strips and added painters tape to the back. It was the only way to switch out an item easily after staring at the entire menu and realizing that I might be serving rice 3 days in a row. Or that if I moved a dinner to another night then I wouldn’t have the spicy slaw as a leftover for lunch 2 days later. Rubik’s cube or mathematical conundrum? Anyway, this system worked beautifully and allowed me to see the whole scope of the project and ensure the client was happy with the diversity of offerings. I left it on the wall as art!

My moveable feast. A ‘place and stick’ menu system that kept me from going batty.

I literally used it everyday to keep me on track

Everything was going along swimmingly until one day the client made a late decision switch which left a protein hole for the vegetarian in the family.

Curveball # I lost count: Need an additional protein but no time to go shopping.

So, how do you sneak in extra protein at the last minute using only what you have available? Legumes to the rescue.

I decided the fastest, easiest solution was to make chick pea fritters. Don’t ask me why I thought this would be fast and easy since I had never made these before. But the idea seemed similar to other pancake like food, so that equaled a decent plan. Naturally, it had to be gluten free. This really wasn’t that earth shattering of an idea. It only felt dramatic because I had less them 8 hours to solve the problem and make the food using only available items, in order to make it for the next day’s morning delivery.

Here’s how it went down.

But just a few ingredients: Chick Peas, Gluten Free flour, jalapeño, egg, scallions and cilantro.

Ingredients

(Makes 14 - 3” round Fritters)

1 39 oz can Chick Peas
3 T Gluten Free Flour (or Chick Pea flour. If you aren’t concerned with GF, then regular flour can be used)
1 Egg, beaten
2+ Tbsp Jalapeño pepper, minced (add more if you like more heat)
1/3 c Cilantro packed leaves, 3 T chopped
1/2 c Scallions, sliced
1 t Salt
1/4 t black pepper
1/8 t red pepper flakes, optional
coarse sea salt to finish

Tahini Dipping Sauce
1/2 c tahini
6 T ice water
3 T Lemon juice/zest
2 T scallions, sliced
1 t jalapeño, minced
salt to taste

Instructions

  1. Slice, chop and mince the aromatics.

Mise en place: Chop, slice and have all ingredients ready.

2. Mash the chick peas, leaving some larger and smaller pieces for texture.

3. Add the jalapeño, cilantro, scallions and mix.

4. Then beat egg with salt, pepper and red pepper flakes and add to chick pea until combined.

5. Add the flour 1 tablespoon at a time and mix until the egg is absorbed but still it wet enough to hold it together.

Squeeze a bit into a ball to ensure it holds together.

6. Using an scoop, choosing the size you desire. If you want them as appetizers make smaller ones. If you want them as a side dish, make them larger. Depending on your style and also how you will be serving them, it’s up to you whether you scoop and free form them or scoop and press into a cutter for perfectly equal fritters. Once you decided, scoop, flatten and place them on the sheet tray for fast work. Again, you can choose super flat so they are crispier, or slightly fatter for the thicker more substantial bite. Your choice depending on your needs/desires. Remember, my recipes can be followed exactly or simply be a guide for you to create and make your own modifications. However it is important that when forming these pack them tight so they hold together.


Choose your tool

Scoop for free form, or scoop into a mold

Size matters…

7. Refrigerate for 1/2-1 hour or freeze for 15-20 minutes. This step helps to get the fritters together then frying.

Prep makes easy work. Plus I do recommend placing them on tray to refrigerate or freeze before frying.

8. I like using a cast iron pan when I frying. The heat from the pan allows for a good sear. If you don’t have cast iron, use your best fry pan or grill pan. Working in batches so as to not drop the pan temperature, add oil and about 6 of the fritters. Turn with a small spatula. When done, remove and place on a paper towel and sprinkle with coarse sea salt.

I prefer thinner fritters because I’m a sucker for crisper, crunchy food.

Golden brown and crispy. The paper towel absorbs any excess oil.

I made a tahini dipping sauce to go along with these. A little extra protein from the sesame. Below is the tahini sauce process.

Tahini

Whisk in ice water, and you can see how the water not only changes the consistency but it lightens up the color as well.

Add lemon juice, zest, scallions, jalapeño and whisk together.

Creamy topping. Try it on other foods.

The client immediately texted to let me know that her husband consumed almost the entire batch himself. Huge success. Happy customer, and now I have another little appetizer/side dish to add to my collection and to share with you.

A yummy combination.

You know me, my dishes are never just one use. They usually do double and triple duty. Serve up as an appetizer, or a side dish. You can even swap out toast and use them as a base for eggs. I made one poached egg and one fried egg to place on top of my fritters. I added a dollop of yogurt and some fresh parsley. A few apple slices rounded out this breakfast. I’d say I hit this curveball out of the park.

I fried my egg in a metal round the same size as the fritter to make it nice and tidy. If you use this method make sure to oil the inside of the mold so the egg removes more easily.

Left side fried egg, right side poached egg. Delicious, nutritious and packed with protein. Apple slices added a lovely crispy, freshness.

A happy husband