One of my avid readers likes when I post table scape ideas for easy and casual entertaining. As you know, I like setting a table. For me, even the simplest addition of a placemat on a table calls your guests in and makes it feel special.
It just so happens that when this same avid reader, her husband, my sister and brother-in-law joined us for dinner one Saturday night last year I needed just such a casual table setting. Why was I in such a pinch, you ask, knowing that I usually have everything planned out down to napkins for my parties? Seven annoying letters… WEATHER. Originally, my intention was to entertain outdoors and I had that table setting prepped and ready to go. Yet the pesky, uncontrollable nature just didn't want to cooperate. So direction change required a fast and simple solution for setting the table indoors. I wanted to retain a casual feeling which was good because I didn’t have time to iron another full table setting. So what do you when you are out of time and need to readjust?

Pulling out some fast and easy willing participants.
Do the ole ‘throw a muslin fabric down the middle of the table’ trick. Since this look does not require ironing it is one of the easiest solutions to 'no time for that!' In fact, you sorta want those natural wrinkles. However, without a full tablecloth you really need a landing spot for the place setting, otherwise a piece of wrinkled fabric in the middle of the table just looks like a mess. I wanted to keep the theme neutral, so black placemats were a natural choice and kicked off the theme.
I like high contrast, as you have seen in some of my other settings (Yellow Burst of Sunshine, Creamiscle Tablescape). What can be more high contrast than black and white? But that combo can sometimes be stark and harsh. However, when you swap stark white for cream it transforms into chic and well, actually...creamy. Consider the black and cream combo as getting back to basics. It can be the easy, go-to palette for a casual table setting that you can build upon, or amp it up to create a more formal setting. In this installment of how the table turns, I present two table settings using three of the same elements. I consider the first one featured to be a thrown together yet casual look that can be pulled off at the last minute. While the other is a tad, and I do mean tad bit more formal.

In order to take this out of ho hum dull, the addition of a few muted nods of color was in order. Remember, it was supposed to be an outdoor dinner party.
With the cream muslin tossed across and the black placemats down, some finishing touches were needed. I used two different napkins; one cream which tied in with the muslin runner and other a muted green/orange/pink/cream which picked up the colors of the mum floral centerpiece. The reason for both types of napkins? Simple. I didn't have enough of the colored ones and really wanted to use them giving way to the festive and not the hum drum. Plus there ain't nothing wrong with mixing and matching. From past blog posts on table settings, you know this mix and match part of me by now. The fact is I love to combine different elements that play off of each other. It just doesn't have to be that fussy, as long as it's nicely put together, you can achieve a cohesive look. I think the trick to achieving that is when using the mix and match technique, just alternate the different elements and it looks planned... ah hum, as it was.
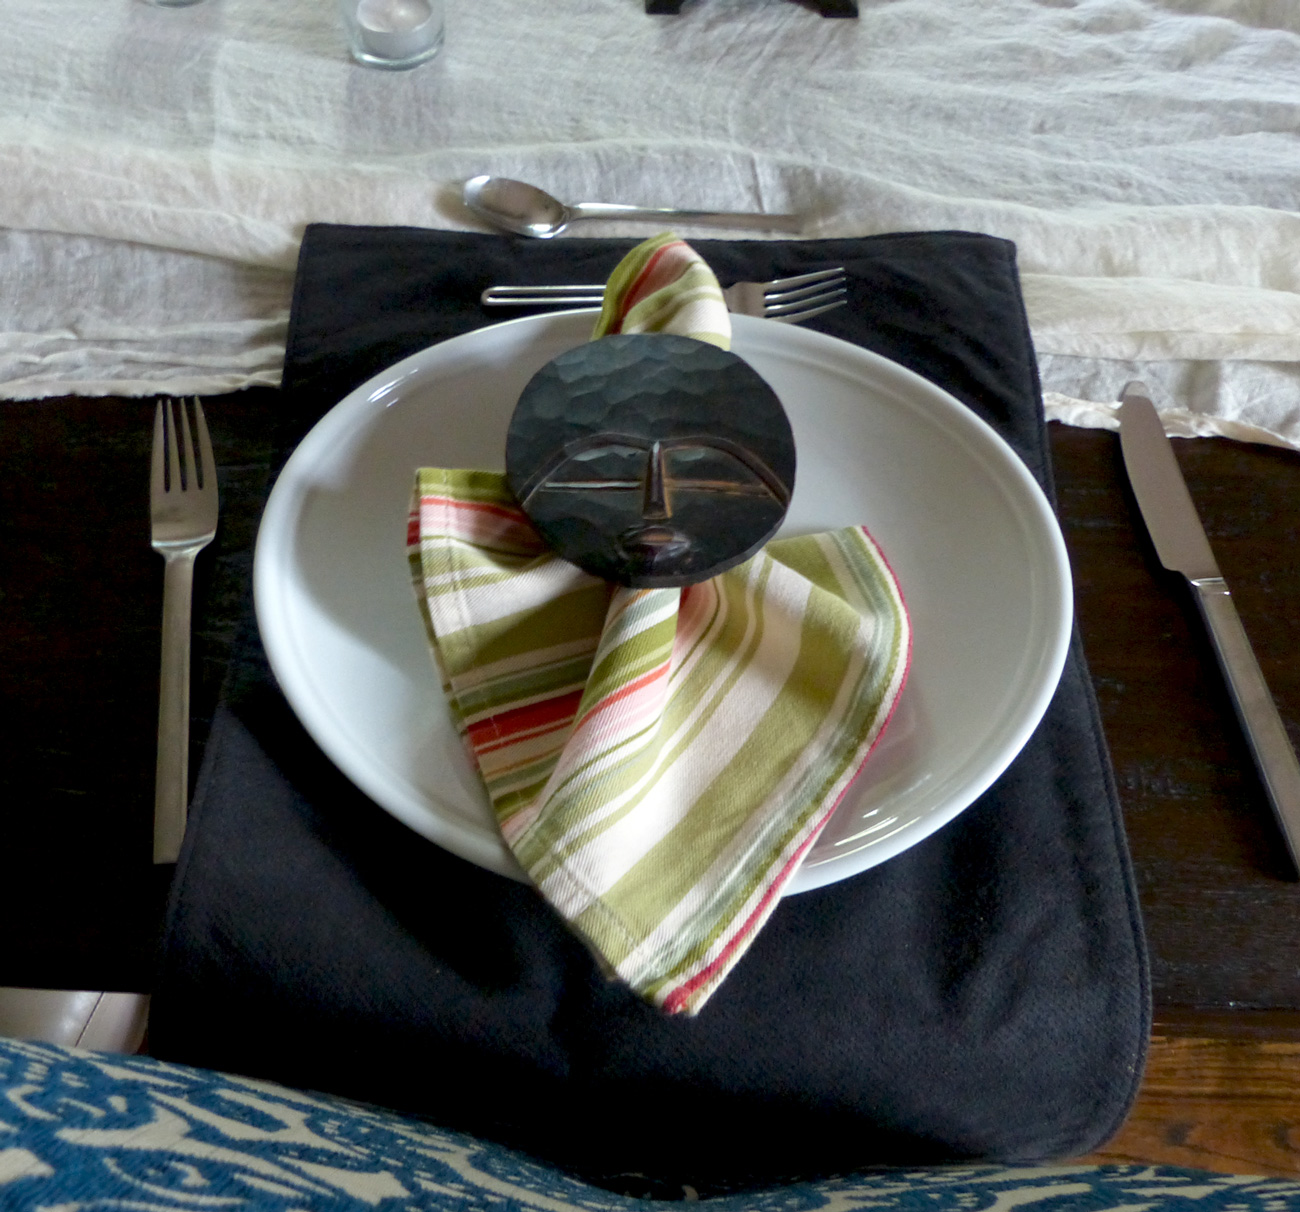
Note that I turned the placemat the opposite way of the traditional placement, allowing it to slightly hang over the table. Creating more of a centered focus on the plate.
I used hand carved wooden napkin holders to add a bold statement, and just pulled the napkin through and allowing the bottom to fan out before placing it on the plate. This method hides any wrinkles if need be. If you don't have napkin holders, simply place the napkin on the plate. No biggie. Silverware in their proper positions, and white votive candles keep it casual yet welcoming.


You don't have to go nuts with the florals. Stay super simple by bunching together a single color pulled from the napkins and combine it with the neutral white, and voilà. Casual table for brunch, an afternoon meal or early supper. OR when the weather forces you to change the game plan. Mix and match your basics to create a laid back table setting.
Now, using the same basic elements; same white dinner plates, same black placemats, and cream napkins, create a setting of simple elegance. Just a few small changes create a subdued and refined table utilizing the black and cream theme.
- Simply swap out the wrinkled muslin for runner that makes a statement.
- Keep the cream napkins but use all the same color, no mix or match for this version. This really aids in elevating the look in a subtle way.
- Place candlesticks down the table along with votives to create a warm and glowing centerpiece instead of flowers.

Napkins with a simple triangle form gently placed in the middle of the plate. No napkin holders needed to create an elegant look.

Notice that the same black placemat as in the casual setting but these are positioned horizontally.
And there you have it in black and white x 2. Well, creamy white. One casual, one a bit more refined. Both easy approaches to welcome your guests to the table. Whether you are serving hamburgers or foie gras, "Tutti a la tavola a mangiare!" (So says Lidia Bastianich)