Green & Black: A Graphic Table Setting

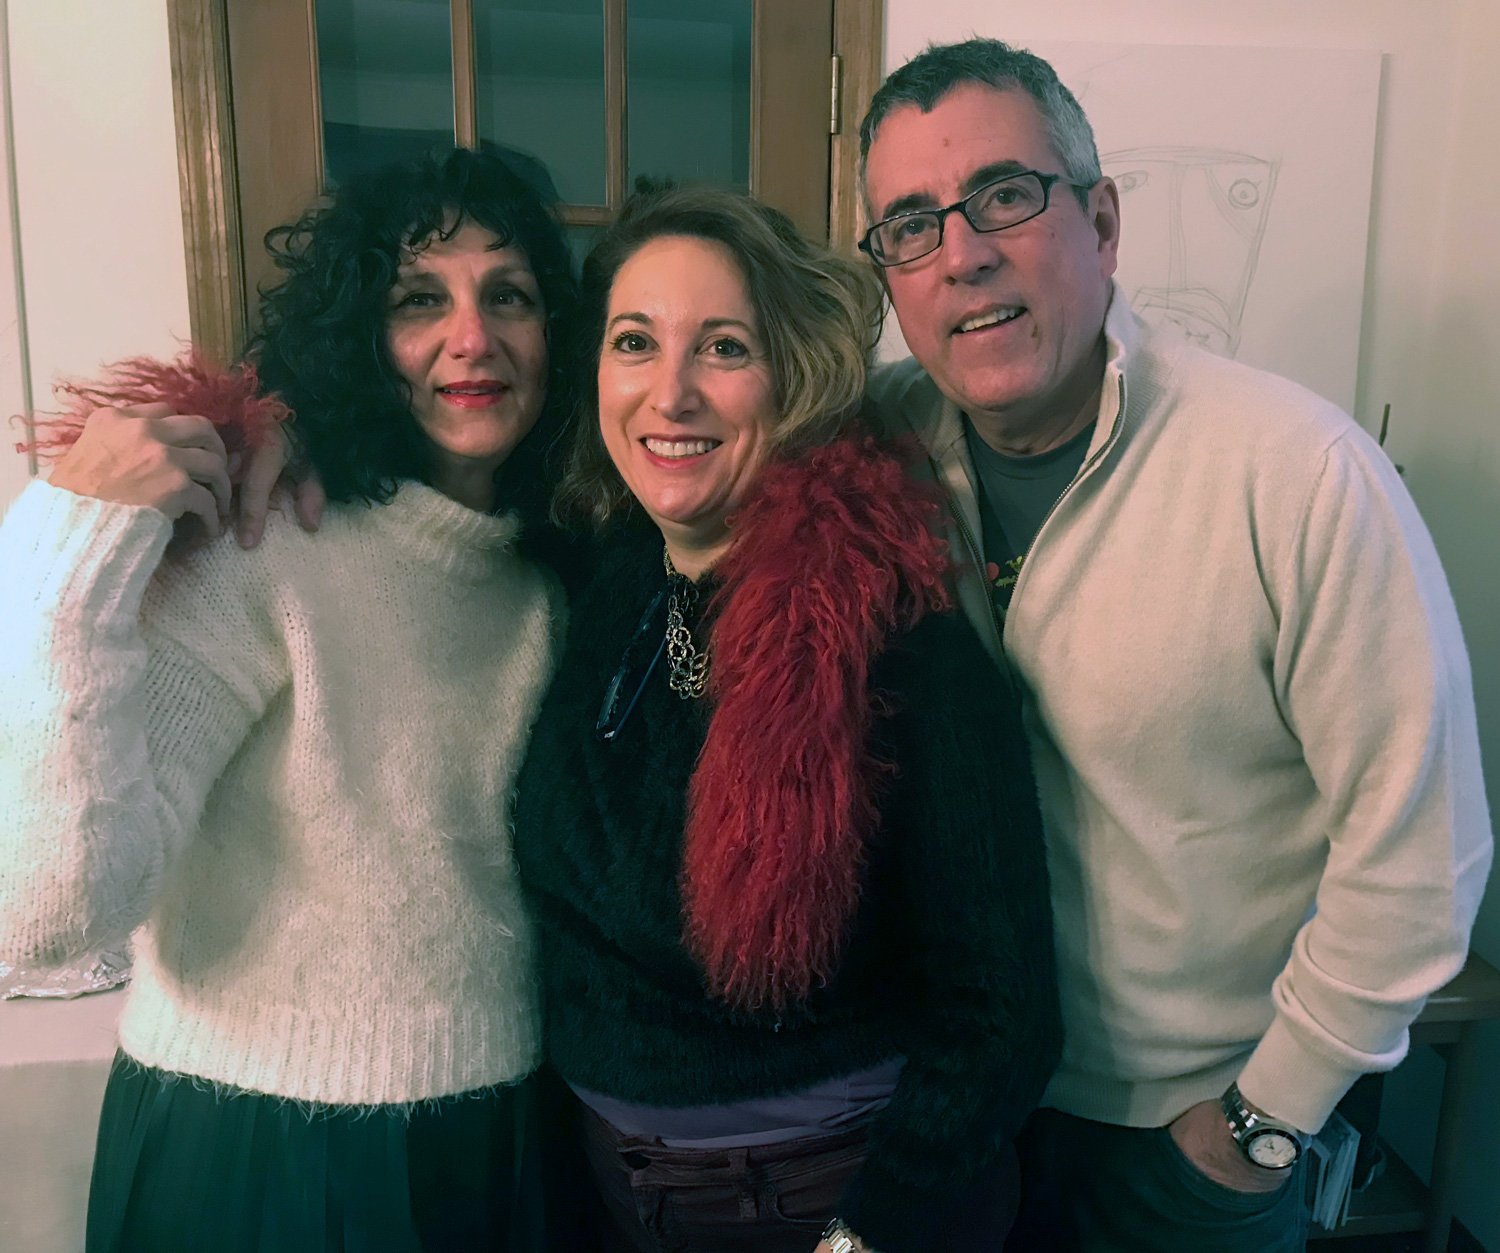
To say I was nervous about hosting a small dinner party during the pandemic would be an understatement. I know most people have ventured into this territory many moons ago, but JuanCarlos and I have been super cautious. And rightfully so, since we know plenty of people who have had COVID, some of whom we were attempting to meet with until luckily we found out their positive status prior to gathering. We’ve had a few of those close calls so you can understand our hesitation. Thankfully, everyone we know has recovered and is fine.

With our caution has come both a sense of safety and a deep sense of isolation. Therefore, it was time to step out of our shell, out of fear and into joy again. And so we did. And indeed joy we felt. I spent the day preparing food and thinking about a table setting. (Well, it only took me that long because I had to stop to photograph everything, not because I made a feast.) Even though our dinner party total would only amount to 4, I wanted to make it feel a bit elegant and momentous given it would be the first time I’ve set our dining room table in over 2 years!! It’s the dead of winter here in NY, and the temps have been frightful. I have plenty of tablecloths that evoke Spring and Summer, even Fall vibes. But oddly enough not as many for Winter. I wanted the setting to be appropriate for the temperature but not feel cold.

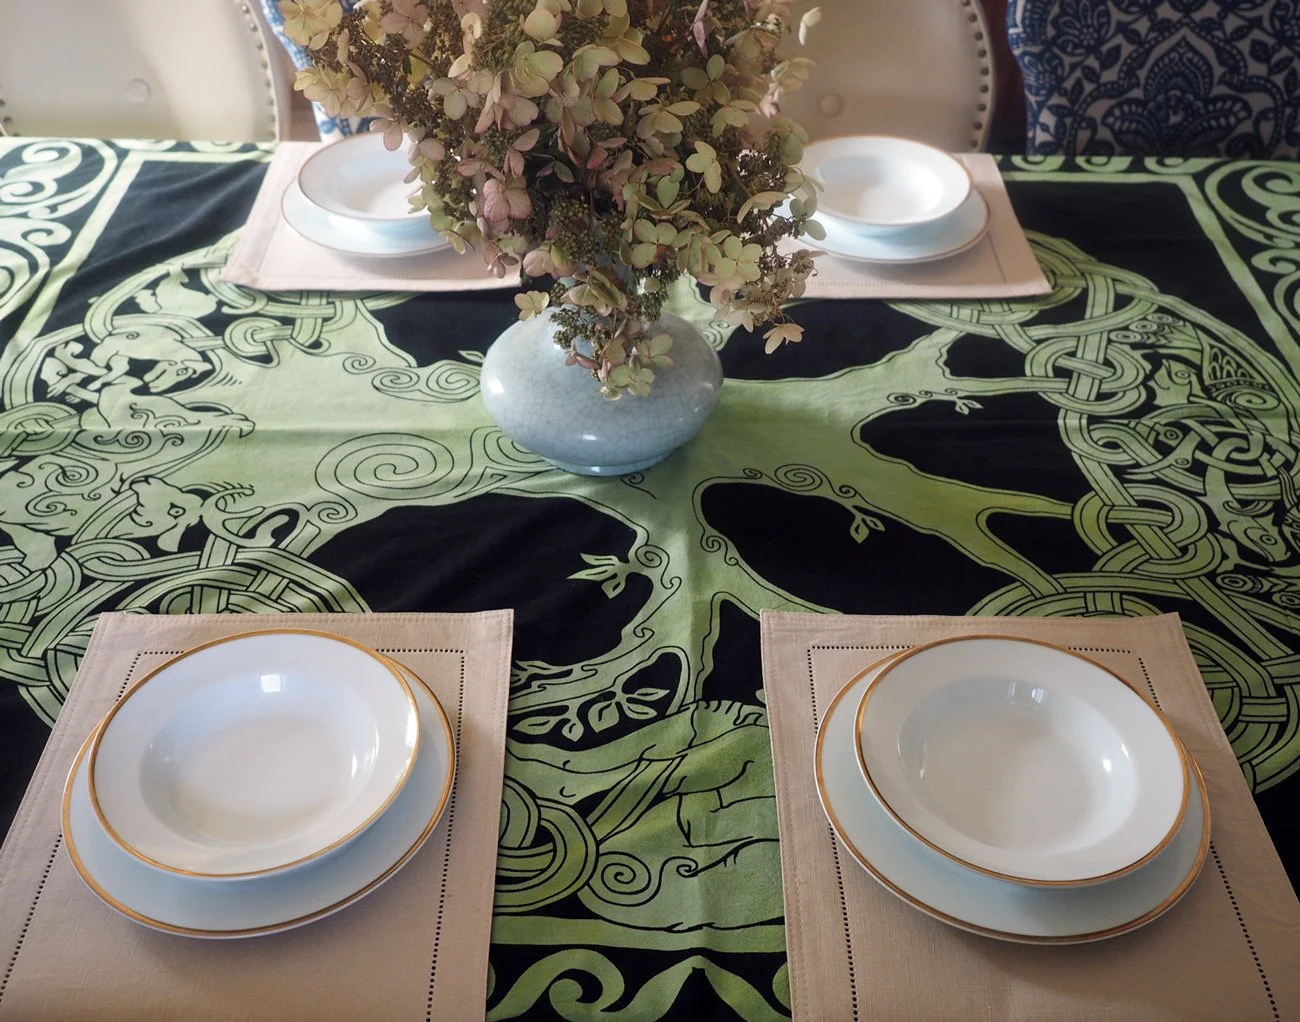
I settled on a very graphic green and black table cloth that set a strong tone. Next was figuring out all the other elements that would complement without becoming overwhelming. Believe it or not, I had a hard time deciding on what napkin to choose. And that is saying a lot since I have a fairly large collection of napkins.

Please, no judgement. I’ve collected these over the years. And pre-pandemic, we entertained ALOT.

The black napkins seemed like an obvious choice but quite frankly there was plenty of black in the main cloth. Plus they wouldn’t have added anything to the party in the way of color dimension. White was clearly too stark and didn’t blend at all. Orange, as you can see, was way too shocking and garish, and would have been too many strong colors competing. Sometimes choosing a napkin is instantaneous, but this time around it took some thinking.

The orange and white ones felt too harsh of a contrast to me. The black might have worked but just felt Blah.

I landed on a multicolored stripe cotton napkin that softened the tablecloth’s intensity and added a whimsy of muted colors. Even though these napkins tend towards a springtime feel, their tonality was the ideal softening agent. To bridge that creamy base color in the napkins I decided to include a soft beige placemat.

Like Goldilocks and the Bears. This choice felt “just right”.

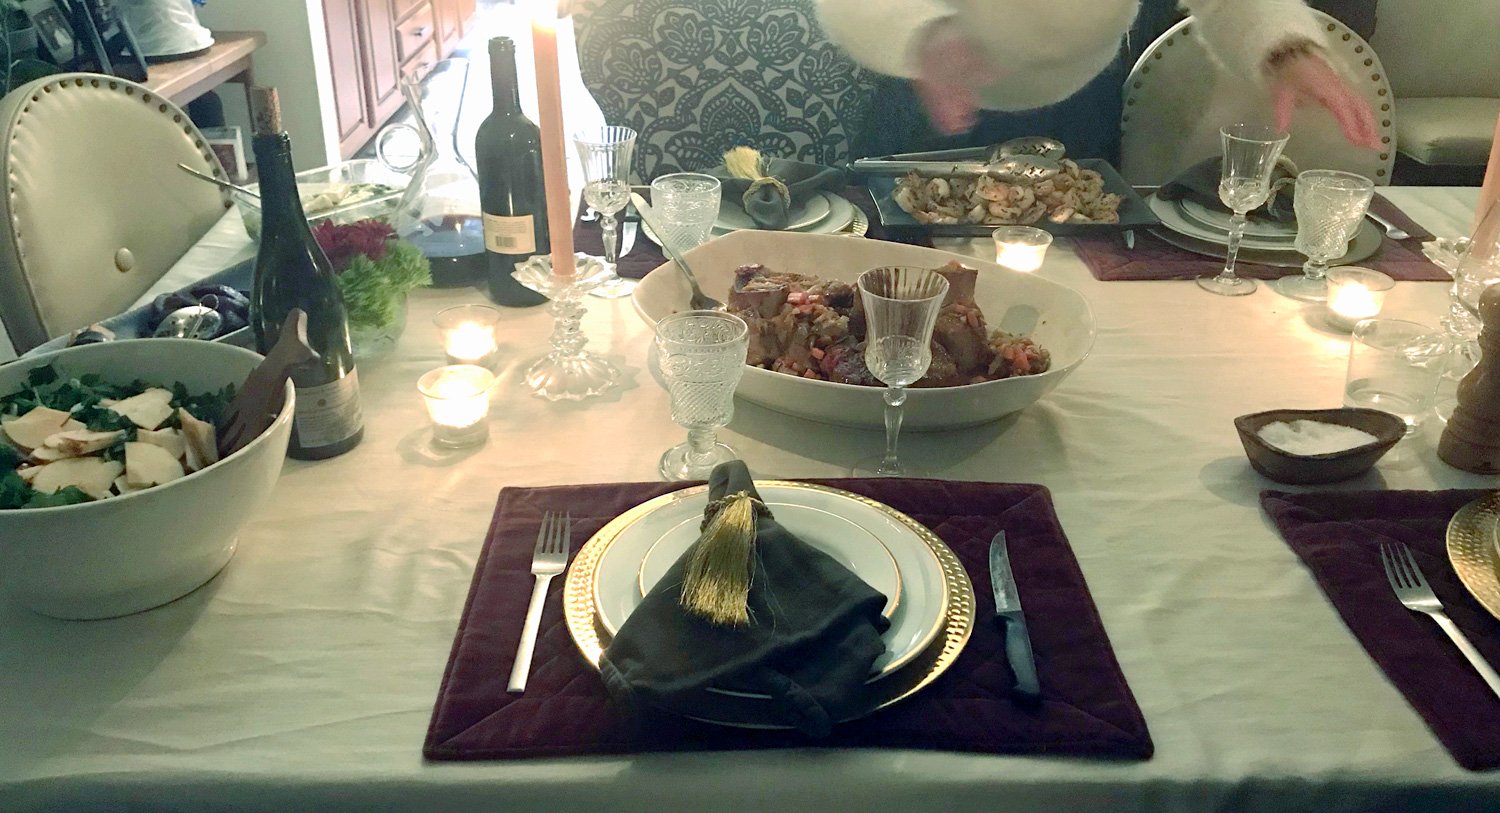
Since this was not going to be a formal dinner party, but an easy Saturday night with my sister, Alyssa and brother in law, Peter, no charger plates were needed. But a little bling was essential. Choosing white plates with a gold rim would help with that. Now that gold was introduced, adding the votive candle holders that I hand painted would finish off that golden touch.

Yes, those are OUI yogurt jars that I saved and hand painted with gold. I have a ton in silver too. I like how the design works with the movement of the tablecloth. Happy coincidence.

Votives provide a lovely low light glow, but I also like height. Which brings me to the candle sticks. Simple cut glass would add the height I wanted and also some sparkle without pulling attention away from everything else going on. Ugh, but now what color candle stick??? I must be out of entertaining practice because these decisions usual come to me in a flash. However, I do think showing this process helps to serve as a great demonstration of how a simple choice can change a look. And that there are no wrong decisions here. Just preferences. I had several choices; greyish silver, maroony purple, yellowy gold, or green. I chose the yellow gold, but any one of them would have worked just as well.

I might have immediately chosen the green since it was a perfect match, but for some reason I only had one.

Ok,
Tablecloth, check
Napkins, check
Napkin rings, check
Plates, check
Glassware, check
Candles, check
Let’s set a table…

When using placemats, sometimes I like turning them in other direction so they don’t cover as much of the tablecloth.

Gather all your elements. Once you see them all together the picture becomes clearer.

First layer down. I started with all the place settings in the center of the table, but right before our guests arrived I rearranged the seating.

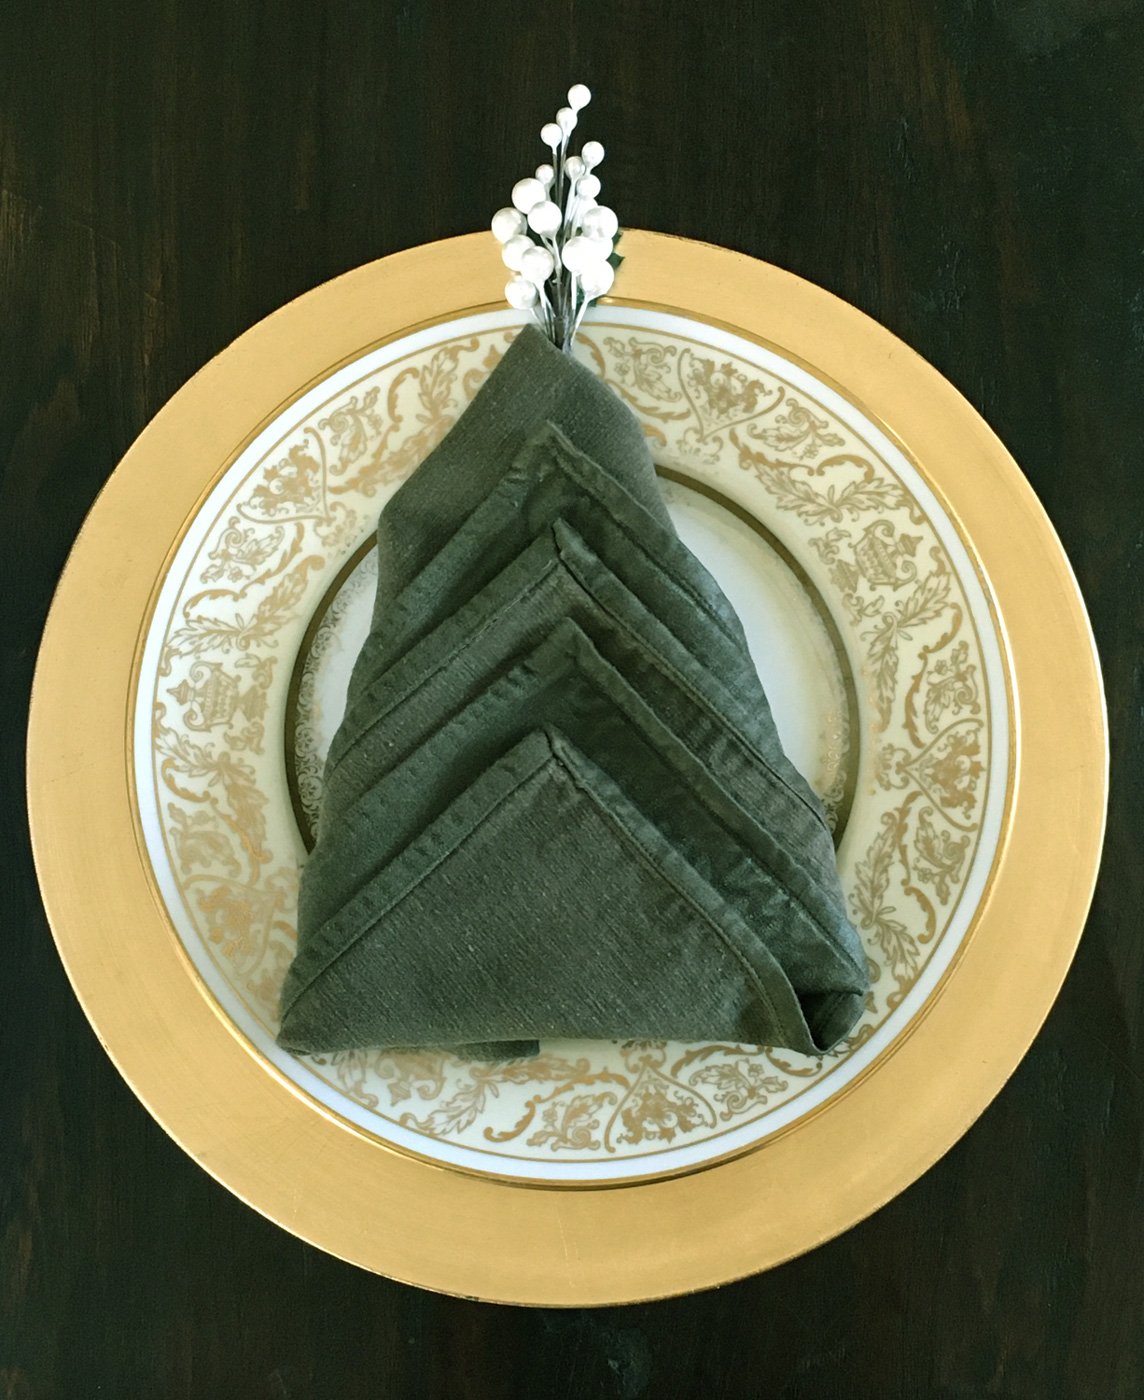
To add some additional height, I went vertical with the napkin. Using a simple napkin ring and pulling the center of the fabric through to create an octopus-like vibe. It’s super simple but makes a visual impact.

This is a simple napkin style. For more options, check out my post entitled: Napkin Folding - 5 Basic Folds - Countless Options

I wasn’t serving any fish or seafood, but I did think the napkin resembled an octopus. It created the height I wanted and was playful.

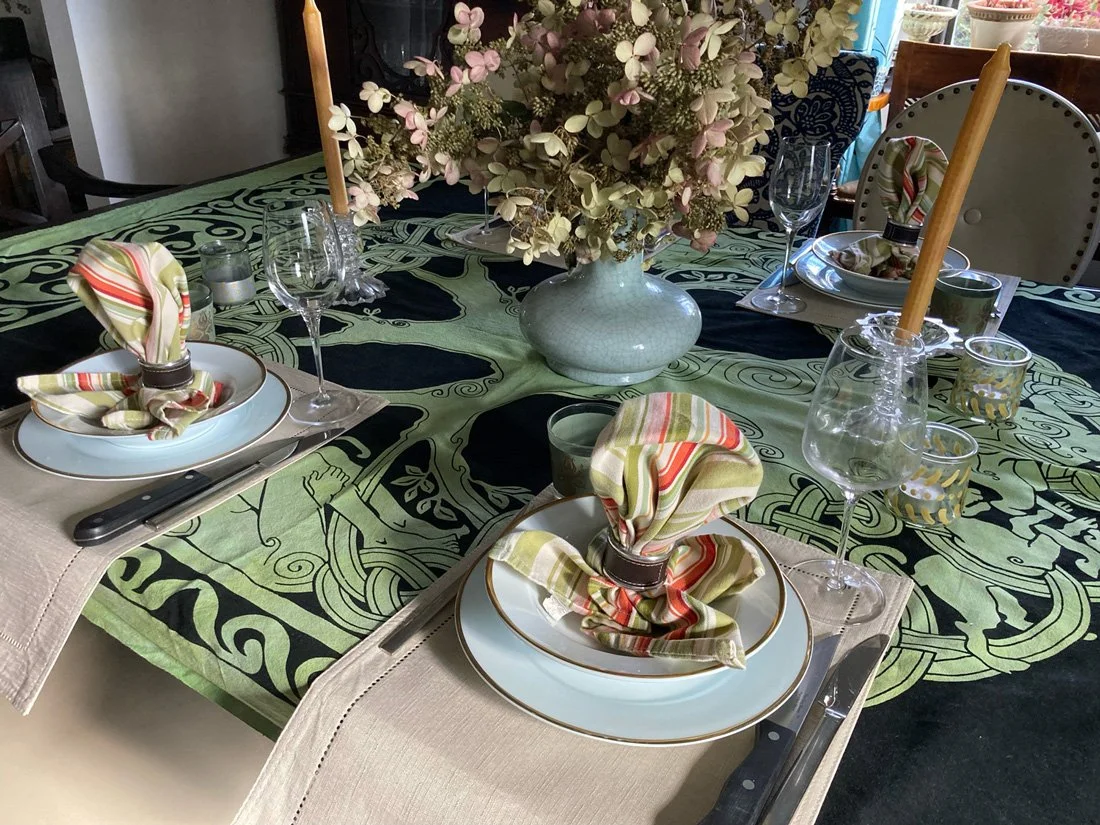
I love how the whole table came together. It’s elegant but not fussy.

Finish with silver and glass ware, some florals and my first in-house pandemic table setting was in the books.

Some random thoughts:

I absolutely love the movement of this tablecloth. The big, graphic swirls are so eye catching. When you take in the whole print from above, with the flowers perfectly centered, the roots of the tree really come alive.

I also adore the details of this print. Every time I see the figures on this cloth I can’t help but to think of the famous Robin William’s line in The Bird Cage: “Who sets a table and doesn’t look at the bowls?” For those who know and love this movie, no explanation is needed. For those who don’t, I implore you to watch this very funny movie.

I hope this has inspired you to take a chance on setting a table with a super bold, very graphic, intensely strong tablecloth print. With the right complementary elements It can be fun and is sure to make a statement that will impress. The first thing my sister said was, “Wow!” Unlike me, who is clearly very wordy, she is a woman of few words, but in this case, only one was needed.

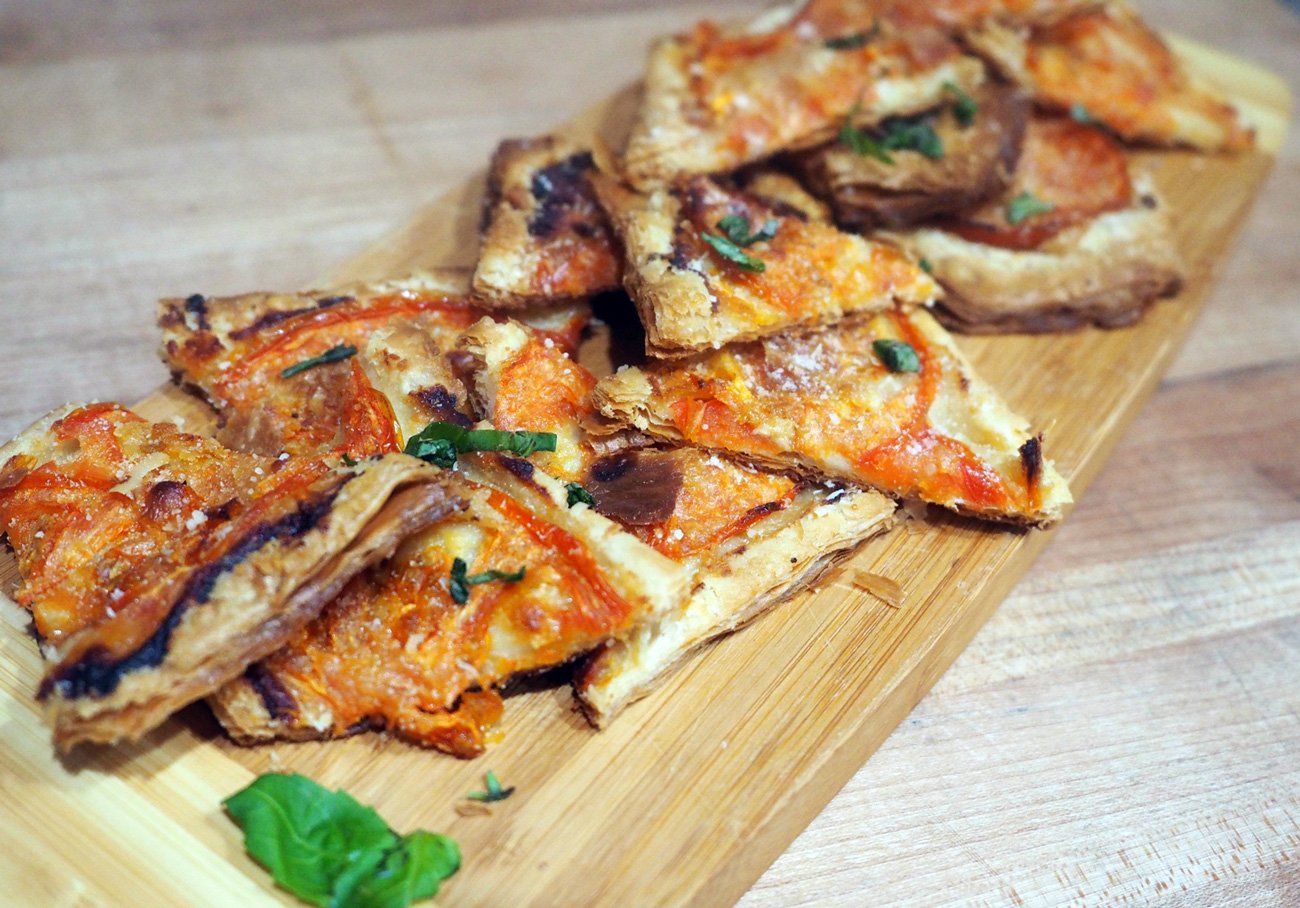
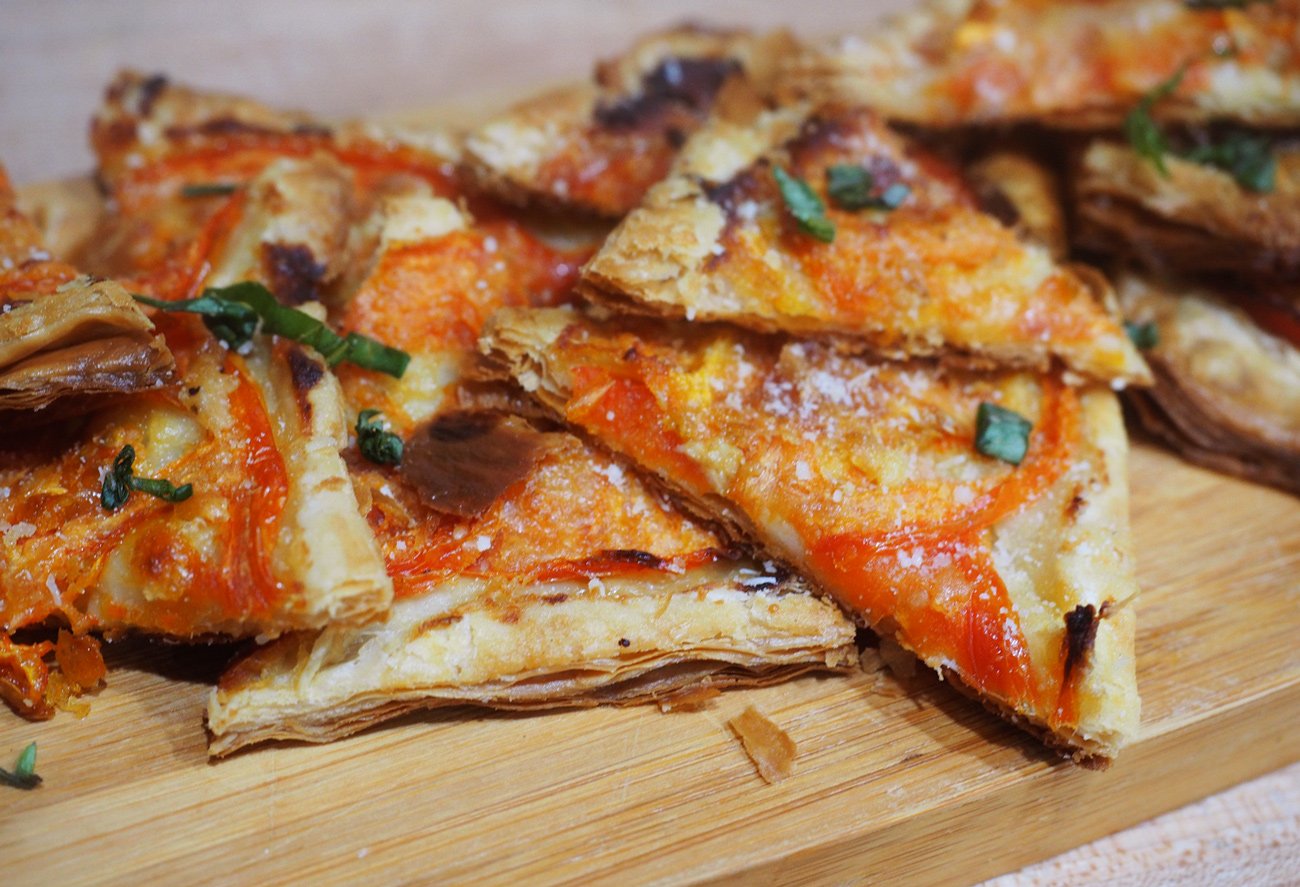
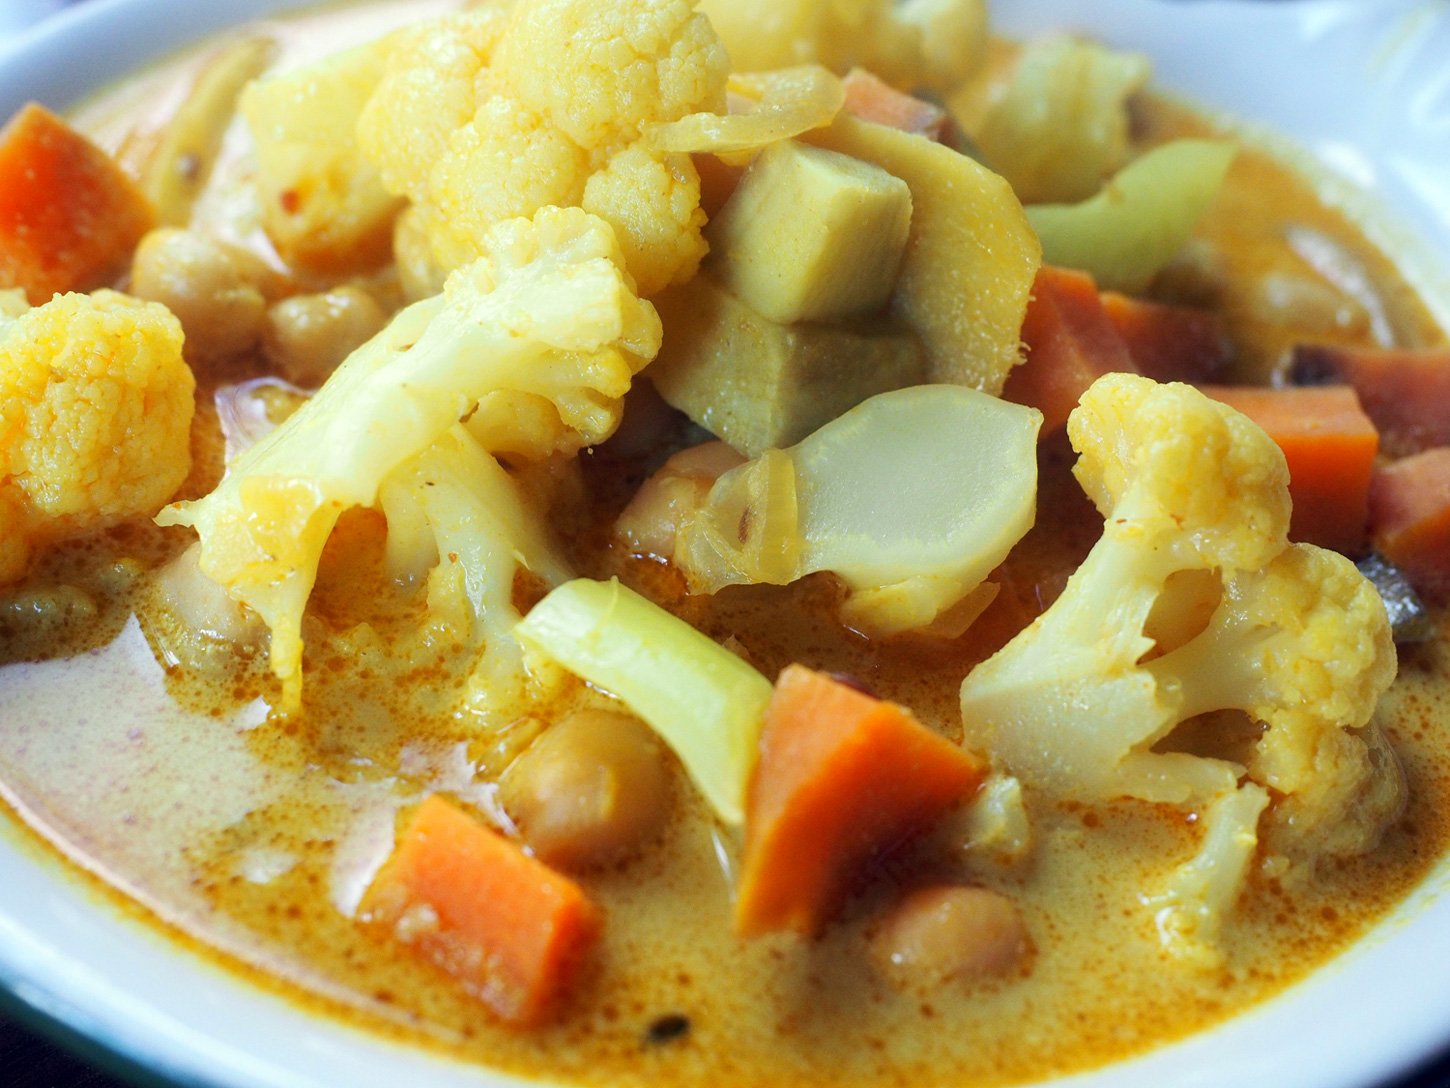
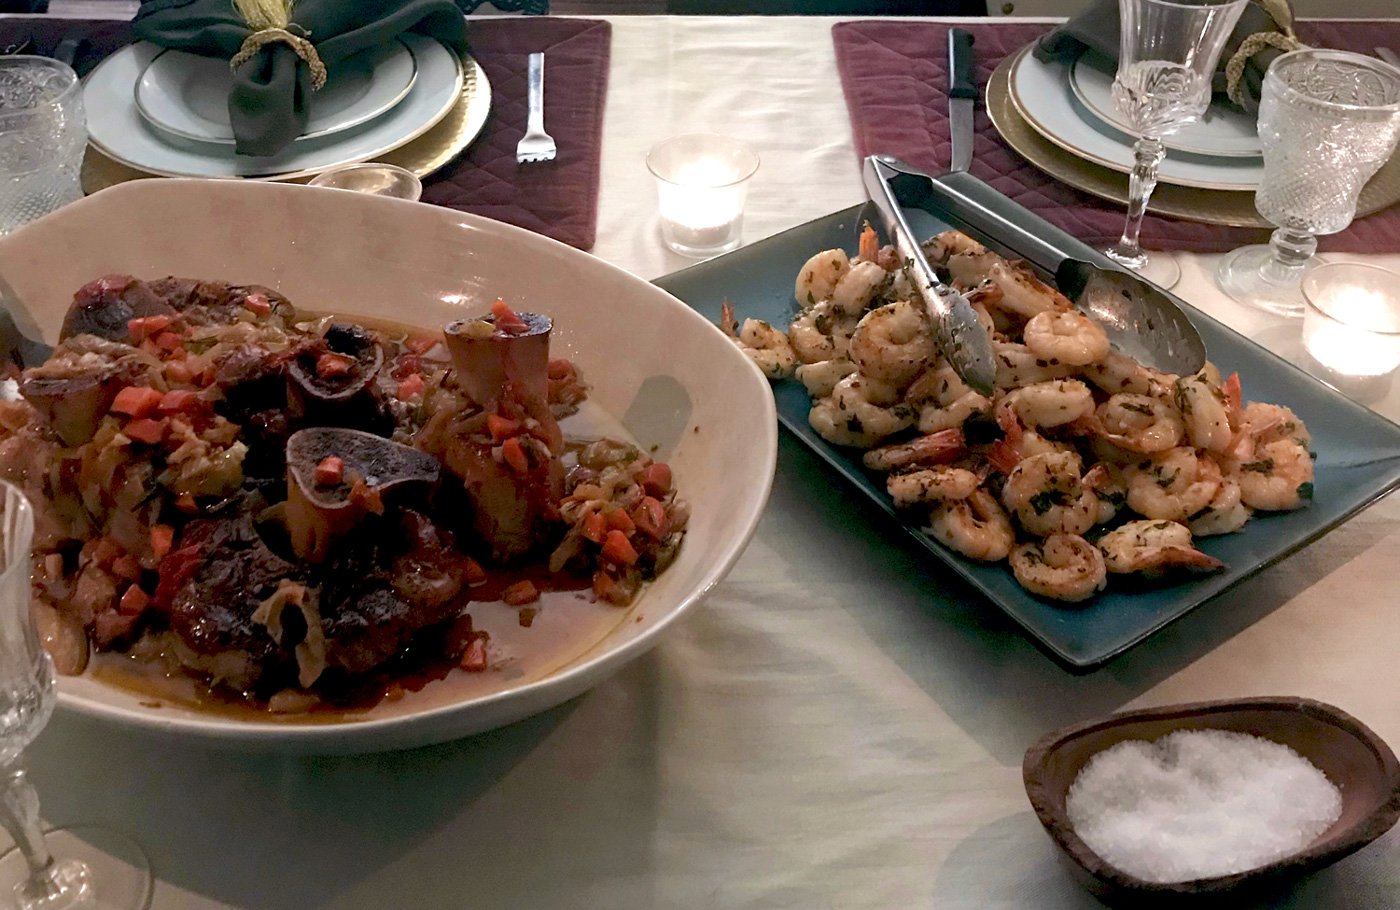
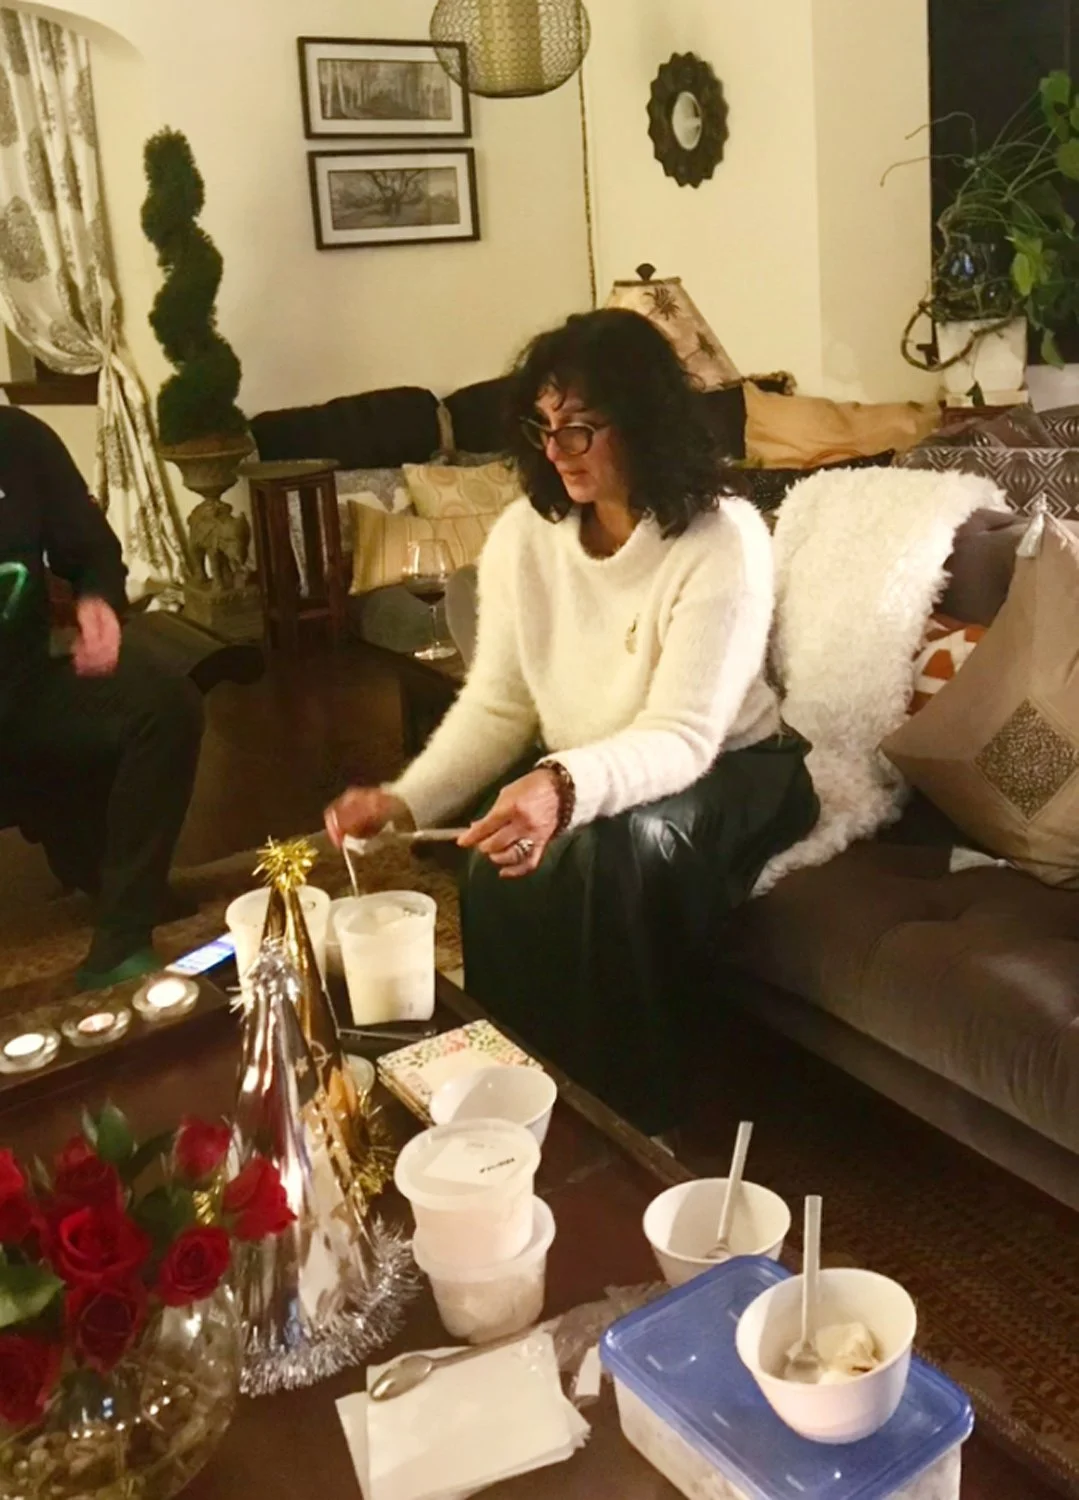
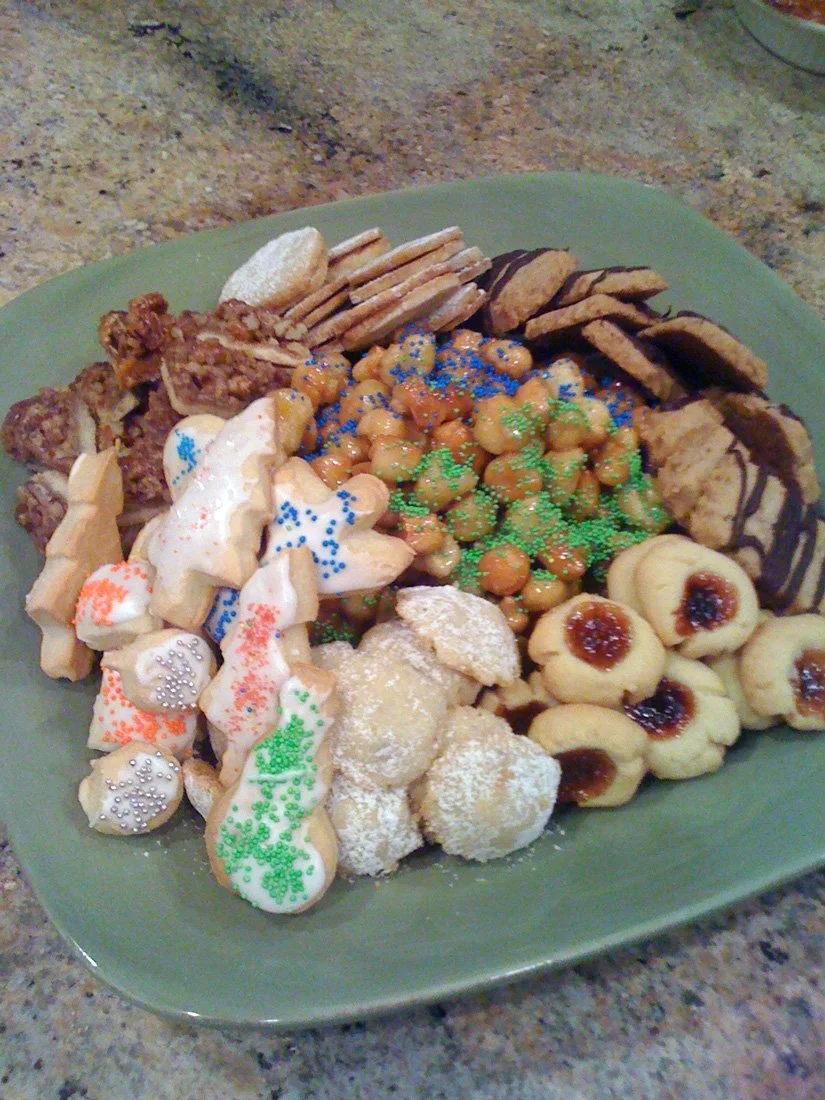
And in case you were wondering what we served… Here are a few images, and the menu.
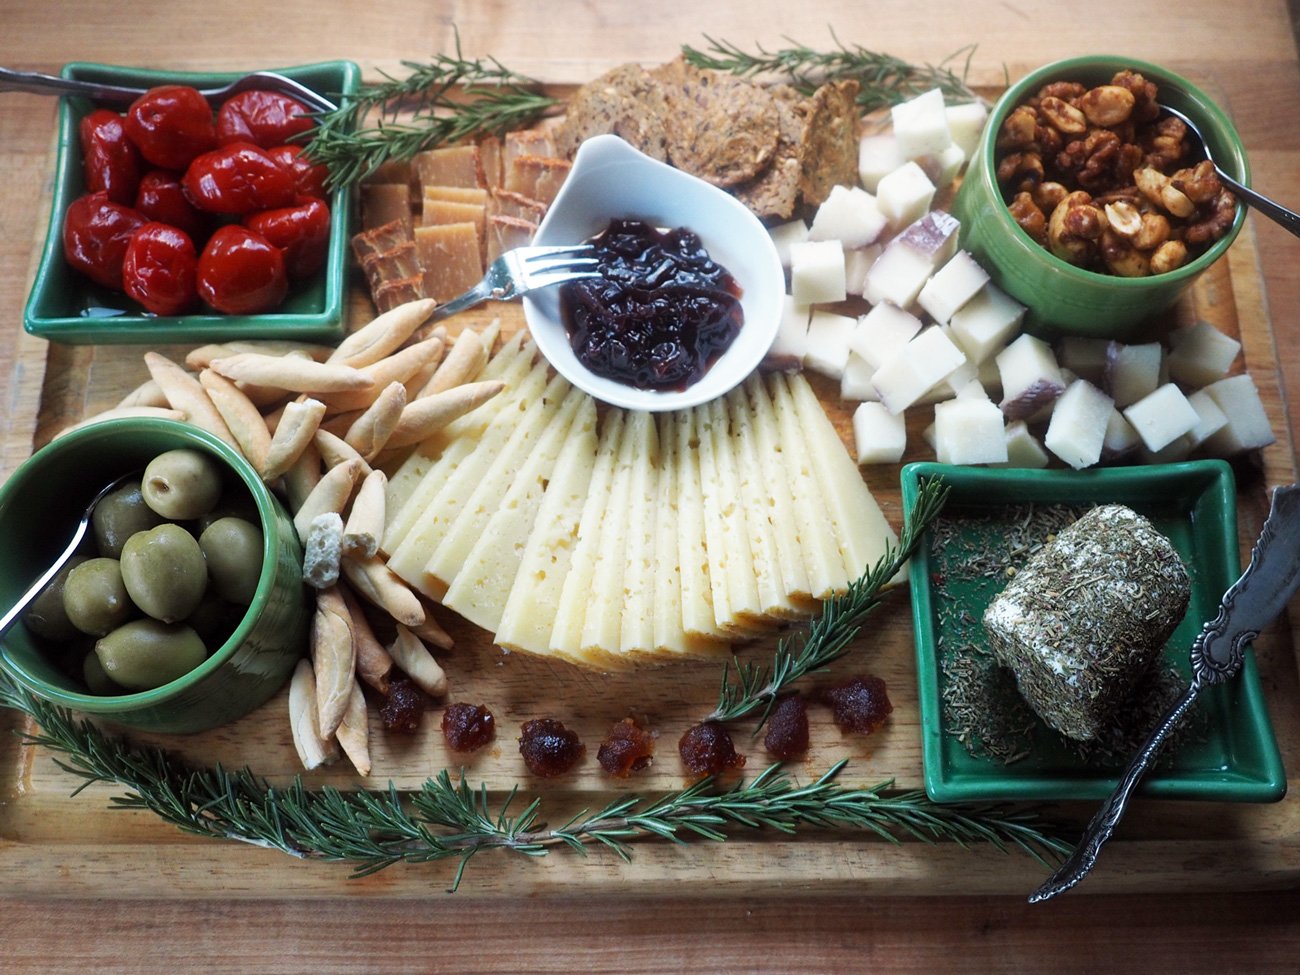
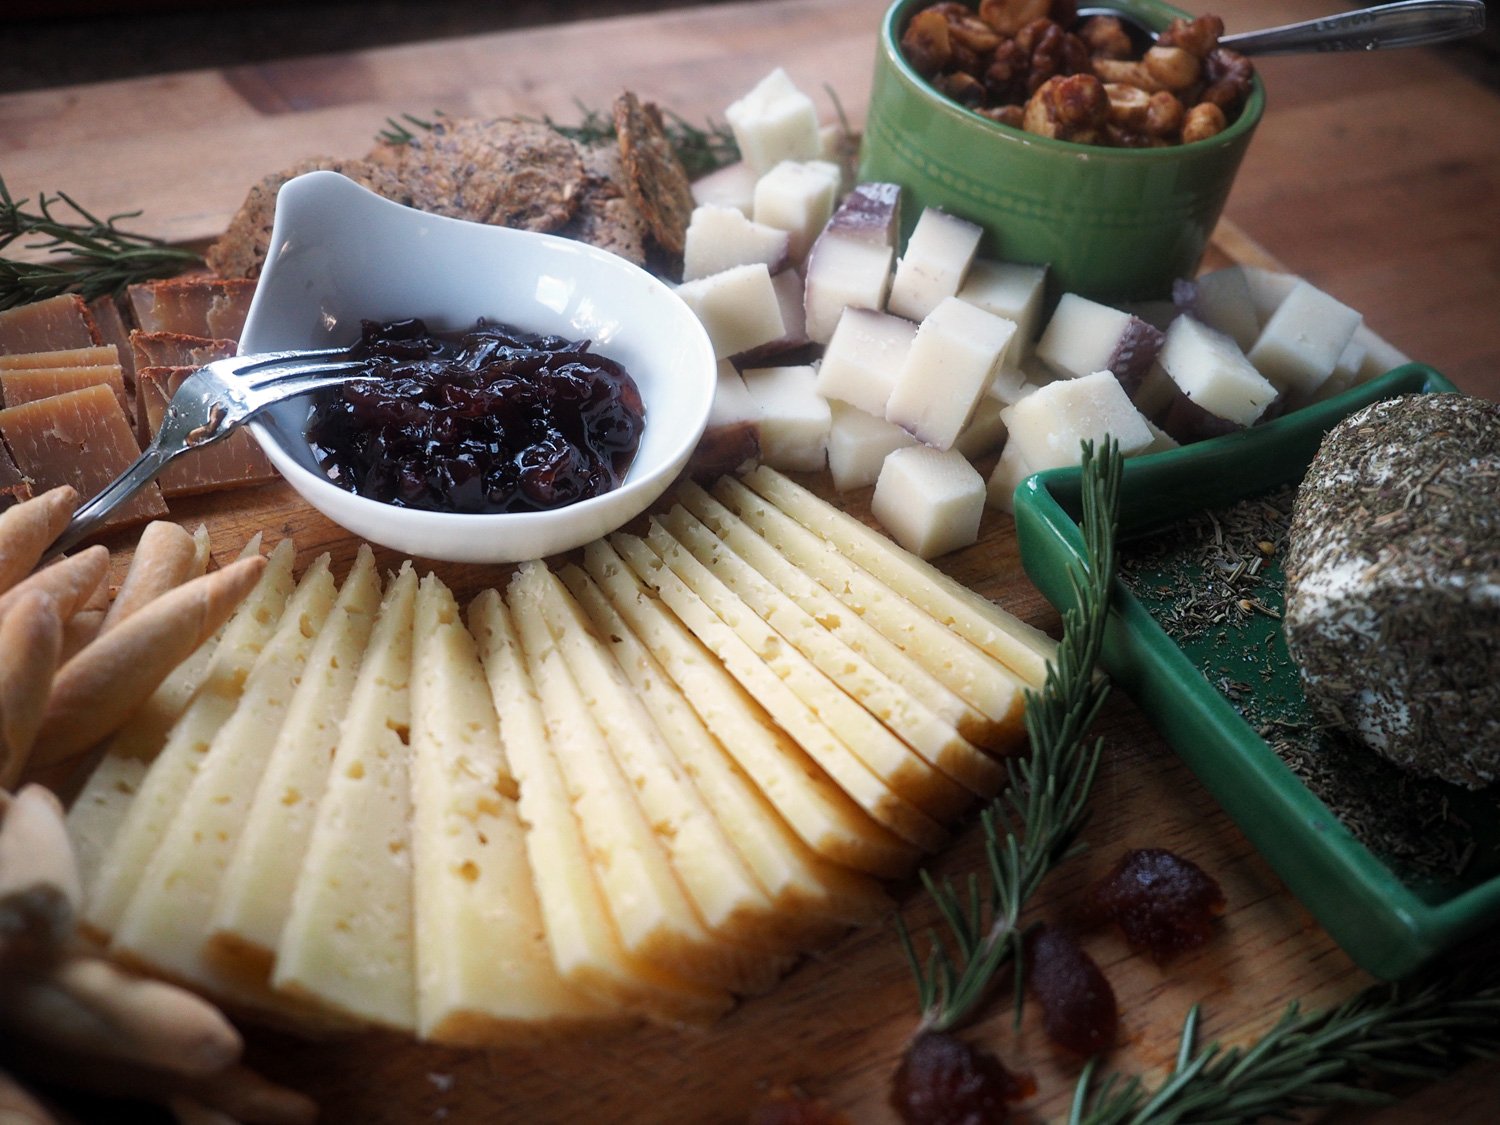
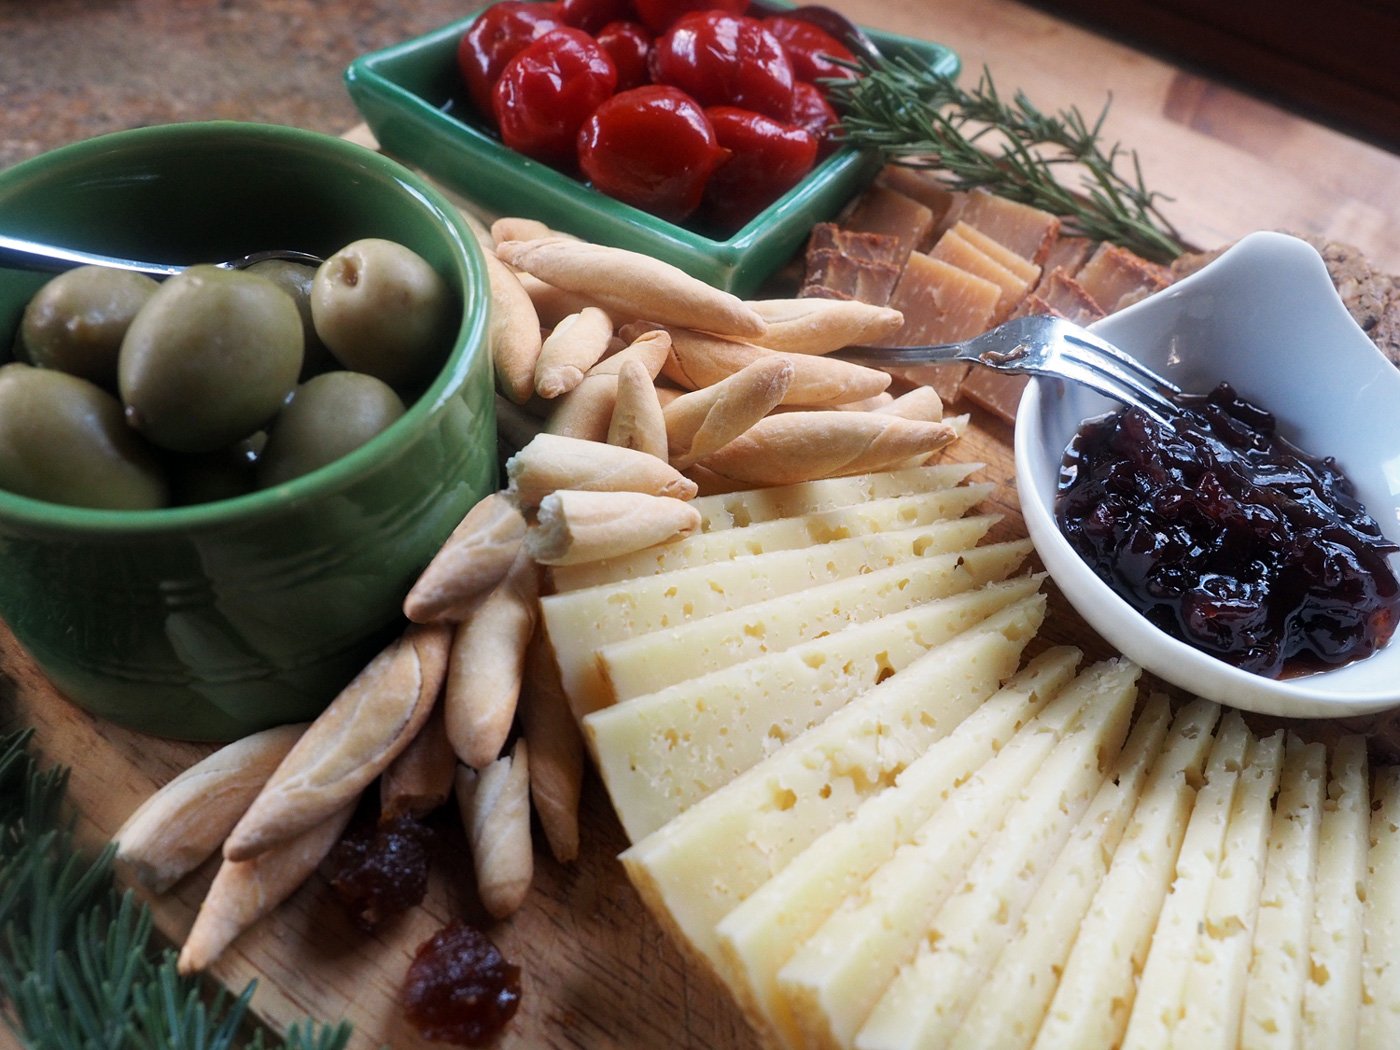
Cheese Board

(Hot Peppers, Olives, Mini Bread Sticks, Majorero Pimentón Cheese, Mary’s Gone Crackers, Murcia al Vino Cheese, Dana’s Nuts: Spiced & Candied, Goat Cheese with dried herbs, Jammin’ Onion Jam, Manchego Añejo, Apple Paste)

Tomato Tartlet

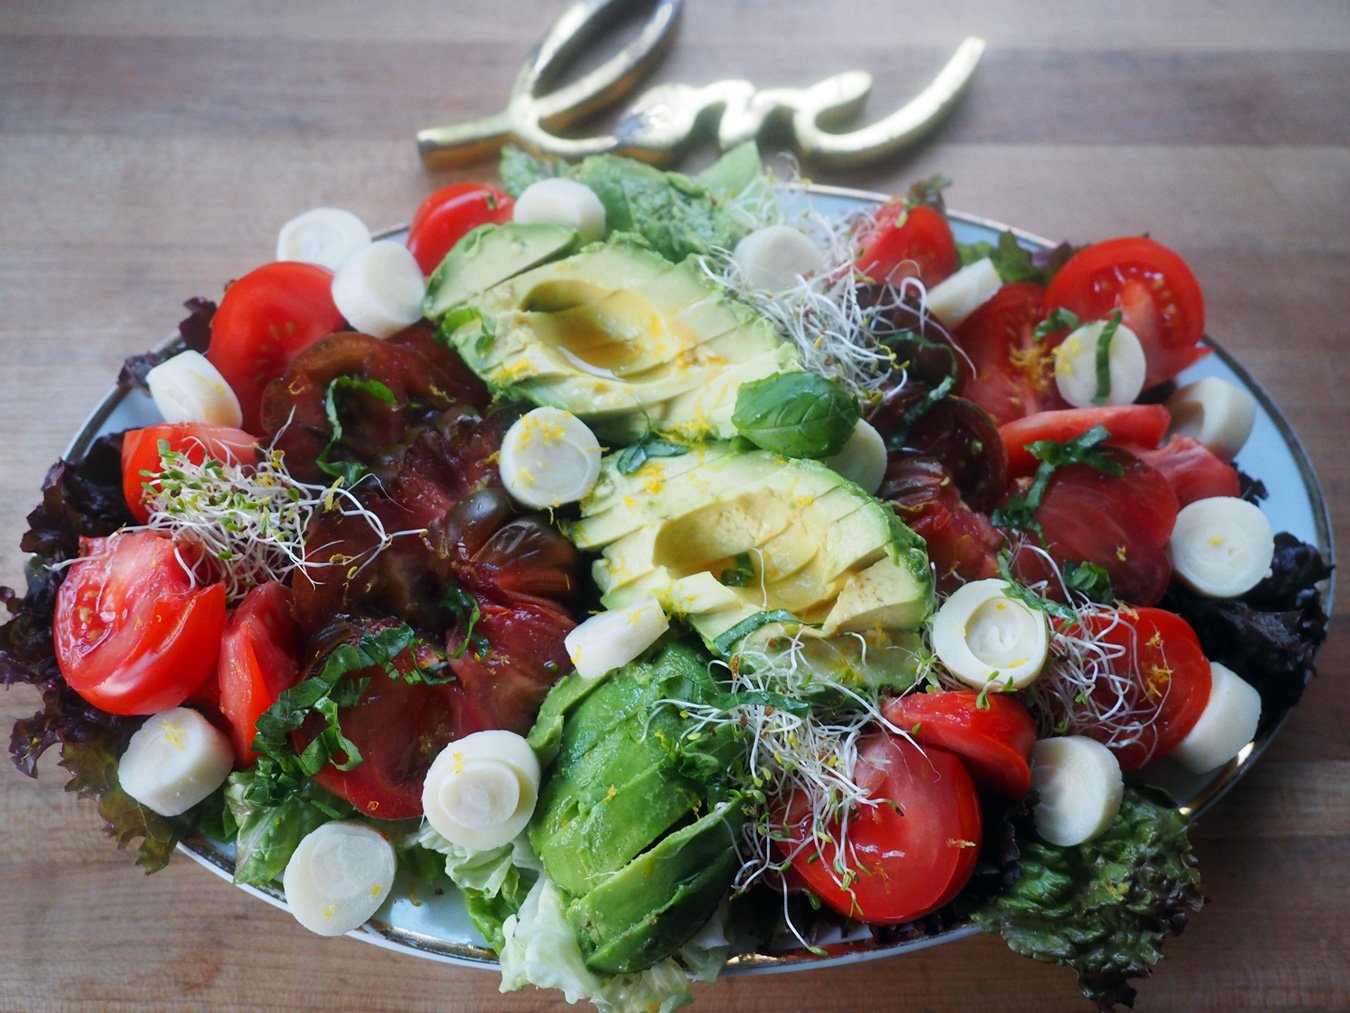
Tomato/Avocado/Hearts of Palm Salad

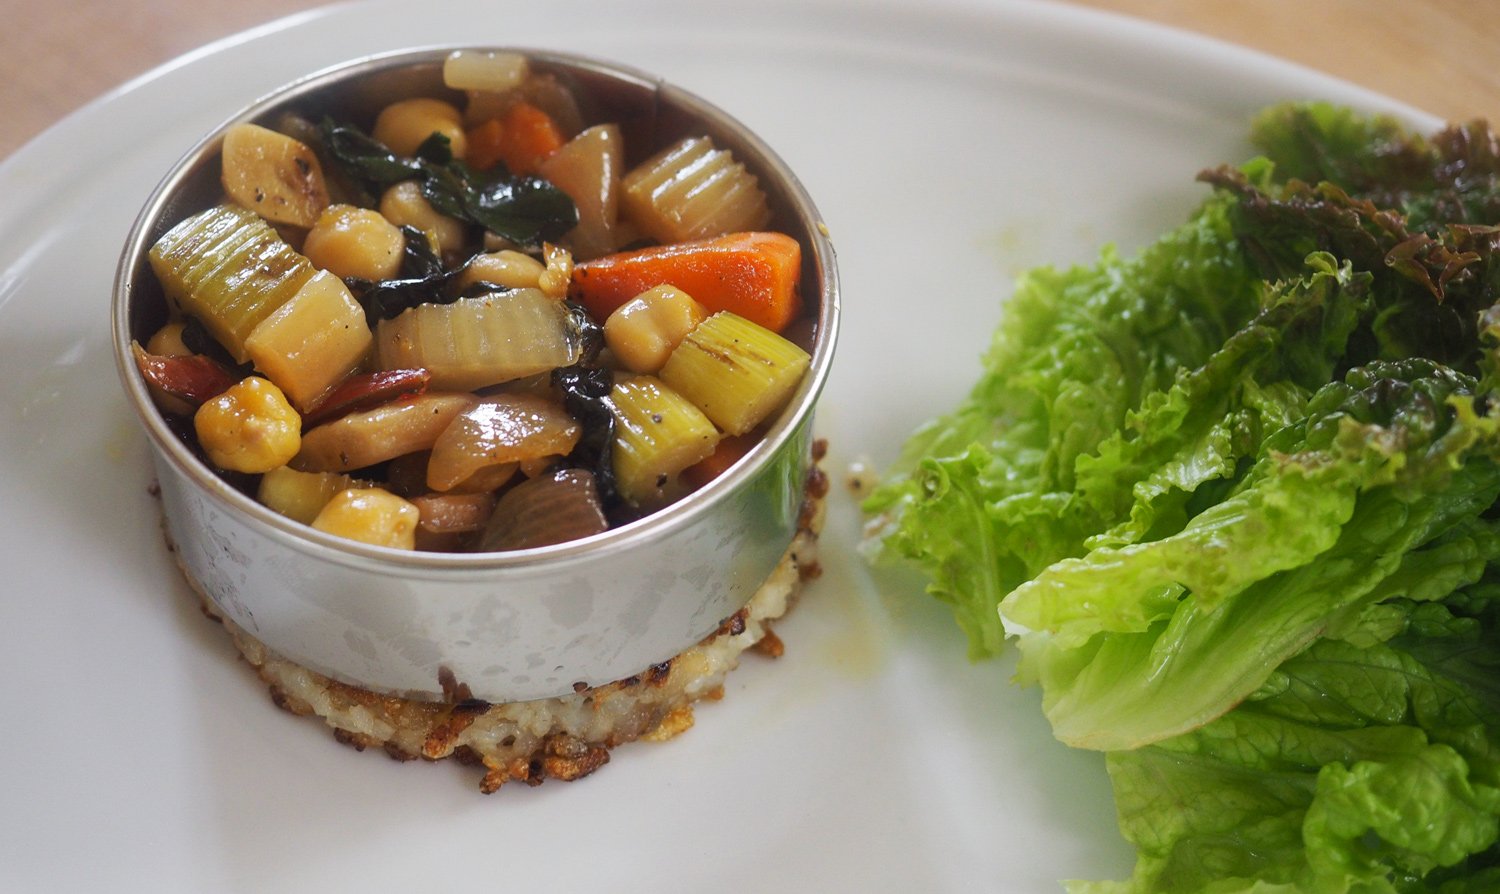
Cauliflower, Sweet Potato & Chick Pea Curry with Basmati Rice

Roasted Spiced Carrots & Onions

Oven Roasted Chicken

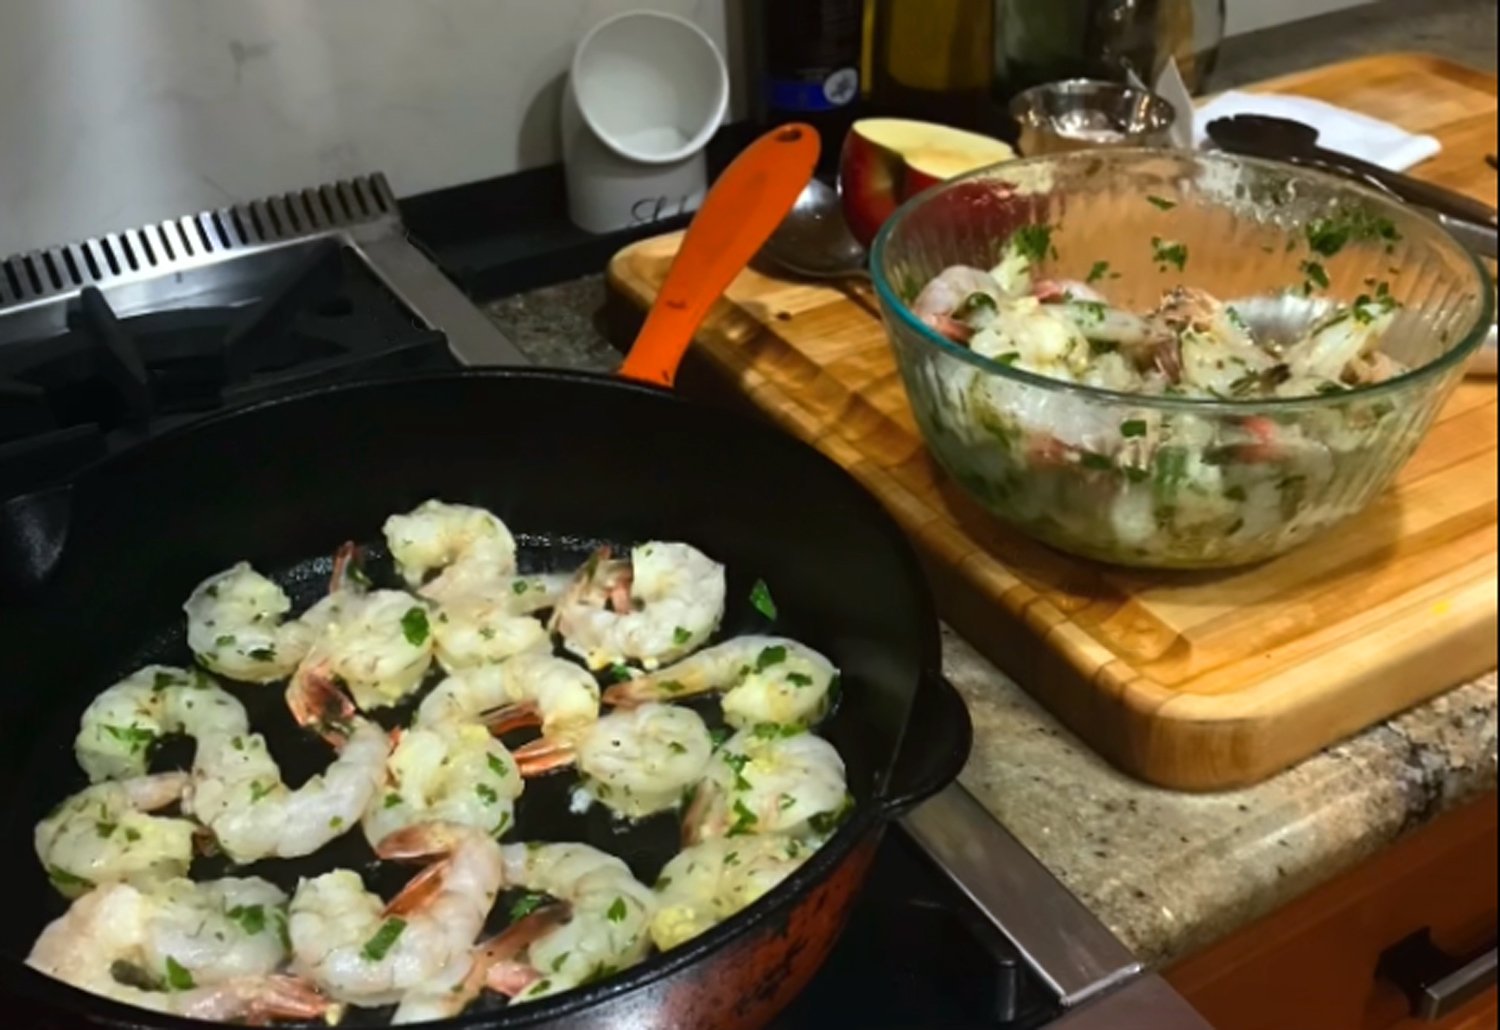
Apologizes, I didn’t take photos of the last two items to share.


Chick Pea Fritters - Gluten Free Treat

You know why it’s important to learn baseball when you are younger? So you can hit life’s curveballs when you are older. You never know when the universe is going to toss one at you. But rest assured, a few will be pitched your way. Some are serious and life altering, Some are less severe but still require adjusting. Some curveballs are disguised as opportunities. Actually, let me rephrase that. Most of life’s curveballs actually ARE opportunities.

This past summer, I had an awesome gig come across my plate. I was hired to cook for a family of 7 adults, providing lunches and dinners for a two week period. (The family ended up loving what I provided that they extended it for entire month.) This was a huge undertaking in every sense of the word. And there were plenty of fastballs and curveballs pitched my way.

Curveball #1: Refrigerator and freezer needs. I have 2 refrigerators with 2 regular freezers plus 1 full freezer. Yet that was not going to be enough. But as luck would have it our neighbors sold their house, moved out and the new owners weren’t moving in for a month. Coincidence or Fate? I say lifesaver as I packed their fridge and freezer to the brim.

Curveball #2: The clients many food restrictions which required a complicated menu planning.

Curveball #3: The management of each meal, heating instructions, and color coded labeling system. With so many containers being delivered, the only way they would know what to heat up was having a color coded labeling system so they knew what dish went with what and for when. They would also need instructions for re-heating and for sauces/dressings. M/L = Monday Lunch, F/D = Friday Dinner and so on.

Other challenging parts of the gig was that I had to deliver the food over an hour away twice a week which required a well orchestrated shopping-cooking- delivery schedule, using various coolers and pack out lists to ensure nothing was left behind. Add to that the various food restrictions which included what proteins some of the guests ate and others did not. This meant that I had to come up with two mains for every meal. Ensuring that every person had sufficient protein was like solving a Rubik’s cube. Oh, did I mention, gluten free? That part is easy for me since I’ve been gluten free for over a decade. So, I won’t even count that.

There were other curveballs but I think you get it.
Big, Big, Big. And I’m always up for a challenge, especially one that requires logistical thinking. I have the detail oriented mind to tackle this type of task. All bragging aside, it’s actually one of my super skills.

I am a very visual person. In order to tackle this monster, I needed to see it. At first, I starting handwriting the menu and the to do lists. Then I typed it into the computer. But soon realized that it was a living, breathing beast which needed to be shifted and modified constantly. Moving items around on the computer wasn’t as effective since all the columns kept getting out whack. I knew the only way to confront this monster of a task was the old fashioned method of sticking it up on a wall. I needed a system that would allow flexibility, full visibility and the ability to easily move food offerings around without shifting others out of place (as what happens in a Word Doc). This could be the next new meaning of a Moveable Feast.
I printed out each offering, cut them into small strips and added painters tape to the back. It was the only way to switch out an item easily after staring at the entire menu and realizing that I might be serving rice 3 days in a row. Or that if I moved a dinner to another night then I wouldn’t have the spicy slaw as a leftover for lunch 2 days later. Rubik’s cube or mathematical conundrum? Anyway, this system worked beautifully and allowed me to see the whole scope of the project and ensure the client was happy with the diversity of offerings. I left it on the wall as art!

My moveable feast. A ‘place and stick’ menu system that kept me from going batty.

I literally used it everyday to keep me on track

Everything was going along swimmingly until one day the client made a late decision switch which left a protein hole for the vegetarian in the family.

Curveball # I lost count: Need an additional protein but no time to go shopping.

So, how do you sneak in extra protein at the last minute using only what you have available? Legumes to the rescue.

I decided the fastest, easiest solution was to make chick pea fritters. Don’t ask me why I thought this would be fast and easy since I had never made these before. But the idea seemed similar to other pancake like food, so that equaled a decent plan. Naturally, it had to be gluten free. This really wasn’t that earth shattering of an idea. It only felt dramatic because I had less them 8 hours to solve the problem and make the food using only available items, in order to make it for the next day’s morning delivery.

Here’s how it went down.

But just a few ingredients: Chick Peas, Gluten Free flour, jalapeño, egg, scallions and cilantro.

Ingredients

(Makes 14 - 3” round Fritters)

1 39 oz can Chick Peas
3 T Gluten Free Flour (or Chick Pea flour. If you aren’t concerned with GF, then regular flour can be used)
1 Egg, beaten
2+ Tbsp Jalapeño pepper, minced (add more if you like more heat)
1/3 c Cilantro packed leaves, 3 T chopped
1/2 c Scallions, sliced
1 t Salt
1/4 t black pepper
1/8 t red pepper flakes, optional
coarse sea salt to finish

Tahini Dipping Sauce
1/2 c tahini
6 T ice water
3 T Lemon juice/zest
2 T scallions, sliced
1 t jalapeño, minced
salt to taste

Instructions

  1. Slice, chop and mince the aromatics.

Mise en place: Chop, slice and have all ingredients ready.

2. Mash the chick peas, leaving some larger and smaller pieces for texture.

3. Add the jalapeño, cilantro, scallions and mix.

4. Then beat egg with salt, pepper and red pepper flakes and add to chick pea until combined.

5. Add the flour 1 tablespoon at a time and mix until the egg is absorbed but still it wet enough to hold it together.

Squeeze a bit into a ball to ensure it holds together.

6. Using an scoop, choosing the size you desire. If you want them as appetizers make smaller ones. If you want them as a side dish, make them larger. Depending on your style and also how you will be serving them, it’s up to you whether you scoop and free form them or scoop and press into a cutter for perfectly equal fritters. Once you decided, scoop, flatten and place them on the sheet tray for fast work. Again, you can choose super flat so they are crispier, or slightly fatter for the thicker more substantial bite. Your choice depending on your needs/desires. Remember, my recipes can be followed exactly or simply be a guide for you to create and make your own modifications. However it is important that when forming these pack them tight so they hold together.


Choose your tool

Scoop for free form, or scoop into a mold

Size matters…

7. Refrigerate for 1/2-1 hour or freeze for 15-20 minutes. This step helps to get the fritters together then frying.

Prep makes easy work. Plus I do recommend placing them on tray to refrigerate or freeze before frying.

8. I like using a cast iron pan when I frying. The heat from the pan allows for a good sear. If you don’t have cast iron, use your best fry pan or grill pan. Working in batches so as to not drop the pan temperature, add oil and about 6 of the fritters. Turn with a small spatula. When done, remove and place on a paper towel and sprinkle with coarse sea salt.

I prefer thinner fritters because I’m a sucker for crisper, crunchy food.

Golden brown and crispy. The paper towel absorbs any excess oil.

I made a tahini dipping sauce to go along with these. A little extra protein from the sesame. Below is the tahini sauce process.

Tahini

Whisk in ice water, and you can see how the water not only changes the consistency but it lightens up the color as well.

Add lemon juice, zest, scallions, jalapeño and whisk together.

Creamy topping. Try it on other foods.

The client immediately texted to let me know that her husband consumed almost the entire batch himself. Huge success. Happy customer, and now I have another little appetizer/side dish to add to my collection and to share with you.

A yummy combination.

You know me, my dishes are never just one use. They usually do double and triple duty. Serve up as an appetizer, or a side dish. You can even swap out toast and use them as a base for eggs. I made one poached egg and one fried egg to place on top of my fritters. I added a dollop of yogurt and some fresh parsley. A few apple slices rounded out this breakfast. I’d say I hit this curveball out of the park.

I fried my egg in a metal round the same size as the fritter to make it nice and tidy. If you use this method make sure to oil the inside of the mold so the egg removes more easily.

Left side fried egg, right side poached egg. Delicious, nutritious and packed with protein. Apple slices added a lovely crispy, freshness.

A happy husband


A Pot of Versatile Veggies - Refrigerator Remnants


I know it’s been awhile since I’ve posted a new recipe.  Between making sure I provided a few posts with helpful tips and holiday entertaining, and focusing on fulfilling orders from my customers, I let a period pass without dedicating time to share recipes. Although those may be some reasons, truth be told, the more obvious one is that without our usual entertaining schedule, I’ve been less motivated to experiment and haven’t had the need to invent new dishes to serve guests.  That part makes me a bit sad. Ok, a lot sad.

Even though we haven’t been entertaining doesn’t mean I haven’t been cooking.  On the contrary, I’ve actually been cooking up a storm, doing more than ever since I starting providing weekly meal service to select customers in my local area, plus baked goods via shipping.  Plus, I’ve had some catering opportunities pop up as well.  So cooking has been firing up my kitchen, it just didn’t feel like there was anything to blog about.

Or so I thought. As life often does, it shines a light on a topic and then energy is sent forth which appears in full bloom. Here’s a clear example of what I’m talking about. Did you ever think about a friend and then suddenly that friend calls you? It’s like sending out a smoke signal, and you get a return response. That energy swirls around us constantly. It happened just like that to me recently. I had been talking to three friends about the fact that I have not blogged about a recipe in quite some time, and expressed my mixed emotions about it. So, imagine my surprise and thrill when I got the spark to create again. That particular day while I was doing my usual refrigerator ‘cleanse and see what’s still viable’ exercise, I felt a sudden reminiscent pang of my old something from nothing style.  It dawned on me that I have been creating dishes for JuanCarlos and myself all along but just hadn’t been focused on photographing, documenting and writing about them.  When I looked at this batch of veggies that needed some love and attention, I thought this could be worth sharing if nothing else but to motivate you to clean out your fridge. Admittedly, this recipe is not earth shattering. In fact, it’s quite basic. But it’s significance is greater than the recipe itself. One, it motivated me to photograph and document again. And two, hopefully it will inspire you to go through your fridge and figure out what to do with your miscellaneous food items. I should create an ongoing series entitled: Refrigerator Remnants.  You see, inspiration is everywhere.

Veg.Setup.jpg

Fennel, Celery, Rainbow Chard, Garlic, Onions, Carrots. The absolute basics.


Basically, this process is nothing more than pulling out all those unused items in your fridge that are at their last hope for use, and then coming up with a plan on how they all play together.  As I mentioned, this ‘recipe’ isn’t rocket science.  It’s actual a pumped up mire poix or soup base but without the liquid.  But it is hearty, tasty, versatile, and most of all met the requirements of using items that might have ended up in the trash a few days from now. 

This pot of veggies can be used as a side dish to any protein: meat, chicken, fish, beans or tofu.  It can be a main with a heaping helping of rice or couscous or even piled on top of a baked potato.  Or can even be part of a taco filling or quesadilla.  I’m sure there are plenty of other ways to serve up this veggie packed plate. Feel free to use any of my suggestions but I’ll let you figure out how you want to serve them up.  For now, I encourage you to go through the exercise of rummaging through to find your Refrigerator Remnant Recipe. Remember, these were the items and amounts that I had in my fridge. The goal here is to inspire you to create with whatever you have, and balance the flavors with the amounts you have. For instance, even though I had a ton of celery, the fennel was what was most pronounced in the combo below.

Here’s mine:

Ingredients

2 med onions (approx. 2.5 c )
4 lg carrots (approx. 3.5 c)
4 c celery
3c fennel
2 garlic cloves
12c red Swiss chard
Olive oil, salt & pepper

Instructions

  1. Cut all the vegetables into large chunks.

Chopped.Veg.jpg

As I said, a pumped up mire poix.

2. Cut and discard the ends/toughest part of the Swiss Chard. Then cut the remaining ribs out and chop them into smaller pieces..

3. Cut the leafy part of the Swiss Chard into strips.

4. Pour oil, salt and pepper into the pot to heat up then add all the vegetables except the leafy parts of the chard. Add whatever spice combo you desire. See below of different combos to try.

Raw.Veg.pot.jpg

5. Cook for 20-25 minutes, until tender but still al dente. You don’t want these to cook down so much that they become mush. You want a tooth bite to them.

6. Add Swiss Chard leafy parts, cover and cook over low flame for 5-8. minutes until wilted.


I didn’t add any additional spices since I made such a big batch I didn’t want to commit to one spice profile. I figured I would enhance it each time I warmed it up. This worked out fine as the anise from the fennel really flavored the dish to the point of not needing anything else.  But this is one of those dishes where anything goes.  Make it your own.  Here are some spice combos to try.

Italian Flavor: Dry Thyme | Oregano | Red Pepper Flakes | Cannellini Beans

Indian Flavor: Turmeric | Cumin | Cinnamon | Cloves | Curry | Coconut Milk

Middle Eastern: Cumin Seeds | Fennel Seeds | Sumac | Cardamom | Chick Peas

French: Herbs de Provence | Tarragon | Chives | Chervil

Spanish: Saffron | Pimentón de la Vera/Paprika | Cayenne Pepper

Mexican: Cilantro | Chili Pepper | Cumin | Allspice | Coriander

And here is how I served it up.

I had leftover ginger/red onion paella rice so I shaped it into a large patty and fried it up.  Then topped it with veggies.  For JC I added the leftover chicken thigh he had from the night before.  I know, I know, nothing earth shattering here, but I know I have some viewers who get overwhelmed with trying to figure out what to do.  This is just one way of culling everything together.


Leftover ginger/red onion paella rice. Perfect for making fried rice patties.

Note about the rice patty. Since this was leftover paella rice that had been previously sautéed with oil, ginger and red onion it had a natural stickiness to it that allowed it to hold the shape without any binder. If you only have long grain rice then you will need to add a binder of egg and flour in order to hold the patty together.

Why make one when you can make two. This fried rice patties are so delicious.

Use a cast iron pan with oil and high heat to get a crispy exterior.

Golden brown perfection.

Use the same ring for the veggie mix placement makes a nice, neat presentation.

The bigger chunks make this a more hearty side dish.

Using the same ring mold that you used to make the rice patties, place on top and fill with the veggie mixture, and pack tight.

I added chick peas to my mixture to add protein.


New Year's Eve - A Private Party

This was way back when pressing our heads together was a natural, safe thing to do.

Ok, Christmas down. Onto New Year’s Eve. And just as with these past few holidays this year, some adjustments might be required. Smaller gatherings, more intimate, less in your face screaming, yelling, raucous partying to ring in the New Year. Who am I kidding? I have never done that. New Year’s Eve or any other eve, raucous partying just isn’t my scene. Which is why two years ago before the shit hit the fan, we invited our dear friends, Tecla and Scott, to enjoy a quiet, food filled festivity to usher in the New Year. Happily they agreed, and we had the most fabulous time. They stayed the night and then we continued to fill our bellies with brunch the next day. This is how I love spending time. Intimate, one on one, quiet gatherings so that the conversation can be meaningful and intended, and not having to jump from guest to guest. Who knew that New Year’s Eve 2019 would be practice for the small gathering existence we have been living for the past two years.


This year, as with last, JuanCarlos and I will spend it alone by the fire, together counting our blessings, feeling grateful for how safe we are able to remain in our home, working at careers we both love that afford us comfort, security, health and joy. And we can reminisce of celebrations past, and dream of the next New Year Eve’s that we can spend with our friends and family.

If you are able to gather safely with loved ones this year and need some entertaining ideas, here’s a jog down memory lane of what we served that evening. The time when we thought 2020 would be a year of clear vision. Well, it certainly did open our eyes, just maybe not realizing what we would see.

On to the offerings. Tecla and Scott are such joys to be with. Salt of the earth types that are just darn good people. They appreciate good food and wine, and good conversation and laughs. It’s always such a treat spending quality time with them. Clearly, you can see that Tecla is the life of the partying. She wore a boa!

Me, Tecla and JuanCarlos. Scott was taking the picture. Photo Credit: Scott

We decided to start the party in the kitchen, which we never used to do since our kitchen had some serious circulation issues. But months before we completed a small refresh in the kitchen that helped the flow and allowed us the ability to sit around the center island/table. So, we began with a few starters there.

Removing the island that was originally attached to the wall and centering it completely modified the kitchen’s functionality. Now we can host in the kitchen. So we did. Just for appetizers. Photo Credit: Tecla

  • Burrata with Heirloom Tomatoes

  • Crabmeat Cocktail (Lump Crabmeat with diced red pepper, avocado, cilantro and lemon juice)

  • Carrot Ginger Soup

Crabmeat cocktail. You can swap out the crabmeat for shrimp.
Photo Credit: Tecla

JuanCarlos engaging in some sort of deep discussion.
Photo Credit: Tecla


Simplicity of ingredients. When you use the freshest, best quality, that’s all you need. Photo Credit: Tecla

Carrot, Ginger, Coconut Milk Soup is so soothing and a perfect way to start a meal. Photo Credit: Tecla

Then we had dinner in the formal dining room. Personally I am a fan of a separate dining room, and not of the open concept craze. I could explain in depth why I feel so strongly on this topic, but better to save that for another time. Back to business.

I was pleased with the winter wonderland feeling of the ivory tablecloth peppered with cranberry colored velvet place mats and hunter green napkins corralled by gold tasseled napkin rings for a touch of elegance. Small floral arrangements of the same color scheme balanced out the table with candle lights everywhere for a warm glow. Plus the magnificent flowers that Tecla and Scott brought was a perfect addition.

I had made small floral arrangements but Tecla and Scott brought this amazing floral bouquet to adorn the table. It was stunning and perfectly complimented my table setting color scheme. Photo Credit: Tecla

Dinner consisted of:

  • Pappardelle with Osso Buco

  • Sauteéd Shrimp

  • Roasted Beets

  • Marinated Feta

  • Butter Lettuce Salad with Parsley Leaves & Sliced Pears

Osso Buco is rich and decadent. Sauteéd shrimp with lots of garlic and herbs are always so satisfying, and easy to make. Photo Credit: Tecla

Seriously, is there anything better than a steaming bowl of pasta? NOTHING Photo Credit: Tecla

Let’s eat. Photo Credit: Tecla

Then we had dessert and after dinner drinks by the fire in the living room. I love moving around and utilizing as much of our home as possible to entertain. I think it keeps the evening interesting and you can create separate environments for each stage.

Our large Indonesian coffee table has been the ideal landing spot for appetizers, dinner or desserts.

Dessert was simple and easy. I made a variety of flavors of homemade ice creams, homemade Christmas cookies, our Italian family tradition, Struffoli. What is really interesting is that Tecla was born and raised in Florence Italy. One year I sent her struffoli for the holidays thinking that she would enjoy an old Italian tradition. Much to my surprise these were not part of her holiday tradition. My grandmother was from Salerno, in the south, near Naples. Food and traditions are quite different from region to region. Yet, somehow it doesn’t matter north, south, east or west, tradition or not, once you try struffoli they will become part of your new tradition.

Stuffoli: fried dough balls soaked in honey. What’s not to love?

Not fancy, just scooping out homemade ice creams.
Photo Credit: Tecla

Traditional Christmas Cookies

The next morning, I utilized much of the previous night’s table setting to serve brunch. I had pre-made most of the items a day or two before, so it was mostly a matter of placing everything out for us to enjoy.

When you are hosting a brunch for overnight guests, it’s important to think the menu through so you aren’t overloading yourself with having to prepare too much. Buying some items that require nothing more than placing them on a plate or bowl mixed with homemade items that can be prepared well in advance is the stress free way to go. A Tortilla Española is perfect method to serve up eggs and potatoes without being a short order cook. A Leek & Onion Goat Cheese Tart provides another warm, rich dish that compliments everything else. Both these can easily be made a few days ahead. I am always making my Crunchin’ Coconut & Seed Granola for customers, so that was readily on hand.

Tecla enjoying a few morning treats and good dose of coffee. A bountiful table that had a wide assortment from which to choose.


Alright, maybe we did cheer a little bit. Photo Credit: Tecla


We had so much fun that night. When I look at these images now I am filled with two contrasting emotions. One of sadness at the thought of how clueless we were about the hell storm that was about to besiege us. Two, of great joy and pure gratitude for being able to spend such a wonderful time together. And for the sheer, carefree feeling we all felt that evening. I look to these photos and envision the day when that kind of untroubled, happy-go-lucky, merriment can enjoyed again.

Wishing you all health, health and health for that is the greatest wealth of all. And love.


The evening sealed with a kiss, and a promise of more to love to come.

Napkin Folding - A Few Festive Ideas

Ok, here we are on the heels of Thanksgiving and more festivities are rushing our way. I know what you are going to say. It’s the same time period every year. Yet somehow it feels like the time between the two holidays gets shorter and shorter. So, if you are one of the lucky ones that’s been tapped twice for hosting duties, bless you, and you may need some new entertaining tricks.

Since I have noticed that one of the most highly viewed posts on my blog is Napkin Folding - 5 Basic Folds - Countless Options, I figured that might be where a few fresh ideas are needed. That post seems to really resonate with readers around the world, and I hope it continues to provide simple yet pretty options for your table settings. But if you’ve already used up those ideas, a bunch of festive options might come in handy right about now.

This post isn’t as extension as the previous. I didn’t show all the ways you can modify or adorn each one. And I didn’t show perfectly finished place settings, but I did give you a little something extra.
Video demonstrations to show exactly how to fold each one, plus bullet point step by step instructions.

Cue the video tape!

Let’s start with the most obvious festive fold for the season…

The Christmas Tree

I used a deep forest green square napkin. Of course, you can use whatever color you want, the tree shape is clear but green drives the theme home.

  • Fold in half, and in half again to create a smaller square.

  • Fold back the first open edge up towards the top of the triangle point of the napkin.

  • Continue to fold up each open edge to create layers.

  • Turn the napkin over and fold the sides inward toward the bottom edge

  • Flip back over, making any tiny adjustments, and add a decorative topper. Or just leave it as a plain tree is just fine, too.

The Holiday Wreath

I used an orange and green plaid napkin. I felt it gave more visual interest as a wreath. Of course, you can use whatever color you want, but I recommend a multicolored option to add to the affect.

  • Accordion fold the napkin.

  • Holding one end, twist the folded napkin all the way to the next end.

  • Pull one end through a napkin ring letting the edges stick out.

  • Tuck the other end into the ring.

  • Adjust so it’s round and add a decorative element.


The Poinsettia

For this one, I like using a napkin that has a border to help create more of a flower petal effect. But if you don’t have napkins like that it’s fine. The shape is unmistakably flower-like. Back in my catering days we used this folding method to create decorative liners for bread baskets. I figured why not make a bold statement at each place setting with this fold that is reminiscent of large Poinsettia petals.

  • With right side down, fold each corner into the center to create a smaller square.

  • Holding the center together, flip the napkin over and fold each point into the center creating an even smaller square. I find flipping it right onto the plate makes it easier so the shape remains beautiful without having to move it.

  • Then holding the center points, pull the under fold out and up to create a petal. Repeat for each corner.

  • Simply placed on the center of the plate it creates a big, bold statement.


The Menu Envelope

Some of us go all out and actually print out a menu. Instead of just placing the menu on the plate, why not conceal it within a napkin envelope. And for those who think printing up a menu is overkill, reconsider for these top three reasons.

  1. It informs your guests of the glorious meal that awaits them

  2. It shows you took the time to curate the menu.

  3. It creates a pretty keepsake for you and your guests.

Onto the fold. Use a square napkin, color of your choice. I chose white for a traditional envelope feel, here’s how it goes.

  • Fold in half, and half again to create a smaller square.

  • Place the folded corner edge at the top, then place your menu in the center

  • Fold the side corners in over the sides of the menu

  • Fold the bottom triangle edge up towards the middle and tuck the top edge under to reveal the top of the menu

  • Fold the top triangle down to close the envelope, and adorn with a decorative pop of color or a sprig of rosemary

You can also leave the menu out placed on top of the envelope.

The Fountain Burst

You can use any color napkin. I chose one with a dainty border to impart a fringe edge.

  • Fold in half, and then accordion fold the entire napkin.

  • Pull the bottom of the napkin through a napkin ring. (If you don’t have a napkin ring, you can cut paper towel tubes into rings. Since it will be covered for the finished result it’s not crucial that you use some pretty napkin ring. You can even use ribbon to tie it.)

  • Pull the napkin through 1/3 the way up, then tuck the bottom edges up and into the ring, covering it completely.

  • Place onto the plate and fan out the top portion to create a fountain burst across the entire plate.

Or you can leave the bottom untucked and let it fan out on the bottom as well. That’s pretty too!

I hope the videos helped to demonstrate how fairly easy these are to pull off. This was my first video demonstration, so please be kind with your comments, but any and all feedback is always welcomed. I’m learning as I go to help give you a more visual representation of my work. Lastly, my apologies that these weren’t in full table set ups, but I know that your imaginations and creativity will bring the entire table setting together. Just in case you need a head start, here are a few suggestions:

Take cues from the napkin theme you choose to inform your table design. For example, if using a Christmas tree napkin, keep the centerpiece simple by laying down some greens and adding votive candles as a table runner.

Same goes for the Holiday wreath. Maybe twist greens into a circle and place the votives in the center to mimic the wreaths.

I hope these napkin folds help bring cheer to your holiday table.

May you have a safe, healthy and joyous Christmas

May the New Year usher in a true sense of health and well being for all of human kind.

Blessings!