Napkin Folding - 5 Basic Folds - Countless Options

orange.tie.jpg

I asked. You answered. Now the ball is back in my court to deliver.

Some of you have requested simple, yet elegant ways to fold a napkin.   Sure, you can just plop a napkin down next to the plate. Why not, what's all the fuss, right?  Guests are just going to place them on their laps anyway.  But I will ask you this one question, and then see how you feel about just plopping that napkin down.

When you enter the home of a host/hostess and see a table set with place settings and napkins lovingly positioned, how do you feel? 

1. Oh Ah, what a beautiful, welcoming setting. I feel special.

2. Oh yeah, that's where we're going to eat

If  you answered #1, keep reading.  If you answered #2 grab some other reading material and forget about scrolling through the rest of this post. I promise next week will bring something of more interest for you.

Setting a table can be as easy or as complicated as you want. The same goes with the finishing touches such as  folding a napkin.  I choose the simple method, but still try to make an impact.  Some of the styles below are quite basic with a twist. They are geared a bit more towards the festive side for the holidays, yet any of them can be used or modified for any occasion.  

The idea here is not to twist yourself up as you fold napkins.  Sure those fancy, schmancy, origami style versions look impressive.  But let's face it, those take a ton of effort and time only to have sadness kick in when your guests pull apart your time consuming creation and place them on their laps.  I'm all for making the table look pretty.  You guys know that about me by now. But I am also practical.  Employing simple techniques for maximum impact.  Whether it's preparing a dish, plating it or folding a napkin.

I pulled out a few items to play with for this episode of how to fold a napkin... Fast but pretty.

I pulled out a few items to play with for this episode of how to fold a napkin... Fast but pretty.

Let the folding, or rolling begin. The best part about these suggestions is that you don't need the exact napkin or ribbon or decor that I show in these examples.  These are guides and intended to motivate you to look around your house to see what you can use.  Any of the ideas shown can be easily refashioned to incorporate what you already have.  In fact, all the ribbons I use are from packages I received, or remnants lingering around just waiting to be given the chance at another useful life.  I also cut the ribbon handles off of nice shopping bags.  These are usually good quality and the perfect size.  Give a good think about what you have readily available.  Need more hints. How about using twigs or acorns, cinnamon sticks or nutmeg rounds. A feather, a flower, chives. 

Although most of these are for individual place settings, I've shown two napkin options for use on a buffet or cocktail setting.

The Simple roll

This method is a no brainer.  The art comes in how to finish it with a little extra flare.

  • Fold the napkin in half and in half again.

  • From the open edge side of the napkin, begin rolling towards the folded edge of the napkin. This helps to create a cleaner finish.

  • Tie a 3/8" ribbon around the mid section and finish with an adornment.

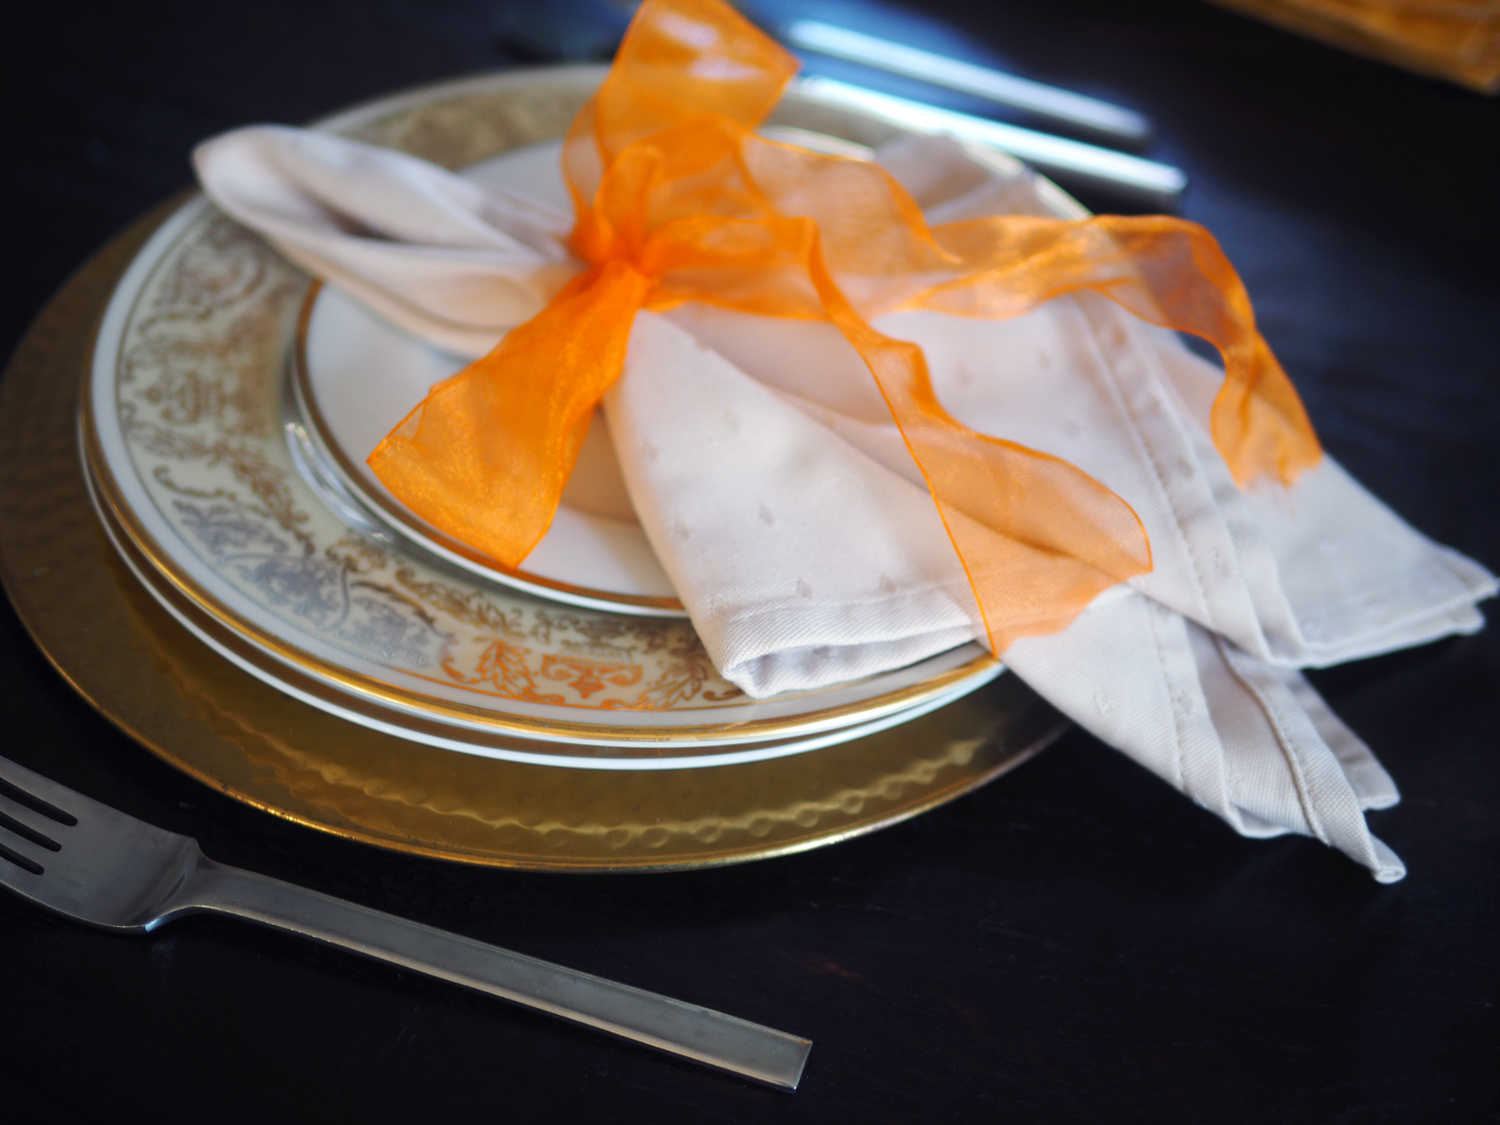
Once you have rolled the napkin up, tie a ribbon, knot it, place an ornament down and tie a bow. Place in the middle of the plate.

Once you have rolled the napkin up, tie a ribbon, knot it, place an ornament down and tie a bow. Place in the middle of the plate.

3/8" ribbon + ornament

3/8" ribbon + ornament

Note the folded edge on the left side is where you want to roll to.

Note the folded edge on the left side is where you want to roll to.

The Simple roll - Candy Caned

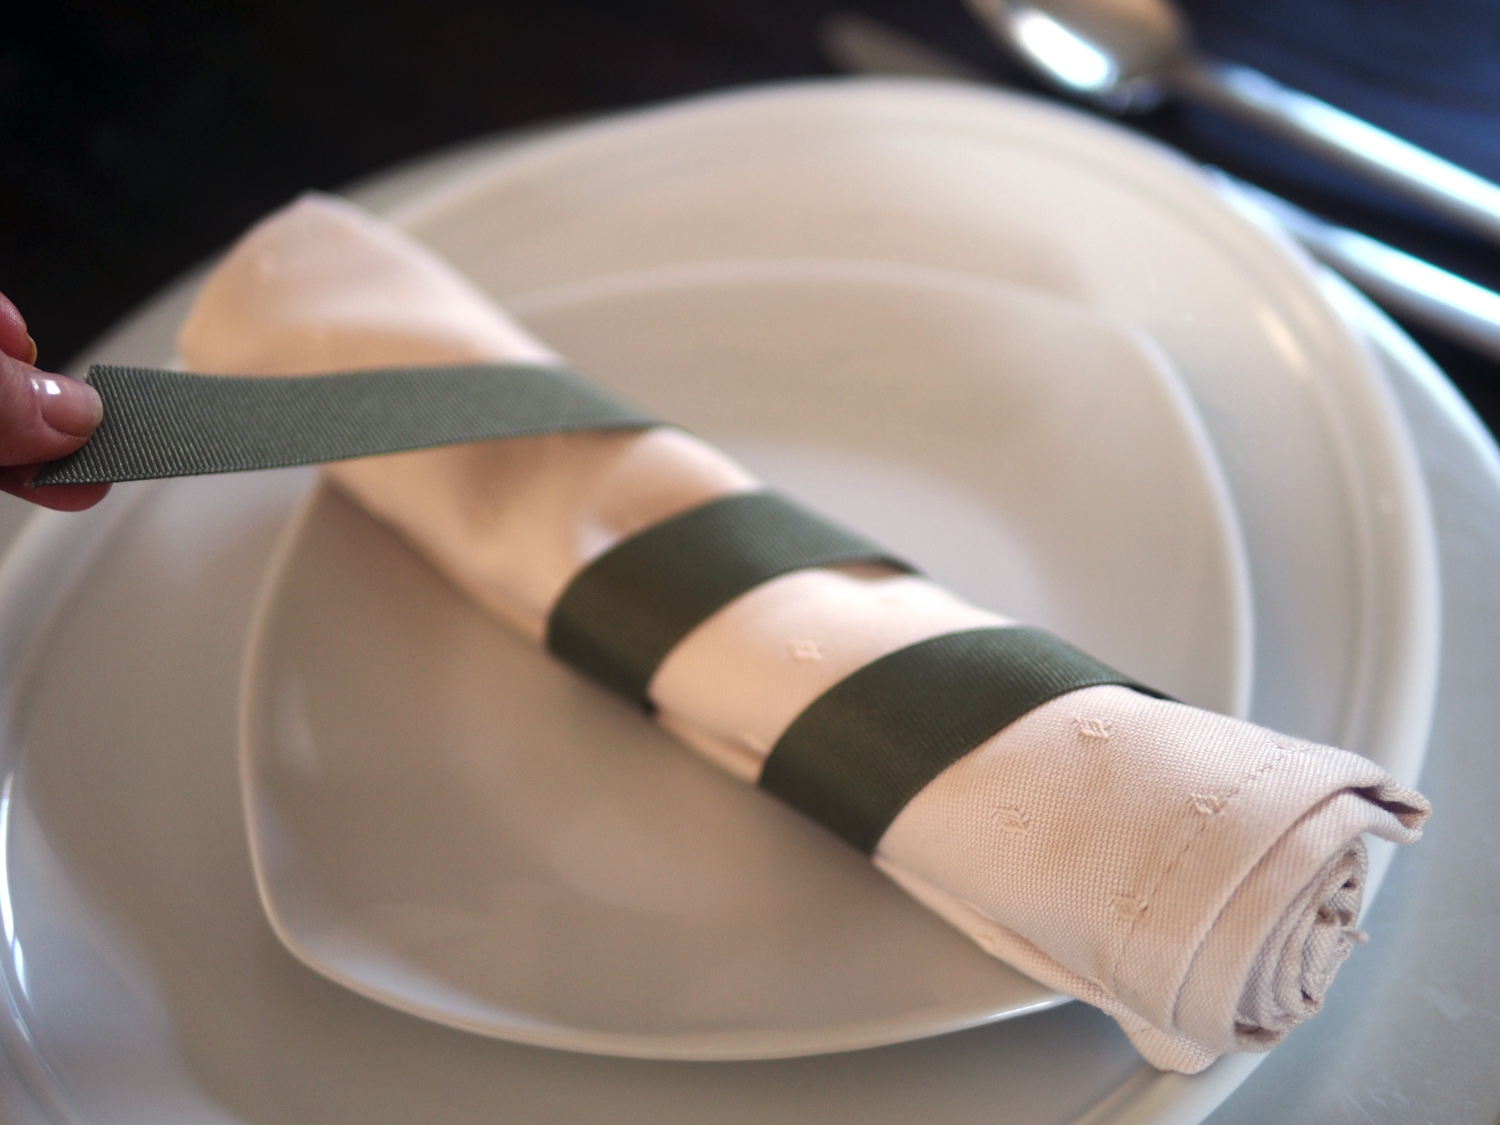
Using the same simple roll technique, wrap the roll with a wider ribbon to create a candy cane or striped effect.

  • Tuck one end of the ribbon under the bottom right side of the napkin

  • At an angle begin to wind it around leaving equal amounts in between.

  • Tuck the edge under.

Chic, simplicity

Chic, simplicity

Roll the napkin

Roll the napkin

Using 1/2 grosgrain ribbon, tuck on end under the napkin and wind it around leaving equal amounts in between. Tuck the edge under.

Using 1/2 grosgrain ribbon, tuck on end under the napkin and wind it around leaving equal amounts in between. Tuck the edge under.

The simple roll - Crisscross

Can this simple roll be more versatile?  Duh, of course, it can.  If you don't want to spiral the ribbon around, why not create a straightforward crisscross effect.

  • Place the ribbon midway under the napkin, then crisscross in front placing the ends across the plate.

Modern, simple and elegant.

Modern, simple and elegant.

The buffet Roll

Using the roll technique, find a vase or bucket or even a wide bowl that coordinates with your table theme.  Then place all the rolled napkins in an orderly fashion. Place your napkin bucket near the flatware and dishes on your buffet table for easy access for your guests.  

buffet.napkins.bucket.jpg
I didn't have enough black napkins so I used a cream/green one to coordinate. The way to make it look planned is to concentrate the colors. I choose to use the darker color for the circular perimeter with the light colored center. It feels like a fl…

I didn't have enough black napkins so I used a cream/green one to coordinate. The way to make it look planned is to concentrate the colors. I choose to use the darker color for the circular perimeter with the light colored center. It feels like a flower.


The Simple fold

I know you are saying, "What the heck? This is a napkin folded over in a rectangle.  Is she serious?"  Yes, I am.  This is a straightforward approach but by turning the napkin horizontally it feels slightly different.  Don't worry, keep scrolling. There are more plays off this easy technique.  

Is there anything easier than folding a napkin and placing it in the middle of the plate. I think not. But we can pump it up. Read on...

Is there anything easier than folding a napkin and placing it in the middle of the plate. I think not. But we can pump it up. Read on...

The Simple Fold Doubled Wrapped

You see.  The rectangle fold slightly jazzed up. (Fun tip: The sage green, crinkle organza ribbon is from our wedding.  Yes, you read that correctly.  I saved the ribbon from our wedding 16 years ago, and just like our marriage, it's still going strong!)  

  • Using a wide ribbon, starting on an angle tuck one end under the bottom left hand side.

  • Wrap the ribbon around twice, slightly overlapping in the middle so there is no gap.

  • Leave enough ribbon for the tail to poke out on the bottom right hand side. You may need to adjust as you go.

The simple rectangle napkin has a more powerful impact with a doubled ribbon wrap tail peeking out.

The simple rectangle napkin has a more powerful impact with a doubled ribbon wrap tail peeking out.

Fold napkin in half, then half again, than half yet again.

Fold napkin in half, then half again, than half yet again.

The wide ribbon is what makes this angled wrap have more presence.

The wide ribbon is what makes this angled wrap have more presence.

The Simple Fold & Half Knot

Same rectangular fold, same ribbon but with a bit more sass.  

  • Place the wide ribbon under the napkin in the center with the top portion of ribbon being slightly longer than the bottom.

  • Bring the the top portion of the ribbon to lay down over the napkin.

  • Take the bottom ribbon and cross over front.

  • Then tuck that piece under and flare the tail out to the right.

Once you pull the short side through to the right, make both tails lie flatly down.

Once you pull the short side through to the right, make both tails lie flatly down.

The top portion of the ribbon rests across the middle of the napkin while the bottom/under portion gets crossed over front.

The top portion of the ribbon rests across the middle of the napkin while the bottom/under portion gets crossed over front.

Tuck the ribbon under the midsection and pull to a loose knot.

Tuck the ribbon under the midsection and pull to a loose knot.

The triangle

Yes, this is another no brainer fold, but one that also has versatility.  

  • Fold the napkin in half and half again

  • If you have a nice finished edge like the one shown below, fold the point down only to the trimmed edge. (You can also use this approach even if you don't have a fancy edge. It will actually make your triangle fold a bit more special.

  • You can also just fold it point to point.

yellow.quarters.jpg
yellow.foldover.jpg

Simple Triangle & Ornament tuck

Tuck an adornment under one side.  Use a cinnamon stick, or a flower stem or this stem of pearl like buds.


The Triangle Tower - Buffet Style   

Using the same triangle technique but folding edge to edge, you can then stack them to create a uniformed row for a buffet table

yellow.napkins.jpg
yellow.triangle.jpg

The fold & hold

Easy fold in half fashion and tying in the middle.

  • Lay the napkin right side down and fold each edge into the middle

  • Flip the napkin over placing a ribbon midway. Add an adornment

  • Tie one knot to secure and place onto the plate

yellow.napkin.setup.jpg
yellow.napkin.folded.jpg
yellow.napkin.green.ribbon.jpg

The Drape

The more elegant dropping of a napkin. 

  • Fold the napkin in half

  • Grab the middle folded edge and let the napkin naturally drape

  • Place the napkin on the plate. It will create pretty folds

cream.drape.jpg
Fold the napkin in half and grab the folded edge.

Fold the napkin in half and grab the folded edge.

cream.drape2.jpg

The Tied Drape

Just add a ribbon tied 1/3 the way down from the top

As I mentioned, none of these are ground breaking.  They are simple techniques with a little extra pizzaz, which is what I believed you asked for.  I hope I sparked your creative spirit using the napkins and odds/ends pieces in your home to create a festive, happy landing place for your guests.  


Holiday Hosting Tips - Less Stress

Photo Credit: Paul Majewski

Photo Credit: Paul Majewski

Don't let hosting stress you out.  Serving up love during the holidays shouldn't cause grief.  On the contrary, it should bring joy.

In an attempt to ease any pain, I will share some of ways I keep organized when hosting.  I know this type of post has been a long time coming, as many of you have asked for helpful entertaining tips.  With the holidays only a month away, now's the time. Better sooner than later.  What good would a post on hosting tips be if it arrived right before the holiday when you smack in the thick of it.  "Thanks, Dana for the heads up!"  

Hopefully some of these will be of help right now.  Others you can tuck away and retrieve just in time to plan prior to any event or holiday madness.  Speaking of which, when did the holiday season go from being fun to stressful? I have two answers from my perspective.  (In the movie business this is known as foreshadowing. I am giving you a hint about how I organize my thoughts. Be prepared for many more lists and numbering of ideas to come!)

First answer: Perspective
The POV of a child simply enjoying holidays versus the POV of an adult hosting them. There is definitely a major difference. When you are a kid, holidays are completely stress free.  You didn't have to do any buying or prepping, cooking or hosting.  Just sit back, wait for someone to pass you another gift and have a blast. 

Photo Credit: Paul Majewski

Photo Credit: Paul Majewski

 
Photo credit: Paul Majewski

Photo credit: Paul Majewski

Second answer: Competition 
Maybe not for everyone, but there seems to be the pressure of one up-manship. Somehow when we host we feel the need to outdo what we did from the previous year.  How can I make it different, better? This goes for gift giving, too. Why can't one present be enough?

UGH, the pressure.  So, let's start with giving the ole heave ho to those two reasons.  How about we revisit the feeling of being a child and just have fun. Bring back that kid again and find the joy and excitement of the holidays.  Be thrilled with a homemade ornament. Gather with family just to rejoice in all that we do have.

Photo Credit: Paul Majewski

Photo Credit: Paul Majewski

Ring in a joyous feeling. Whatever it was for you, whether it's playing Christmas carols, stringing old fashioned decorations like popcorn strung garland, or have a pot of cinnamon and apples simmering on the stove.  For me, it's baking traditional cookies and reminiscing about my grandmothers.  Let that holiday spirit knock on your door, enter into your home and your heart.

candle.mood.jpg

On the competition side, what I have found over the years is that guests come because they enjoy the company and whatever food is prepared.  So let's just take the 'one up-manship' out of the equation and prepare an event that has as little stress as possible.  No one is keeping a scorecard.  So do what you can with the time and budget you have.  Your generosity of spirit will be enough.

list.jpg

Once you have the emotionality back, then comes the practicality. Preparation is the key.  In the film/tv production world this is called pre-pro.  The pre-production work that is done prior to ensure that the production goes as smoothly as possible.  There are usually lists and budgets and contact sheets with phone numbers and schedules.  Guess what?  All these apply whenever throwing an event.  I guess this is why the transition from production to catering, events and home hosting was an easy one for me.  I love lists.  Even better, I love checking things off my lists.  Call me anal. Call me crazy.  Call me whatever you like but having a plan keeps you on track and avoids unnecessary spending and work. Once you try it, you will call me brilliant.

JC is fond of taking pictures of my lists.  I'm glad he does because now I have photo evidence to share with you. Some are handwritten like this image. Others I type up and print out.

Here's how I usually go about planning any party.

Step 1:  Guest List 

  • Family or friends or a mix

  • How many people do you want to host

Step 2: Event/party type

  • Decide the day and time

  • Is it down dinner, cocktail party, brunch?

Step 3: Menu Selection

Begin planning 2-3 weeks prior.  For me, quite time is when ideas come to me. So I sit in a corner of our living room known as the Moroccan bed and gather pen, pad, magazines, cookbooks and iPad. With a cup of coffee or glass of wine depending on the hour of the day I start my research, thumbing through recipes I have made or page through other materials for additional ideas. Then I begin making a list of menu items that I think would work with the theme or holiday.  At this stage it's the pie in the sky list.  I throw in all the possibilities.

Step 4: Menu Review and Refinement

This portion will be dictated by the guest list, the budget and how much time you have. When preparing a menu, it's fine to start with jotting down all the things you would love to make. But upon the all crucial review time, that's when you need to get down to brass tacks and make sure that you can pull off what you are dreaming about. Because I only have a 4 burner stove and 1 oven.  Yes, you read that right.  How this is possible I just don't know?  Believe me, I did my best song and dance to try to convince JuanCarlos that we should cut into our counter and cabinet to make room for a 6 burner/2 oven Wolf and take a wall down. Alas, I suck at singing, and clearly I didn't have the dance skills for that miracle to occur.  So planning out what gets cooked and warmed up in what order is essential. The dream list turned reality part starts here:

1- Budget:  This really helps narrow down your fantasy menu. It can be the deciding factor between serving monkfish vs. lobster. Sometimes JC and I have a budget in mind.  However, I must be completely honest with you, when we throw parties, we rarely feel constrained to stay within a certain $$.  We buy and make whatever moves us. But if you do need to stay within a budget, then this is the first item you should determine, as it will dictate what you can make. Having and sticking to a budget is also a good way to prevent you from overdoing and overspending,

2- Time: Next important reality check.  How much time and effort will each of these menu items take and is it realistic? A good way to cut down on time is incorporating a mix of homemade items with store bought/prepared items (like roasted nuts or marinated vegetables: mushrooms, artichoke hearts, etc) The only time required:  placing them on a platter or bowl.

3- Guests:  Who is coming, what would they like and are there any special needs (gluten free, vegetarians, Meat lovers, fish lovers, etc)

I review my menu with these crucial guidelines in mind and start revising ensuring that I have a variety of foods for everyone that I can make in the allotted time, and budget.

I also review the menu to include that there are cold, room temp and warm items.  This is for three main reasons. 

One, having cold or room temp items means one less thing to cook and need stove space.  

Two, these items can already be placed on the buffet table so that when guest arrive they can begin the nibbling.

Three, these items usually can be prepared ahead of time, stored in the fridge, and frees up time for you.

Step 5: List making 101: have a page for each list. That's right, there is more than one list.
(Clearly, I like putting things in order.  Plus, I promised you there would be plenty of lists and numbering and I like to keep my promises. I do believe lists help, especially when you reading so much information.  You are easily able to identify the things that are of value.)   Let's move on to the making of the lists, shall we.

  • Guest List

  • Shopping List

  • Daily To Do List

  • Day of Event List

  • Menu (with categories for appetizer/main/dessert)

1- Guest List: 
Send out invite or make phone calls and keep a list of who is coming, total number of guests and make any specific food restriction notes


2- Shopping List:
This will ensure you get everything you need and don't have to make any emergency runs during cooking preparations. It will also keep you from buying items that you do not need and thereby overspending. (Another confession, I sometimes don't stick to this list. I see things in the store that look great and toss them in my wagon thus adding to the menu. It's the nature of my something from nothing style that is engrained in me. But I am getting better at sticking to the list!)

This was one of 2 pages of my master list.

This was one of 2 pages of my master list.

3- Daily To Do List:
This list will be the life savior in keeping all the moving parts organized so you are not cramming everything into the day of the event. Remember pre-pro.  This is at the heart of it.  I review my menu, my theme and think of all the prep that needs to happen. Then I start to list everything that can be done ahead of time.  You can usually begin several days out, completing small tasks and spreading out the work so it truly is much less stressful.  Prep what you can a little at a time in manageable chunks, thus setting yourself up for an 'easy to assemble' approach on the day of.   One trick that has worked incredibly well for me is mise en place.  You remember what that is: French for, everything in it's place.  I cut, chop, prep ingredients, then place them in bags, containers and group each dish's ingredients together.  On the day of the party, all I have to do is combine them.

Get everything prepped, in the amounts you need. Then all you need to do is toss in a bowl. This method is ideal for handing off to a helper because all the hard work is done already.

Get everything prepped, in the amounts you need. Then all you need to do is toss in a bowl. This method is ideal for handing off to a helper because all the hard work is done already.

A sample Daily To Do List, can look like this:

Tuesday/Wednesday:

  • Shop for non perishable items

  • Iron linens for table

  • Straighten up house

Thursday

  • Shop for remaining food items

  • Pull out all platters and serving utensils

  • Buy and arrange florals

Friday

  • Food prep with exact list to check off

    • cut carrots

    • make dressings

    • marinate meat, etc

food.prepped.jpg
centerpiece.jpg
tablecloth
Dishes
florals.jpg

4- Day of List:
Write down all the pending tasks you need to accomplish the day of the event.  

  • Assembly charcuterie/cheese platter

  • Shave zucchini, etc

  • Add toilet paper to bathrooms

  • Change hand towels

asparagus.jpg
List3.jpg

5- Menu List:
I know you may feel this one is silly but I have found that having an actual menu sheet is incredibly helpful. I started incorporating it ever since I forgot to serve an item that was tucked in the back of the refrigerator. Having a complete menu in full sight reminds you of every item that you prepared so you won't forget a single thing.

bar.jpg

Food & Beverage Amounts
There are standard calculations to follow. Check here for a comprehensive summary.  I have my own take on this, as my experience has shown me that our guests enjoy grazing a bit more and longer than the usual estimates.

Appetizers/Hors d'oveurs
When figuring on amounts for each appetizers, plan on making 1.5-2 times the amount of each appetizers for each guest. For example, if you are serving mini meatballs to 20 guests you should have between 30-40 meatballs.  Below are approximate amounts for the different types of events.  My estimates are slightly higher than what is usually recommended.  That's what I learned from years of party throwing.  Plus I come from a long line of women who like to feed people, so being short on food is NOT an option.

Hors d'oveurs Before a Meal: Plan on 6-8 pieces per person.  
Hors d'oveurs as Main for Cocktail Party: Plan on 12-14 pieces per person.  

Serrano ham alongside slices of cool cucumber

Serrano ham alongside slices of cool cucumber

Marinated mushrooms, store bought and then enhanced with fresh parsley and roasted peppers

Marinated mushrooms, store bought and then enhanced with fresh parsley and roasted peppers

Goat cheese stuffed piquillo peppers

Goat cheese stuffed piquillo peppers

Beverages

  • 1.5 drinks/per hour per person

  • Wine bottles 750ml provides 5 glasses of wine

  • Champagne/Cava/Prosecco 750ml bottle provides 6 glasses per bottle

  • Water: 1 liter/4 guests. Offer both flat and sparking

  • Soft Drinks/Juices: Plan on 8 oz/person if you have wine/beer and have a variety of juices, soft drinks. Triple that if you are only serving non alcoholic beverages.

cava.corks.jpg
wine.glasses.jpg

Help:
When throwing a big party it's so important that you have help.  Don't be afraid to ask a family member or friend to come early to help you with the last minute items.  Or if your budget allows, hire someone who can assist in a variety of ways, from setting up, to arranging food on platters to serving and clean up.  Having been hired to do this for clients, I know what a huge difference this can make.  Recently I was able to hire one person to help me out during a family party.  It was a gamer changer since it meant that my party goers didn't need to lift a finger, and it freed me up to be able enjoy without any worries.  If you can't afford this option, then hopefully you are as lucky as I am to have guests that do help out.

placesetting.jpg

Well, that was a ton of info to read through. Sorry for the lengthy post but I have found that these are the keys to keeping me sane, on track and able to enjoy a party.  I wish for you a smooth holiday party throwing season, and that this post provided some helpful hints on how to host a bit more stress free.


tablescape.jpg

Happy Holidays

Weekend Guests -Life's Colorful Stroll

sun.pathway.jpg
You can't hide behind the wine... or the fork.

You can't hide behind the wine... or the fork.

Our world is made up of a bunch small moments.  Each strung together to make up a life.  And when those small moments are fulfilling and memorable, then that string makes up a beautiful life.  Mine is a long string of glistening pearls. Moments upon moments that bring me joy and memories that squarely plant a smile on both my face and heart. 

Last fall I added to that string when we hosted our friends from Miami who have a passion for photography. (Well, Marta has more than passion.  It's her profession. Check out her work here .)

They wanted to enjoy the cool fall weather and snap shots of the changing of the seasons. Which, of course,  is a big deal to them being from a one season city. It ended up being a spectacular weekend as the weather was cool but pleasant, the leaves were all starting to turn and gave way to a rainbow explosion.  The bursts of colors were emblematic of our feelings of spending time together.  Bright and cheerful with the crisp air breathing life into our souls.  

Lake view
orange.tree.jpg
yellow.tree.jpg

On weekends like these, entertaining takes a more relaxed vibe. We keep the food simple so we can spend quality time together. Plus with all the other activities going on who wants to spend oodles of time in the kitchen.  Simple entertaining doesn’t have to mean boring. It just means easy preparation, few ingredients with big flavors.  

Day One - An evening at home with cocktails, snacks & poached salmon

Since I was working in the city, the first night’s meal was prepared by my hubby who made an easy poached salmon with vegetables.  While we waited for the meal to be ready we downed the 'way to easy to drink' Citrus Martinis while snacking on some cheese, olives, marinated garlic cloves and the famous crowd pleasing nut, Marcona almonds (all of which I brought home with me from Despaña.)

Citrus cilantro jalapeño Martinis.  Refreshing and the perfect drink to get the evening started.

Citrus cilantro jalapeño Martinis.  Refreshing and the perfect drink to get the evening started.

I also roasted up some tomatoes ahead of time.  These are the easiest 'must have' staple in your fridge.  Since they are made with enough oil to keep them cured for awhile, they are a savior to pull out in a pinch.  Which is what I did, and then served it on crusty bread.  Our friend, Illy's, reaction to the simplicity but deliciousness of this bite... Priceless.

The OMG moment of food ectasty 

The OMG moment of food ectasty 

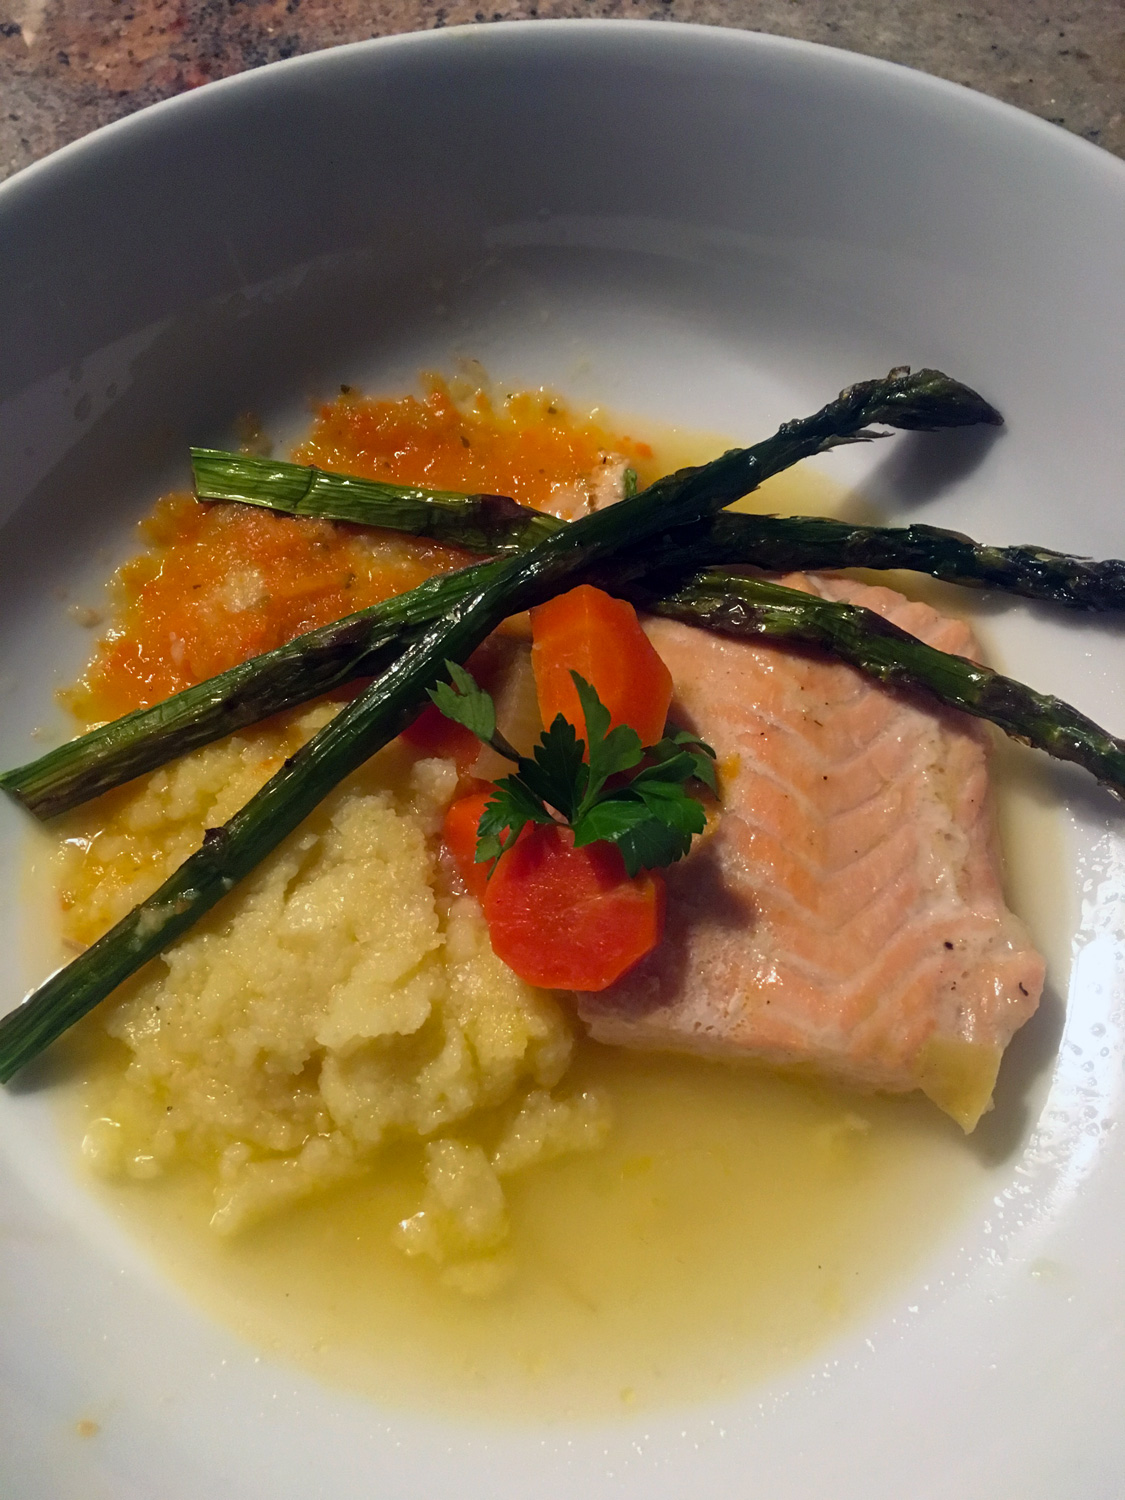
After the snacks and the drinks came the easy 'meal in bowl' dish; Poached Salmon   

Ingredients

salmon.jpg

(serves 4)
1.5 lb Salmon
1/2 yellow onion, cut in quarters
2-3 carrots, cut in 1" pieces
2-3 ribs of celery, cut in 1" pieces
4-5 new potatoes, cut into small chunks
Oil, salt, pepper

Directions: 

Sauté for 2-3 minutes only all the vegetables in a large, deep pan using oil and seasoning with salt and pepper.  Then place the seasoned salmon on top of all the vegetables and fill the pan with water to cover the fish.  Place a cover on the pan and cook over a low heat to a simmer until the fish has turned a pale pink.  Should take about 12-18 minutes depending on the thickness of the fish.  You can leave the vegetables whole or blend them up to create a puree.


Day Two - Fahnestock State Park followed by cauliflower soup, snap peas, salad, scallops
The following day we drove up to Clarence Fahnestock State Park wandering around, climbing up rocks and snapping off photographs as if film were free. Oh, that's right, we had digital cameras.  Snap a 1000 and deal with it later! 

Things are looking up for me.  Photo credit: Marta Neira

Things are looking up for me.  Photo credit: Marta Neira

trees.rock.jpg

Quite honestly, as eye catching as some of the photos are, they never seem to capture the true beauty of nature in its most vibrant state.

JC taking a test digital photo before using his film camera.

JC taking a test digital photo before using his film camera.

The stillness of water reveals stark reflections 

The stillness of water reveals stark reflections 

Reflections of a vibrant kind

Reflections of a vibrant kind

After being out in the chill of the day, we needed a little warmth.  What better answers that call than soup.  That night's no fuss easy line up:

final.plated.salad.jpg
soup-shallots.jpg

Day Three - Stone Barns followed by pizza, shrimp & salad
We drove Marta and Illy to one of our favorite local treasures; Stone Barns at Rockefeller State Perserve   I think you can tell by those smiles that we had a good time.  We hiked around for a leisurely 5 mile trek capturing even more photos of fall’s abundance. Crayola crayons, eat your heart out.

reflection.jpg
Illy's gentle essence

Illy's gentle essence

Marta's soulful smile

Marta's soulful smile

JC with one of his vintage cameras. Photo credit: Marta Neira

JC with one of his vintage cameras. Photo credit: Marta Neira

Marta & Illy admiring the cows at Stone Barns

Marta & Illy admiring the cows at Stone Barns

On our familiar path at Rockefeller Park

On our familiar path at Rockefeller Park

orange.tree2.jpg
moss.jpg
Oodles of color and lushness.

Oodles of color and lushness.

Upon returning for our final evening together, we felt like keeping it cozy with comfort food. I made an array of pizzas as appetizers followed by a quick sauté of shrimp and a salad.  Since we had been out on photography adventures all weekend, there was no time to make homemade dough. Store bought version does the trick and works like a charm.  

Keeping it warm by the stove

Keeping it warm by the stove

Spreading roasted garlic mash on the dough

Spreading roasted garlic mash on the dough

I add oil to a bowl, plop the dough inside, cover with a towel and don't let the dough rise too much.  Then I stretch it out with my hands into whatever shape it feels like making and add various toppings.  Here's a few we served that night.

Hot off the stone

Hot off the stone

Roasted tomato, roasted garlic, basil & Parmesan cheese pizza

Roasted tomato, roasted garlic, basil & Parmesan cheese pizza

Fresh tomato slices, goat & Parmesan cheese pizza

Fresh tomato slices, goat & Parmesan cheese pizza

Roasted red pepper & goat cheese pizza

Roasted red pepper & goat cheese pizza

After that yummy goodness, some greens and a protein were all that was needed. 

  • Sautéed jumbo shrimp (with garlic, scallions)
  • Boston salad with celery, fennel, scallion
     
Similar to my Graped up Bibb Salad

Similar to my Graped up Bibb Salad

Jumbo shrimp with garlic & scallions

Jumbo shrimp with garlic & scallions

There was nothing extraordinary about any of these dishes other than good ingredients made with absolute love.  There was, however, moments of extraordinary all weekend long.  Hosting weekend guests doesn't have to turn your life upside down.  And even if it does, you will always land right side up.

duck.end.jpg
duck.up.jpg

Take a colorful stroll, breathe in the crisp Fall season, spend time with people you love, then return home to a warm meal. Fill your life with special moments and string together your own pearl necklace. 
 

A colorful stoll

A colorful stoll

The girls.  Photo Credit: JuanCarlos Casas

The girls.  Photo Credit: JuanCarlos Casas

ground.leaves.jpg
 
DP-stirredwlove-ID1.jpg

Burst of Burnt Orange - A Fall Tablescape

full.table.jpg

Tick Tock. It's that time of year when everyone's talking turkey. Thanksgiving is breathing down the proverbial bird's neck with thoughts of food prep, guest list and table decor.  Some of us are hosts, some guests. No matter how you carve it; pressure, planning and panic can set it. 

Which is why last year we opted for a different kind of celebrating.  Because I worked, we didn't host Thanksgiving dinner as we have done for a decade.  Instead, we decided to do the next best thing; a Post Thanksgiving cocktail/tapas party.   Which meant we had a wider range of food options to play with; ditching some of the usual carb heavy holiday food.  Food aside, I still needed to create an inviting tablescape.  The theme was buffet style eats with a variety of options for the meat lovers, fish lovers, vegetarians.  I really wanted to have a wide selection that worked well together.  And I wanted to present all these plates on a table that would pay homage to the Fall colors outside our windows.  

linens.cu.jpg

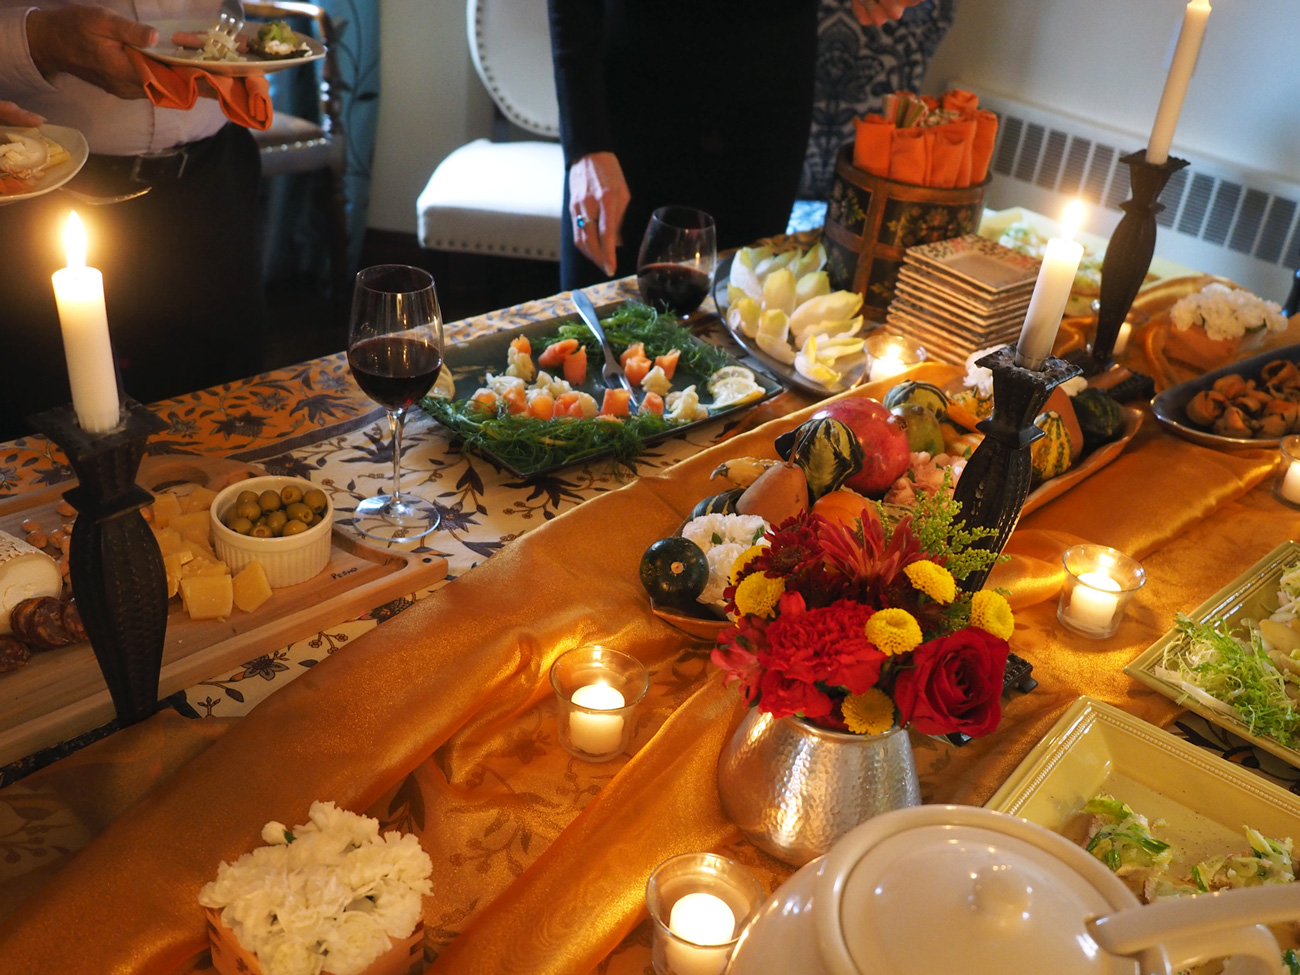
It started with a tablecloth I purchased in Italy the previous year and grew from there.  As I have mentioned in the past, I collect tablecloths, linens and material pieces, then mix and match them with others. I am a big fan of swags of sheer material or muslin to add texture and volume to a table.  In this episode of how to dress a table, I chose burnt oranges and yellow, as a perfection complement to nature.

So let's say your tablecloth is ever so slightly too short for your table, as was mine.  Some may see this as a problem. I prefer to use the word challenge.  And this challenge was easily remedied by embracing the layered look.  I used the yellow sheer material as the base, placed the tablecloth atop and then draped the orange sheer down the middle.  This approach made it look like an intentional layer when it fact it was resolving a length dilemma. Solution provided. Challenge solved.

Warm yellow chiffon sheer for the base

Warm yellow chiffon sheer for the base

Tablecloth stretching full length of the table with an orange organza swath.

Tablecloth stretching full length of the table with an orange organza swath.

Then come napkins and plates. Since this wasn't going to be a sit down dinner, I chose a variety of small plates and bowls that suited the menu.  Flatware was held in a florist vase and a vintage wooden bucket housed rolled up coordinating napkins.  Guests can pick and go.

plates.jpg

I would like to pause to reiterate a purchasing and collecting style of mine. Very rarely do I buy ensemble sets or like items. My style is to pick up pieces that I love along my travels. All the items used in this tablescape were purchased years apart, at a variety of different shops, and in some cases different countries. The key is finding color schemes and palates that you like and that mix and match.  With this method, anything goes.   

napkins2.jpg

For the centerpiece, two goals were set. Create a piece with a nod to Thanksgiving, and one that wouldn't take up too much room.  The fortunate fact about hosting after a holiday is that prices on certain items go down.  For instance, I purchased all those colorful, interesting gourds for $3. Yes, you read that correctly; $3 for all of them.  I then bought some simple mums, my favorite 'go to' inexpensive flower.  I cut them down to the buds, and placed them in shallow sake bowls. Everything in our home can serve multiple purposes.

flowers.jpg

I nestled a few of the flower bowls within the main centerpiece, adding fresh pears to fill it out. The rest were placed around the table.  The gorgeous, large wooden leaf tray is an heirloom of sorts.  My parents purchased it in Mexico while on their honeymoon, many a moon ago, and gave it to me.  I ADORE that bowl tray. A true statement piece bought at the bud of their love.  

centerpiece.jpg

Add some candles, the food platters and the table is ready for guests. 

The menu was all about small bites that guests could sample and go back for more.  All prepped a day a head of time.  

The Menu
Meaty Ragu with crusty bread & fried spaghetti wedges
Charcuterie & Cheese Platter
Escarole Rolls
Balsamic Bathed Carrots Wrapped in Zucchini
Warm Octopus & Potato over frissee salad
Salmon Bites with Yogurt Relish
Asparagus with Goat and Shallot  Sherry viniagrette
Smoked Salmon with Picked Fennel

Maybe this year you'll give up hosting the actual holiday and burst out with foods you love served on a burnt orange tablescape.

food.table3.jpg
food.table2.jpg
food.table.jpg
zucchini.jpg

Whatever type of party you decide to throw, make a plan that suits the time you have.  The idea is a stress free holiday season.  

Aly.foodtable.jpg
Therese.dad.jpg
 
DP-stirredwlove-ID1.jpg

A Backyard Party How To

appetizer.table.jpg

Over here at the Perri-Casas household, we like to entertain.  We love hosting and sharing food, wine, music/dancing, and just a plain ole good time with family and friends.  When the parties are small; but a handful of folks, the preparation is easy, breezy.  But when the guest list gets bigger, so does everything else.  Including the ideas for hosting a successful event.  Top of list; effortless decor and easy, crowd-friendly dishes.  Hearty, simple to prepare, allergy-friendly, and most of all, delicious. Foods that hit all the right notes.  

Just this past weekend we hosted a pig roast. On our guest list were a handful of vegetarians and vegans. 
Yeah, you read that right.  We invited vegans to a pig roast.  According to my husband, that's completely kosher because the pig only ate vegetables thus making it vegetarian/vegan!  Oh, my Taurus husband can justify anything!

We structured the party to be about mingling, not about a formal sit down meal.  One main reason for this is that our patio, though large, really cannot comfortably seat more than 24.  Plus this style of entertaining helps with flow of both food and people, as guests go to the buffet table to partake of various treats then bump into different guests to chat with.  

My sis, Alyssa and cousin Therese (photo credit: Dori Eckert)

My sis, Alyssa and cousin Therese (photo credit: Dori Eckert)

George contemplating fire with my brother in law Peter

George contemplating fire with my brother in law Peter

My dear friend Jackie catching up with my nephew, John

My dear friend Jackie catching up with my nephew, John

Organization is essential with a party this size.  So I ALWAYS make a list.  I am famous for making lists both in my professional life and home life.  Make fun all you want but this is key to staying organized and not accidentally missing things.  Just ask JuanCarlos who forgot some items in the basement fridge.  (He said I left one item off my list: Remind JC to make his own list.)

The day before I also place out all the platters I want to use with notes of which dish will go where.  This helps for two reasons.  First; one less thing to think or worry about the day of. Two, if a guest wants to help serving up dishes, this identification system tells them what they should use. Takes all the guess work out of the equation.

As far as what to serve, my game plan was to make sure we had a wide variety of food options for everyone.  30 guests were expected.  The best way to keep it manageable was to make some dishes from scratch and mix it up with some prepared items. Here was my thinking.  Note the ones with (*) are the ones I just had to put on a plate!

Appetizers
Cheese Platters with Jams, Grapes, Cucumbers, Radishes *
Breads/Gluten free crackers *
Assortment of Tapenade & Olives *
Roasted Chick Peas * (these were store bought but here is the link to my version which I prefer)
Pickled Mushrooms * 
Marinated Artichoke Hearts *
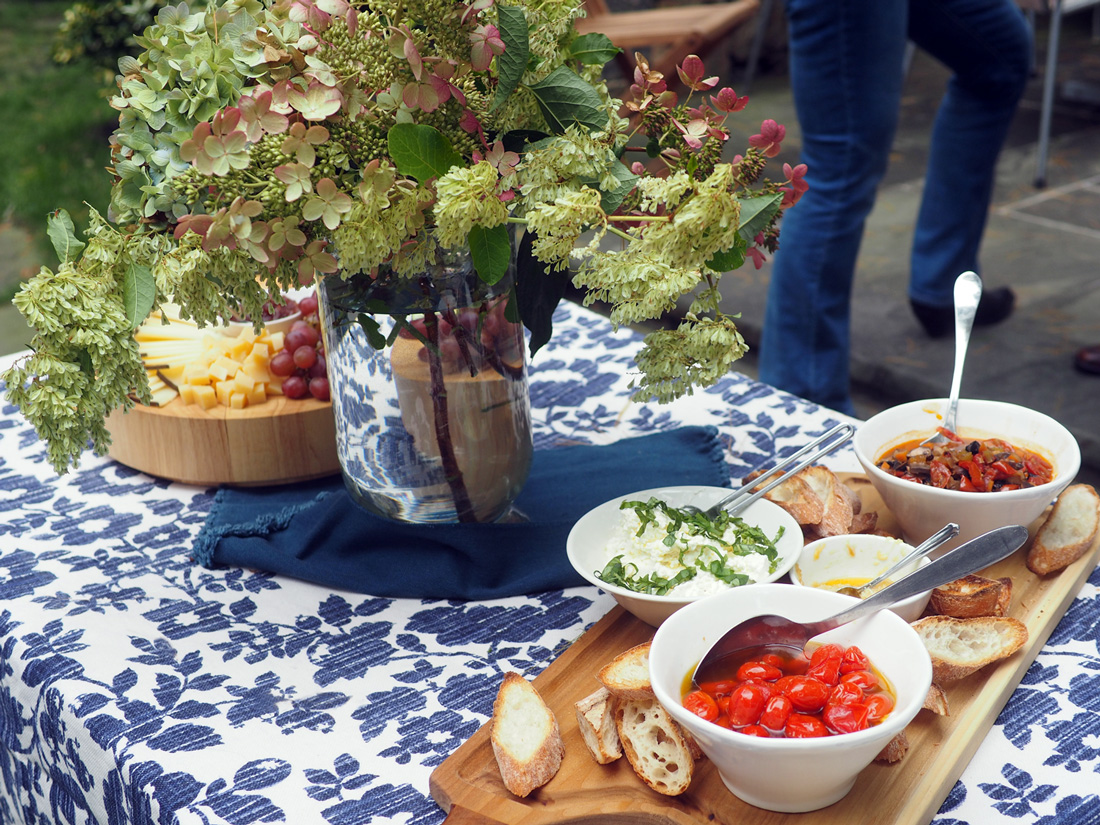
Crostini platter with Fresh Ricotta, roasted garlic mash, Roasted Tomatoes, Mushroom 'Bolognese'

All these can be plated well ahead of time and placed out as guests arrive.  These are perfect starter offerings to let them mingle and jingle amongst themselves with a drink.

Abundant cheese platters with jams and grapes, cucumbers and radishes.

Abundant cheese platters with jams and grapes, cucumbers and radishes.

Ready made items ready to go.

Ready made items ready to go.

Roasted tomatoes, garlic, mushroom bolognese, ricotta, crostini.

Roasted tomatoes, garlic, mushroom bolognese, ricotta, crostini.

 
JuanCarlos at his beloved grilling station.

JuanCarlos at his beloved grilling station.

Since a whole roasted pig takes hours upon hours upon hours to make, there needs to be food in between the appetizers and the main course.  This is what I call the intermezzo eating portion of the festivities.  I know, you are thinking; more food before the meal, that is hog wild nuts.  But believe it or not, people come to our home ready to eat.  So we make sure they are well fed.  Plus it's cool because we like to experiment on them!

Intermezzo
Grilled meats served with bread & chimichurri sauce
Grilled sausage
Grilled Corn on the Cob

Farm fresh corn roasted on the grill. (Photo credit: Dori Eckert)

Farm fresh corn roasted on the grill. (Photo credit: Dori Eckert)

flank.steak.jpg

Main
Potatoes with Basil/Garlic oil
3 Bean Salad
Tomato Salad
Roasted Salmon Platter
Puerco Asado

Once the roasted pig was ready, the main portion of the meal was served.  All the above items were easy to get onto the table since I prepped them earlier.  The tomatoes were sliced and assembled on a platter in the morning and refrigerated. So was the bean salad.  I boiled the potatoes the day before, cooled them down on a sheet tray and in the fridge they went.  Right before serving, I popped them in the oven just to warm them enough to absorb the basil/garlic dressing I made the day before.  The salmon was roasted earlier in the day then served at room temperature.  And that is how you get a bunch of big platters out without being taken out on a stretcher yourself.

3 Bean Salad is easy when you prep everything ahead of time so right before the party all you need to do is combine the ingredients.

3 Bean Salad is easy when you prep everything ahead of time so right before the party all you need to do is combine the ingredients.

Chick peas, cannellini & black beans, yellow pepper, red onion, English cucumber, scallions and hearts of palm.

Chick peas, cannellini & black beans, yellow pepper, red onion, English cucumber, scallions and hearts of palm.

Tossed with a simple lemon/lime mint viniagrette

Tossed with a simple lemon/lime mint viniagrette

Oven roasted Wild Caught Salmon with cucumber slices, capers, radishes and homemade 'tartar sauce' of sour cream, greek yogurt, shallots, dill.

Oven roasted Wild Caught Salmon with cucumber slices, capers, radishes and homemade 'tartar sauce' of sour cream, greek yogurt, shallots, dill.

The whole hog, roasted to perfection.

The whole hog, roasted to perfection.

Fall off the bone tender chunks of pork.

Fall off the bone tender chunks of pork.

Desserts
Gluten free chocolate cake with coconut cream/fruit
Black bottom cupcakes (Mom made these, YEAH for me)
Apple Tart
Fresh Fruit Platter * 
Goat cheese & blue cheese & honey & figs * 
Turron *

In my opinion, desserts should be just like the meal, offering a mix of items to your guests.  That is why I like offering baked sweets along with a cheese plate and fresh fruit. 

Since it was getting chilly outdoors, we moved inside for dessert. A few choices giving some variety to make everyone happy.

Since it was getting chilly outdoors, we moved inside for dessert. A few choices giving some variety to make everyone happy.

 
wines.jpg

But wait, the details aren't done yet. Food is the key component, but let's not forget the 2D's.  Drinks and Decor. 

Drink wise; we mostly focus on having wine but usually have a few other drink options such as Vermut, Scotch, Gin and Vodka.  We always have plenty of sparkling water, too.

Decor; an informal outdoor gathering requires nothing more than cohesion.  So let me briefly run down how I handled the tables and flowers. Can you say wing it!  (Was that brief enough?)

Normally I have a visual theme planned out but this time it was indeed a last minute pull together. Evidence that you can create something from nothing on the fly.  I didn't have time to get flowers from my favorite place Dahlia NYC so I took my scissors and went hunting in my backyard and a nearby park.  I cut hydrangeas from our big tree and some other flowers to help fill out the vases for big bursts of florals.  

I arranged one large vase for the food table and smaller ones to place on all the other tables, bringing the look together.

I arranged one large vase for the food table and smaller ones to place on all the other tables, bringing the look together.

Also, while I was raking the yard I notice there was an abundance of pine cones and thought I could use those somehow.  

Hunter gatherer.

Hunter gatherer.

Using the flowers I cut from the park plus the extra leaves from the hydrangeas, I laid them across the stone wall then nestled the pine cones on top to create a fall festive row of flora.

Tablecloths. I didn't even bother to iron.  It was an informal outdoor gathering, so I was ok with that.  I went with a blue and cream theme because I knew I had a variety of coverings that could work in tandem.  When you have several tables, do not fret over everything being matchy matchy.   Coordination is the name of the game.  Just make it all look visually cohesive. I used different patterns all within the same color scheme layering cobalt blue placemats to tie the tables together.

crostini.bar.jpg
appetizer.table.overhead.jpg

There was plenty of food, good wine, dancing music and joyful guests.  The perfect party mix.  I think a good time was had by all.  I hope some of these tips can help you throw your next gathering with ease and less stress so you, too, can enjoy along with your guests.

My sister, Alyssa

My sister, Alyssa

Grill masters tossing success

Grill masters tossing success

Aleida and my mother in law Dora tearing it up to salsa music.(Photo credit: Dori Eckert)

Aleida and my mother in law Dora tearing it up to salsa music.(Photo credit: Dori Eckert)

My sister in law Dori

My sister in law Dori

My always helpful, cheerful parents.

My always helpful, cheerful parents.

JC with our dearest friends, Angelica and Marcos

JC with our dearest friends, Angelica and Marcos

CHEERS to all!