Fall Themed Centerpiece

fall.florals.final.jpg

Yup, it’s that time of year. Nature is doing her thing. Leaves are turning those awesome vibrant hues. Acorns and pinecones are dropping like bombs. Squirrels are busy squirreling away treats. And us mere mortals are coming to terms with the summer really being over. But there’s always a silver lining.

Autumn brings a crisp freshness to our world. A cleansing of nature as leaves fall and regenerate new buds. And the opportunity to wear those chunky sweaters breathes new life into our fashion repertoire. The change of season also ushers in the occasion to freshen up your decor. In my house, beauty is brought inside.
Cue the Fall Themed Centerpiece.

Sure, you can create a floral arrangement, upright and traditional. Or, you can climb outside the box (or that large vase) and go horizontal. I don’t mean wrestling around with your significant other in the fallen leaves. Although, that doesn’t sound like a bad idea at all. I mean, take your florals and fashion them into a landscape that meanders through a forest-like scene. One that creates several visual points of interest.

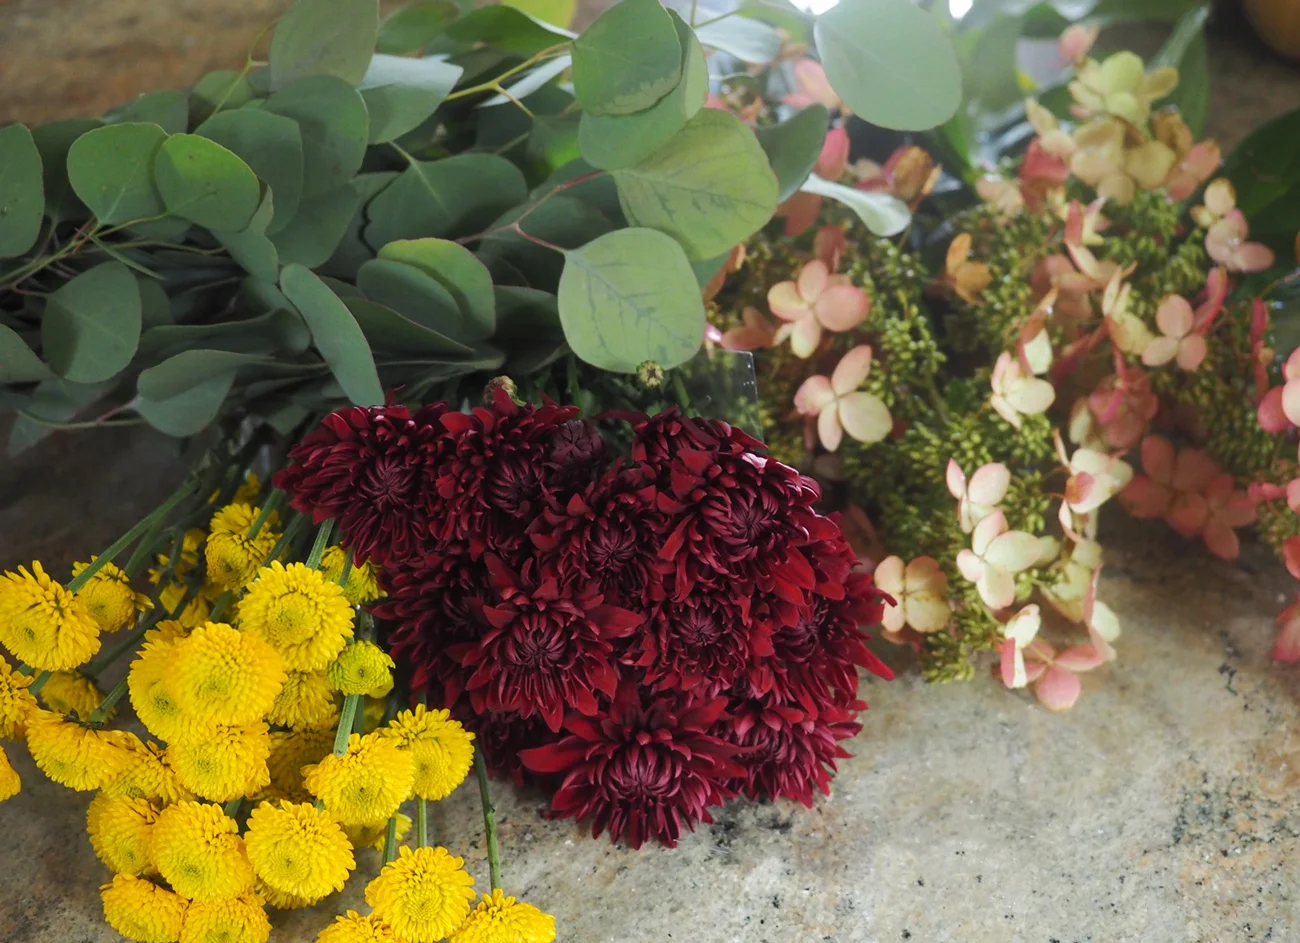
The best part of this type of centerpiece is that you can design it with whatever you have, and do it inexpensively. I grabbed yellow and crimson mums (from my favorite floral spot Dahlia NYC) to mimic the colors of the leaves, plus some eucalyptus leaves. All the other items I grabbed from our garden (rosed hued hydrangea, pine cones) or around the house. The entire arrangement cost me $20.

Burst of yellow pom pom mums, crimson mums, eucalyptus leaves and hydrangea are the stars.

Burst of yellow pom pom mums, crimson mums, eucalyptus leaves and hydrangea are the stars.

Long wooden trays or boards are perfect. But you can use a ceramic platter or whatever else suits your fancy.

Long wooden trays or boards are perfect. But you can use a ceramic platter or whatever else suits your fancy.

Going horizontal meant finding a main ‘vessel’ that would serve as the base since I was ditching the usual tall, large vase. I searched for something a tad out of the ordinary. A few choices popped up, including a long ceramic platter, but I settled on a wooden tray for a few reasons. One, it was the largest and I felt I needed the space. Two, it’s easy to carry since it is a tray. Three, I like the feeling of the earthiness of the wood. But use whatever you have. Oval, or round, rectangle or square. It doesn’t make a difference. The only important aspect of this kind of arrangement is to go low and long. Landscape, not portrait. I then gathered up some small vases, cups, shallow bowls, pumpkins and water phials (tubes with rubber caps to hold water for single stems).

The helpers to this arrangement. It’s key to gather up your tools.

The helpers to this arrangement. It’s key to gather up your tools.

Next, I lined the tray with parchment paper to protect the wood. And moved onto laying the groundwork… literally. Instead of using the eucalyptus leaves in a large spray like I usually love doing (Eucalyptus Burst), I spread them down to create a bed, as if it were a forest and the leaves fell to the ground.

I love this wooden tray, so it was important to me that I make sure it was protected.

I love this wooden tray, so it was important to me that I make sure it was protected.

Since these stems will be lying down, do not fill the water phials to the top, as then the water will slip out.

Since these stems will be lying down, do not fill the water phials to the top, as then the water will slip out.

Fill the tray, leaving spaces, or making spaces for the vases.

Fill the tray, leaving spaces, or making spaces for the vases.

From there, I nestled vessels of differing heights to hold the flowers. All the while, visualizing how to spread out the color.

I loved how the color of this sake cup blended right in.

I loved how the color of this sake cup blended right in.

Slightly taller, heart-shaped glass vase seemed appropriate and perfect to give some height to this horizontal piece.

Slightly taller, heart-shaped glass vase seemed appropriate and perfect to give some height to this horizontal piece.

Then I added the pumpkins and squash to the scene.

Yellowy, green pumpkin added a nice pop of color amongst the green leaves.

Yellowy, green pumpkin added a nice pop of color amongst the green leaves.

Filling the space with a butternut squash adds to the bounty.

Filling the space with a butternut squash adds to the bounty.

It was then time to fill the vases with flowers. I started by cutting the stems of the crimson mums short so they could fill up the shallow bowl.

mums.shallow.bowl.jpg

I continued to fill in and see what looked good and worked in each vase, thinking about spreading the color around the arrangement, as well as adding contrasting colors next to each other.

See how both the yellow pumpkin and the crimson mums are accentuated by being placed next to one another?

See how both the yellow pumpkin and the crimson mums are accentuated by being placed next to one another?

shallow.bowl.jpg

I noticed that there was a corner that seemed empty, so I added another shallow bowl for an additional burst of color. You see, you don’t have to have it all planned out exactly. You can add, subtract, modify as you go.

The idea is to create something that feels right to you. Move things around until it pleases your eye and your heart.

right.side.view.jpg

I stepped back to inspect landscape and its little scenes within itself. I decided to tuck in the last two hydrangea flowers and have them cozy themselves into the eucalyptus base, as if they might had fallen down. Plus, it created more depth and visual interest.

Use the water phial to hydrate the hydrangea. Then tuck it in wherever feels right.

Use the water phial to hydrate the hydrangea. Then tuck it in wherever feels right.

The final touch was to slip a few pinecones right up front.

I think it turned out pretty cool. Loads of color. Little pockets of visual charm in every corner. Highs and lows, Pops of bright yellow contrasted by deep crimson hues. Abundance and bounty.

What I really enjoyed about this arrangement was that it had tiny vignettes within the main piece. Different points of interest within one big floral display.

leftside.final.cu.jpg
Lots of love everywhere.

Lots of love everywhere.

A bounty of autumn.

A bounty of autumn.

Use what you have. But most importantly, use your imagination and heart.

Let the leaves fall where they may. And may they fall beautifully, spreading the love across your autumn table.

 
DP-stirredwlove-ID1.jpg

Burst of Burnt Orange - A Fall Tablescape

full.table.jpg

Tick Tock. It's that time of year when everyone's talking turkey. Thanksgiving is breathing down the proverbial bird's neck with thoughts of food prep, guest list and table decor.  Some of us are hosts, some guests. No matter how you carve it; pressure, planning and panic can set it. 

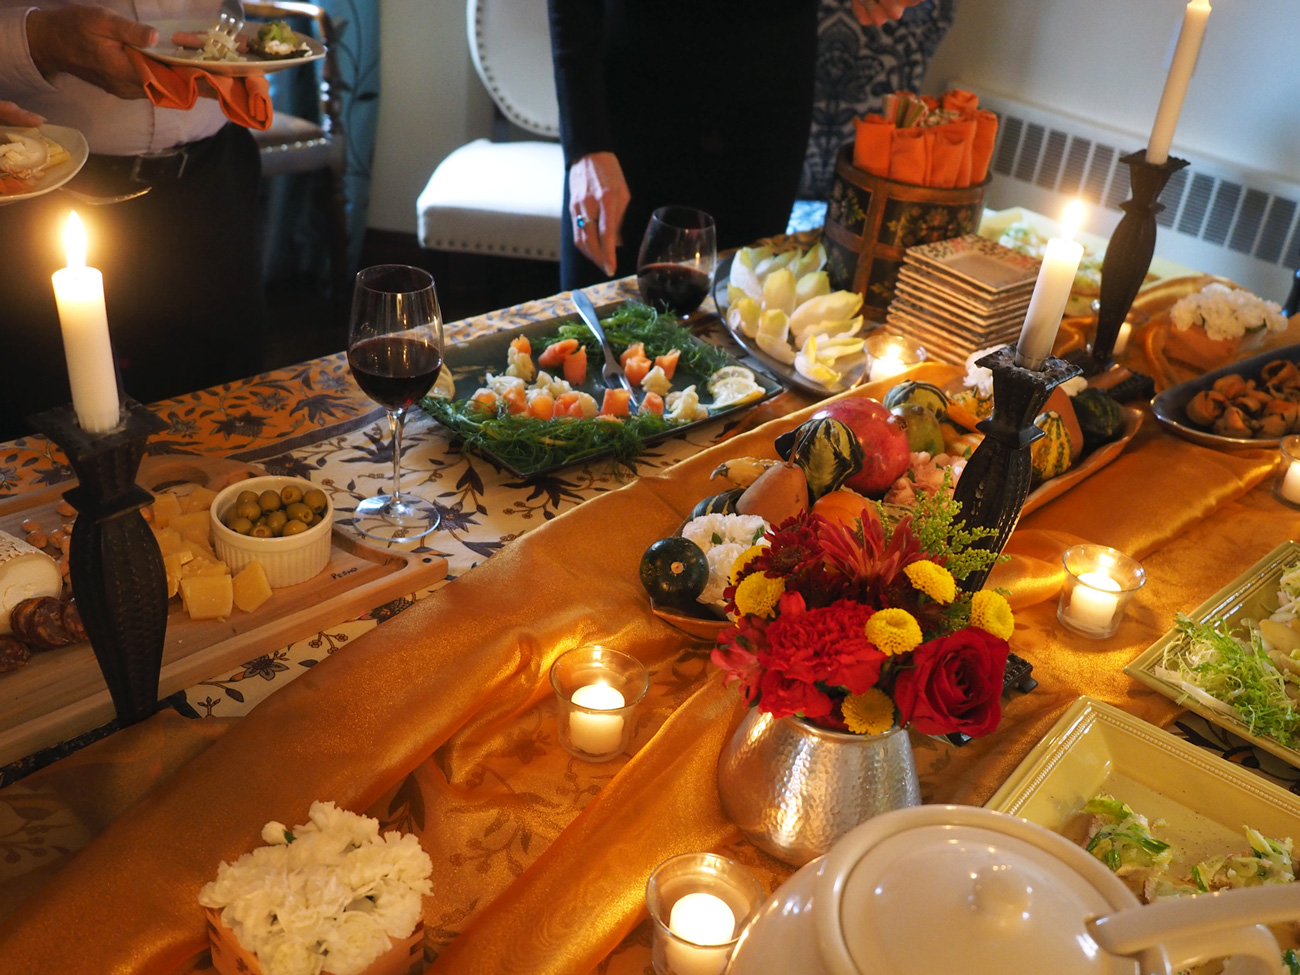
Which is why last year we opted for a different kind of celebrating.  Because I worked, we didn't host Thanksgiving dinner as we have done for a decade.  Instead, we decided to do the next best thing; a Post Thanksgiving cocktail/tapas party.   Which meant we had a wider range of food options to play with; ditching some of the usual carb heavy holiday food.  Food aside, I still needed to create an inviting tablescape.  The theme was buffet style eats with a variety of options for the meat lovers, fish lovers, vegetarians.  I really wanted to have a wide selection that worked well together.  And I wanted to present all these plates on a table that would pay homage to the Fall colors outside our windows.  

linens.cu.jpg

It started with a tablecloth I purchased in Italy the previous year and grew from there.  As I have mentioned in the past, I collect tablecloths, linens and material pieces, then mix and match them with others. I am a big fan of swags of sheer material or muslin to add texture and volume to a table.  In this episode of how to dress a table, I chose burnt oranges and yellow, as a perfection complement to nature.

So let's say your tablecloth is ever so slightly too short for your table, as was mine.  Some may see this as a problem. I prefer to use the word challenge.  And this challenge was easily remedied by embracing the layered look.  I used the yellow sheer material as the base, placed the tablecloth atop and then draped the orange sheer down the middle.  This approach made it look like an intentional layer when it fact it was resolving a length dilemma. Solution provided. Challenge solved.

Warm yellow chiffon sheer for the base

Warm yellow chiffon sheer for the base

Tablecloth stretching full length of the table with an orange organza swath.

Tablecloth stretching full length of the table with an orange organza swath.

Then come napkins and plates. Since this wasn't going to be a sit down dinner, I chose a variety of small plates and bowls that suited the menu.  Flatware was held in a florist vase and a vintage wooden bucket housed rolled up coordinating napkins.  Guests can pick and go.

plates.jpg

I would like to pause to reiterate a purchasing and collecting style of mine. Very rarely do I buy ensemble sets or like items. My style is to pick up pieces that I love along my travels. All the items used in this tablescape were purchased years apart, at a variety of different shops, and in some cases different countries. The key is finding color schemes and palates that you like and that mix and match.  With this method, anything goes.   

napkins2.jpg

For the centerpiece, two goals were set. Create a piece with a nod to Thanksgiving, and one that wouldn't take up too much room.  The fortunate fact about hosting after a holiday is that prices on certain items go down.  For instance, I purchased all those colorful, interesting gourds for $3. Yes, you read that correctly; $3 for all of them.  I then bought some simple mums, my favorite 'go to' inexpensive flower.  I cut them down to the buds, and placed them in shallow sake bowls. Everything in our home can serve multiple purposes.

flowers.jpg

I nestled a few of the flower bowls within the main centerpiece, adding fresh pears to fill it out. The rest were placed around the table.  The gorgeous, large wooden leaf tray is an heirloom of sorts.  My parents purchased it in Mexico while on their honeymoon, many a moon ago, and gave it to me.  I ADORE that bowl tray. A true statement piece bought at the bud of their love.  

centerpiece.jpg

Add some candles, the food platters and the table is ready for guests. 

The menu was all about small bites that guests could sample and go back for more.  All prepped a day a head of time.  

The Menu
Meaty Ragu with crusty bread & fried spaghetti wedges
Charcuterie & Cheese Platter
Escarole Rolls
Balsamic Bathed Carrots Wrapped in Zucchini
Warm Octopus & Potato over frissee salad
Salmon Bites with Yogurt Relish
Asparagus with Goat and Shallot  Sherry viniagrette
Smoked Salmon with Picked Fennel

Maybe this year you'll give up hosting the actual holiday and burst out with foods you love served on a burnt orange tablescape.

food.table3.jpg
food.table2.jpg
food.table.jpg
zucchini.jpg

Whatever type of party you decide to throw, make a plan that suits the time you have.  The idea is a stress free holiday season.  

Aly.foodtable.jpg
Therese.dad.jpg
 
DP-stirredwlove-ID1.jpg

Mums... the Word

I love working with flowers and listening to each stem tell me how it wants to be displayed. Living in Westchester NY, I go into Grand Central Station when I travel into the NYC.  There are tons of great shops in Grand Central, but one of my favorites is Dahlia Florist. They have a wonderful selection of flowers that at reasonable prices and that last long.  And as with shopping for food, I don't usually go there wanting to buy a particular flower. Instead, I see which ones look the best and have a common theme.  I try to go in the morning because Simone is there and she knows what is the freshest or will tell me if I can or can't combine particular flowers together in one vase. 

I can tell you that I am more of a purist when it comes to floral arrangement.  I like to keep the colors simple, sometimes even all one color but using different flowers.  I find this style can create a powerful impact.  I have also found that this monochromatic or zen approach can elevate the elegance factor even for the most common, inexpensive flowers, like carnations or mums.

My purchase this past week waiting to arranged

My purchase this past week waiting to arranged

Hence the title of this post, Mums the Word. But in this case, I am not keeping quiet about the beauty of Mums but instead declaring that indeed they are The Word.  When using several variations of Mums of the same color and displaying them simply and abundantly they can create drama.  I also picked up some Alstroemeria because I thought their purple hue and subtle green tones would play well off the white Mums.

When I chose these flowers I knew that I wanted to make one big arrangement, as opposed to many small ones, which I have done in the past for party tables.  This one was intended to bring spring cheer to our dining room, so one statement piece was in order.  Picking out a large glass vase that had a wide opening meant that I would probably need a flower frog at the bottom. With such a wide mouth it's a bit more difficult to arrange without having some stability. The frog holds the first batch of stems exactly where I want them to be so they establish the center.  

Wide mouthed vase

Wide mouthed vase

Flower frog helps to hold the stems in place

Flower frog helps to hold the stems in place

I started by cutting the stems to the length I wanted.For this arrangement I knew that I wanted to create a ball of white in the middle.  To do that effectively, the stems need to be cut at relatively the same length and slightly higher than the lip of the vase. The challenge sometimes with Mums is that they have flower stems that shoot off at different levels of the main stem. Often times you have to be creative with the cuts to get the height you want trimming those bottom stems and leaving the main bunch as one stem.

I started building the center using all of the same kind of Mum.  Once I had a good amount, I began placing the next type of mum all around the perimeter and continued the same method with the last type filling in all the spaces.

Using the frog to establish the center from which the ball can build

Using the frog to establish the center from which the ball can build

The final layer was placing the Alstroemeria on a severe angle at the very edge of the vase.  The angle allowed them to sit out as opposed to straight up which helped shape a wide circle around the burst of white mums.

 Once I had a complete ball, I kept filling in any empty spaces.  I really love the strong statement that the Alstroemeria make as they corral the mums in a purple lasso.

The finished main arrangement, a ball of white cheer

The finished main arrangement, a ball of white cheer

Since there were leftover mums, and plenty of vases, I composed small white bunches that would accompany the main arrangement.

Heres' an overhead angle of the finished centerpiece with the smaller vases flanking it. It delivered on the promise of bringing spring cheer to our dining room.  Cheerio!

Sometimes a few buds break off.  I don't like throwing those away.  Each flower has it's purpose and beauty.  So I always try to find a way to show it off.  Here's a zen way of letting the buds shine.  I used a wooden sake cup, filled it with small pebbles and water, and began placing the buds to float together.

I hope this demonstrated just how beautiful an inexpensive flower can blossom into a magnificent centerpiece, or even a little bud garden. Spread the Mum word!


Also, I am repeating this little message about posting a comment since there might be some questions on how to do so.   Please note that you do NOT have to subscribe to Squarespace. After you write a comment, a black window pops up with several icons.  If you click on the one to left that resembles an outline of a person that will allow you to submit the comment without a sign up. You will only need to put your name, as leaving your email is optional. I would love to hear your comments and feedback, so please comment away!